Adding an Export Step
Follow the instructions below to add a step to a data layer that exports the data in memory to a file-based linked data set (FLDS) on the file store.
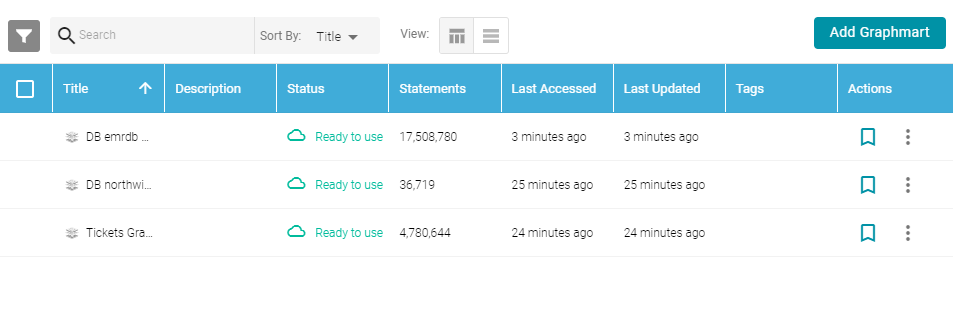
- In the Anzo application, expand the Blend menu and click Graphmarts. Anzo displays a list of the existing graphmarts. For example:
- On the Graphmarts screen, click the name of the graphmart that you want to change.
- Click the Data Layers tab. Anzo displays the existing data layers.
- Click the menu icon (
 ) on the layer for which you want to create a step, and then select Add Step/View. Anzo opens the Add step dialog box.
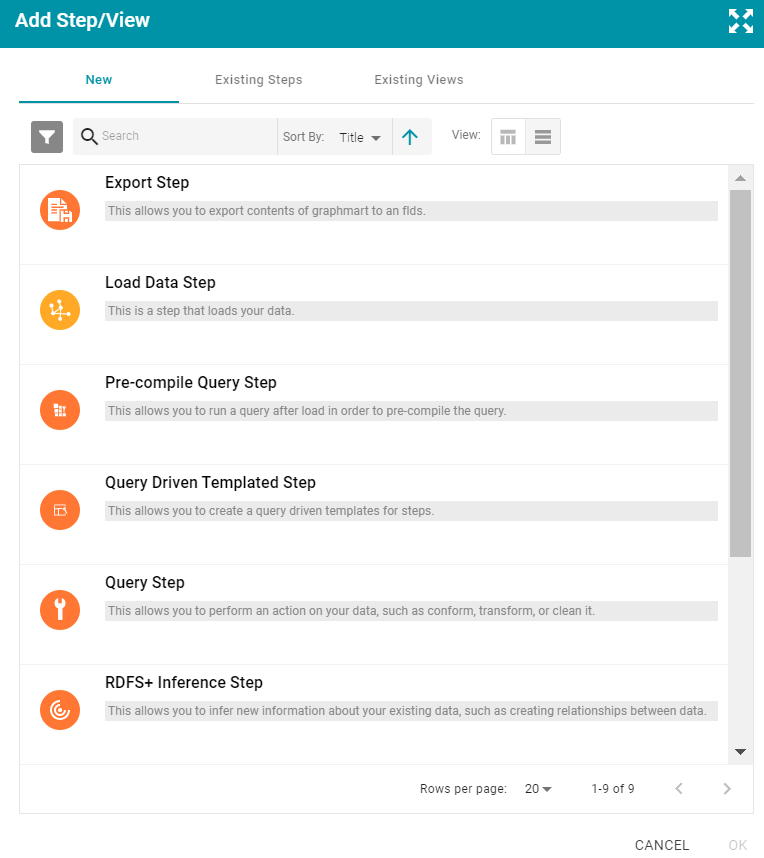
- Follow one of the options below, depending on whether you want to create a step from scratch or clone an existing export step for reuse:
- To create a new step, select Export Step and then click OK. Anzo opens the Create Export step screen. Proceed to the next step.
- If you want to clone an existing step and add it to this layer, click the Existing Steps tab and follow these steps:
- Select the export step that you want to clone and click OK. Anzo displays the Clone dialog box, which asks if you want to copy the permissions from the existing step.
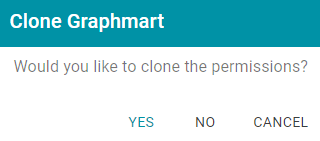
- On the Clone dialog box, click Yes to copy the permission configuration from the existing step or click No to copy the step without the permission configuration.
Anzo clones the step, adds the copy to the layer, and returns to the Data Layers screen.
- On the Data Layers screen, click the menu icon () on the cloned step and select Edit. Anzo opens the Edit export step screen. Proceed to the next step.
- Select the export step that you want to clone and click OK. Anzo displays the Clone dialog box, which asks if you want to copy the permissions from the existing step.
- To create a new step, select Export Step and then click OK. Anzo opens the Create Export step screen. Proceed to the next step.
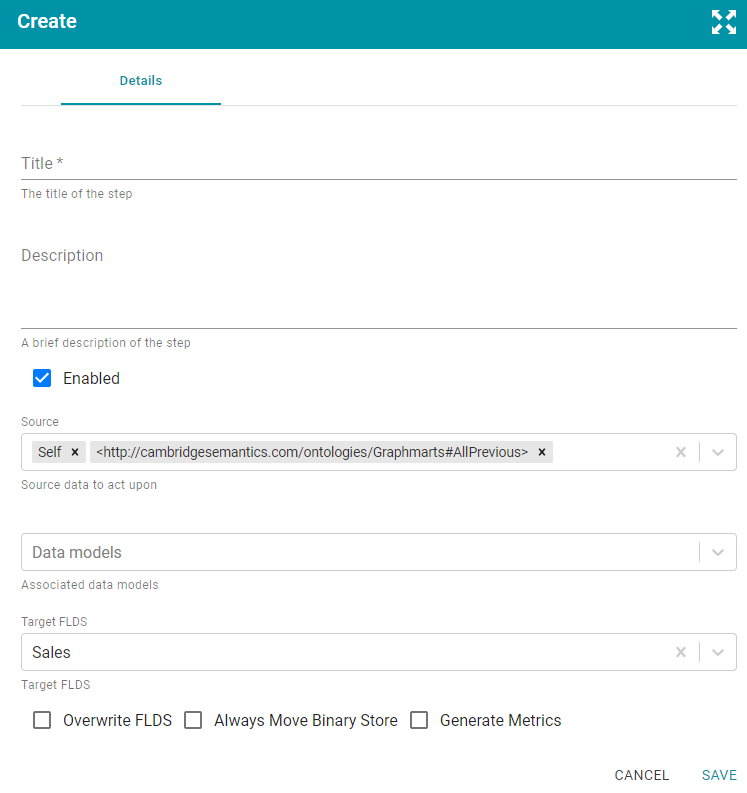
- Under Details, type a name for the step in the Title field and add an optional description in the Description field.
- By default the Enabled option is selected, indicating that the step is enabled and will run when the layer is loaded. If you want to disable the step so that it is not processed, clear the Enabled check box.
- If necessary, click the Source drop-down list and configure the source data for this step. Steps can build upon the data generated by steps in other layers or can be self-contained, applying changes that relate only to the data defined in the layer that contains this step. You can select any number of the following options:
- Self: This option is selected by default and means that Anzo exports only the data that is generated in the layer to which this step belongs.
- All Previous Layers Within Graphmart: Choosing this option means that Anzo exports data that is generated by all of the layers in the graphmart that precede this layer.
- Previous Layer Within Graphmart: Choosing this option means that Anzo exports only the data that is generated by the one layer that precedes this layer.
- Layer Name: The Source drop-down list also includes options for specific layer names. You can choose a specific layer to export only the data that is generated by that layer.
You can remove any of the source options by clicking the X to the left of the option name.
- Click the Data Models drop-down list and select the model or models to export with the data.
- If the graphmart contains one FLDS, the Target FLDS value defaults to that FLDS. If the graphmart contains multiple FLDSes, click the Target FLDS field and select the target FLDS for this export step.
- At the bottom of the screen, enable or disable any of the following options as appropriate:
- Overwrite FLDS: Controls whether the existing FLDS is replaced with the exported files or whether the exported files are added to the existing FLDS.
- If you want Anzo to replace the current FLDS, select the Overwrite FLDS checkbox. When Overwrite FLDS is enabled, Anzo archives the existing files in a new timestamped directory under the
archivesdirectory at the same level as the FLDS. The FLDS will contain only the exported data. - If you want Anzo to add the exported files to the existing FLDS, leave the Overwrite FLDS checkbox unchecked. When Overwrite FLDS is disabled, Anzo adds the exported files to a new timestamped directory under the
rdf.ttldirectory in the FLDS. The FLDS will contain the original files as well as the new exported files.
- If you want Anzo to replace the current FLDS, select the Overwrite FLDS checkbox. When Overwrite FLDS is enabled, Anzo archives the existing files in a new timestamped directory under the
- Always Move Binary Store: This option usually applies only to exports of unstructured data and controls whether the binary store is moved or copied during the export. Since the binary store can be large and have a nested structure, copying the data can take a very long time. Since moving the binary store is almost instantaneous, however, enabling Always Move Binary Store can reduce the time it takes to complete the export.
- If you want Anzo to copy the binary store to the location specified by the Overwrite FLDS setting, leave Always Move Binary Store disabled (unchecked).
- If you want Anzo to move the binary store to the location specified by the Overwrite FLDS setting, select the Always Move Binary Store checkbox to enable it.
- Generate Metrics: Controls whether graph data metrics are calculated before the data is exported. Since the data must be loaded in AnzoGraph to compute the metrics, you have the option to generate them during the export. If you load the exported files in the future, the graph data metrics will become available in the Dataset catalog. For more information, see Generating a Graph Data Profile.
- Overwrite FLDS: Controls whether the existing FLDS is replaced with the exported files or whether the exported files are added to the existing FLDS.
- Click Save to add the step to the data layer. Anzo adds the step as the last step in the layer. If you want to change the order of the steps, click the black bar on the left side of a step and drag it up or down.