Connecting to a Directory Server
This section provides instructions for connecting to a directory server and mapping the user and group configuration to Anzo so that Anzo can leverage the users and groups from the server.
Connect to the Directory Server
Follow the steps below to create a connection between Anzo and your directory server.
- In the Administration application, expand the User Management menu and click Directory. Anzo displays the Directory screen. For example:
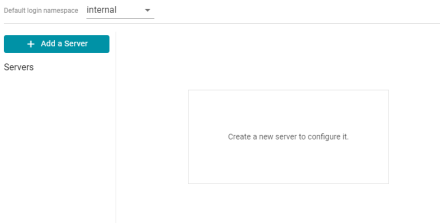
- On the Directory screen, click the Add a Server button. Anzo displays the Create New Server Configuration screen.

- Enter the connection details for the server:
- Host: The host name or IP address for the directory server.
- Port: The port to use to connect to the directory server.
- SSL Connection: Indicates whether the directory server uses an SSL connection. Select the SSL Connection checkbox to enable the SSL connection. If you use SSL, make sure that you load the directory server's certificate to the Anzo trust store. See Adding a Certificate to the Anzo Trust Store for instructions.
- Anonymous Bind: This option indicates whether you want Anzo to connect to the directory server anonymously. To avoid Anzo login problems when enabling this option, make sure the directory server allows anonymous binding and searches when bound anonymously. Select the Anonymous Bind checkbox to enable anonymous binding.
- User DN: The full distinguished name of the account that Anzo will bind against to perform searches on the directory server.
- Password and Confirm Password: The password for the User DN.
- Normalize LDAP DNs: To ensure that duplicate user accounts are not created in Anzo if an LDAP distinguished name has both a lowercase and uppercase version, you can configure the system to normalize distinguished name strings so that values that differ only in capitalization are treated as the same value. If you do not want distinguished names to be normalized, leave the field blank or select None. To normalize distinguished names to lowercase, select Lowercase, or select Uppercase if you want names to be normalized to uppercase.
- Anzo attempts to connect to the server automatically. If the connection fails, make sure that you entered the correct connection details. You can also click Test Connection to check if Anzo can connect to the server.
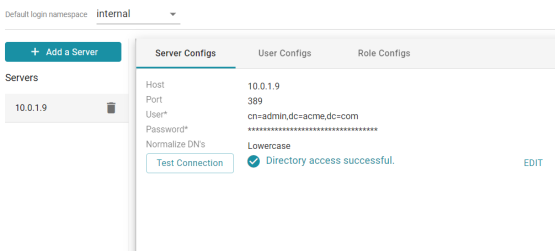
- Click Save to save the server configuration and return to the Directory screen. The new server configuration is selected on the screen. For example:
Once the connection to the server is established, create a user configuration for mapping directory users to Anzo. See Map Users to Anzo below for instructions.
Map Users to Anzo
Follow the steps below to create a user configuration by supplying the mapping the attributes to use to sync users with Anzo.
- On the Directory screen, click the User Configs tab. Then click the Create New User Config button. Anzo displays the Create New Config dialog box.
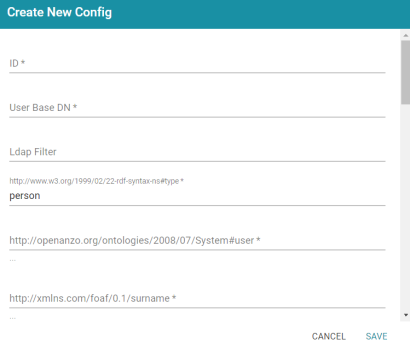
- Complete the following required fields and specify the optional values as desired. Each time you map an attribute, Anzo displays some samples of the values it retrieves for that attribute. If the specified attribute does not match an attribute in the system, Anzo displays an "LDAP Attribute unavailable" message.
- ID: Required setting that defines the unique name for this user configuration. Anzo uses this value as a namespace for usernames in case you connect to multiple directories with conflicting names.
- User Base DN: Required setting that specifies the LDAP distinguished name.
- LDAP Filter: The optional LDAP filter to apply when searching for users (usually left blank).
- http://www.w3.org/1999/02/22-rdf-syntax-ns#type: Required setting that specifies the LDAP class of the type of accounts that should be logged on. Typically person.
- http://openanzo.org/ontologies/2008/07/System#user: Required setting that specifies the LDAP attribute that contains user login information. Typically uid.
- http://xmlns.com/foaf/0.1/surname: Required setting that specifies the LDAP attribute that contains users' surnames. Typically sn.
- http://xmlns.com/foaf/0.1/name: Required setting that specifies the LDAP attribute that contains users' full names. Typically cn.
- http://xmlns.com/foaf/0.1/givenname: Required setting that specifies the LDAP attribute that contains users' first names. Typically givenName.
- http://xmlns.com/foaf/0.1/title: Optional value that specifies the LDAP attribute that contains users' job titles. Typically title.
- http://www.w3.org/2003/06/sw-vocab-status/ns#term-status: Optional value that specifies the status at the level of terms.
- http://xmlns.com/wot/0.1/src_assurance: Optional value that specifies the source for Assured Replication.
- http://xmlns.com/foaf/0.1/phone: Optional value that specifies the LDAP attribute that contains user phone numbers. Typically telephoneNumber.
- http://xmlns.com/foaf/0.1/mbox: Optional value that specifies the LDAP attribute that contains users' email addresses. Typically mail.
- http://openanzo.org/ontologies/2008/07/Anzo#location: Optional value that specifies the LDAP attribute that contains user location information.
- http://openanzo.org/ontologies/2008/07/Anzo#isInternalUser: Optional boolean value that indicates whether users are Anzo internally managed users.
- http://xmlns.com/foaf/0.1/img: Optional value that specifies the LDAP attribute that contains images for users.
- http://purl.org/dc/elements/1.1/description: Optional value that specifies the LDAP attribute that contains user descriptions. Typically description.
- http://openanzo.org/ontologies/2008/07/Anzo#defaultGroup: Optional value that specifies the LDAP attribute that contains the value of users' Anzo Default Group assignment.
- http://openanzo.org/ontologies/2008/07/Anzo#companyDepartment: Optional value that specifies the LDAP attribute that contains user department information. Typically department.
- http://xmlns.com/wot/0.1/assurance: Optional boolean value that indicates whether Assured Replication is enabled.
- When you have finished mapping attributes, click Save to save the user configuration.
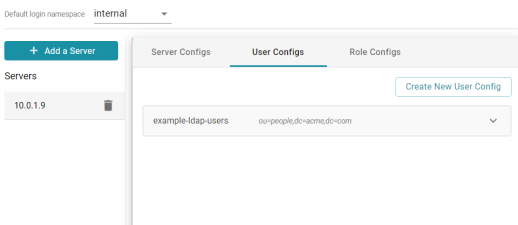
The new user configuration is added to the system and Anzo returns to the Directory screen, which shows the newly created configuration. For example:
Once the user configuration is complete, create a role configuration for mapping directory groups to Anzo. See Map Groups to Anzo below for instructions.
Map Groups to Anzo
Follow the steps below to create a role configuration by supplying the mapping the attributes to use to sync groups with Anzo.
- On the Directory screen, click the Role Configs tab. Then click the Create New Role Config button. Anzo displays the Create New Config dialog box.

- Complete the following required fields and specify the optional values as desired. Each time you map an attribute, Anzo displays some samples of the values it retrieves for that attribute. If the specified attribute does not match an attribute in the system, Anzo displays an "LDAP Attribute unavailable" message.
- ID: Required setting that defines the unique name for this role configuration.
- Base DN: Required setting that specifies the LDAP distinguished name that contains all of the system roles.
- LDAP Filter: The optional LDAP filter to apply when searching for roles (usually left blank).
- http://www.w3.org/1999/02/22-rdf-syntax-ns#type: Required setting that specifies the group object class of the type of roles. Typically groupOfNames.
- http://xmlns.com/foaf/0.1/name: Required setting that specifies the LDAP attribute that contains the names of the roles.
- http://xmlns.com/foaf/0.1/member: Required setting that specifies the LDAP attribute that contains common member attributes. Typically member or uniqueMember.
- http://openanzo.org/ontologies/2008/07/Anzo#usedBy: Optional value that specifies how the role is used by Anzo.
- http://www.w3.org/2003/06/sw-vocab-status/ns#term-status: Optional value that specifies the status at the level of terms.
- http://xmlns.com/wot/0.1/src_assurance: Optional value that specifies the source for Assured Replication.
- http://openanzo.org/ontologies/2008/07/Anzo#permission: Optional value that specifies the LDAP attribute that contains the Anzo permissions to assign to the roles.
- http://purl.org/dc/elements/1.1/description: Optional value that specifies the LDAP attribute that contains role descriptions.
- http://purl.org/dc/elements/1.1/date: Optional value that specifies the LDAP attribute that contains role dates.
- http://xmlns.com/wot/0.1/assurance: Optional boolean value that indicates whether Assured Replication is enabled.
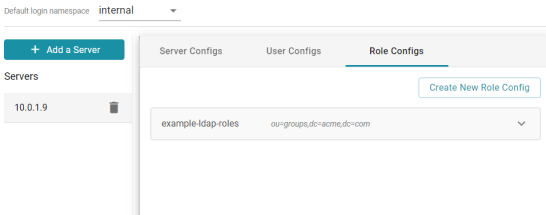
- Click Save to save the role configuration. The new role configuration is added to the system and Anzo returns to the Directory screen, which shows the newly created configuration. For example:
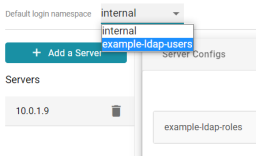
- The last step in configuring the server is to designate the default login namespace to use if users do not fully qualify their username with the @suffix when they log in to Anzo. To set the namespace, click the Default login namespace drop-down list at the top of the screen and select the namespace for the directory server. It will be displayed as the ID that was specified when you set up the user configuration. The "Internal" namespace that is also listed is the internal Anzo LDAP server for local users. For example:
Once you have connected the directory server to Anzo and created user and role configurations, the next step is to add the directory users and groups to Anzo. See Adding Directory Users and Groups to Anzo for instructions.
You can also set up single-sign on access to Anzo. See Connecting to an SSO Provider for instructions.