Accessing an Endpoint from an Application
Since Anzo's Data on Demand service conforms to the OData standard, any tool that supports the OData V4 REST API can access a Data on Demand endpoint to leverage data in Anzo. In addition, applications that support ODBC or JDBC APIs can use the Anzo CData ODBC or JDBC drivers to interact with Data on Demand endpoints. This capability enables users to leverage the benefits of Anzo's semantic layer, data model, and data blending capabilities in their favorite analytics tools.
This topic provides information about accessing Data on Demand endpoints from third-party applications.
- JDBC Driver Considerations
- Authentication and Data Access
- Accessing Data via the OData API
- Downloading the Anzo ODBC and JDBC Drivers
JDBC Driver Considerations
This section describes important items to consider when using JDBC clients for accessing Data on Demand endpoints:
Join Performance
To join results from multiple classes, Cambridge Semantics strongly recommends using OData or SPARQL. Hi-Res Analytics and SPARQL are designed to quickly return large results from multiple classes and should be strongly considered for these use cases. Joins on large data sets are also well-supported with OData when best practices around paging are applied.
You can also join tables upstream in AnzoGraph by creating data layers. For example, you can create a view that joins the data using a CONSTRUCT query. The view becomes available as an OData table. For information about view steps, see Constructing a View of the Data (View Step).
In addition, Custom Data on Demand endpoints (sometimes called Table endpoints) enable you to join classes, add filters, and apply functions to properties during endpoint creation. The tables that you create are automatically translated to SPARQL queries that create views in AnzoGraph, allowing you to perform complex analytics on the graph yet generate results in the tabular format that BI tools expect.
Because the JDBC driver generates multiple OData queries and joins the results in memory, SQL queries that include JOINs on large data sets may take a very long time to complete. When using the JDBC driver, Cambridge Semantics recommends that you query one class at a time and then use the BI tool to do analytics on the returned data. For more information, see JDBC Performance Details below.
Querying Multi-Valued Properties
Some applications do not directly support Anzo’s RDF graph data structures. For example, sometimes the JDBC driver presents multi-valued properties as arrays, which are not supported by some BI tools. When creating a Data on Demand endpoint for a graphmart that includes multi-valued properties, consider denormalizing the results to expand the properties into new rows so that they can be viewed in BI tools. For more information, see Creating Data on Demand Endpoints.
Working with Long Column Names
By default, the JDBC driver creates column names based on the property labels in the data model. The property labels can be too long for some clients. For example, Informatica is limited to 128 characters. When ingesting data from a tabular source, the label is a concatenation of the table and column name. Users may need to shorten the property labels to work with JDBC clients. If the label is missing, Anzo uses the localName of the IRI. For information about configuring the column names to be used for a Data on Demand endpoint, see Creating Data on Demand Endpoints.
Authentication and Data Access
Connections to Data on Demand endpoints must be authenticated. Users can submit their Anzo username and password when accessing data. If your applications use single sign-on (SSO) authentication, you can also use SSO with Anzo. When using SSO, the client authenticates the user against the SSO provider and then passes the credentials to Anzo. All data is secured according to the user's SSO profile. For information about the supported SSO providers and instructions on configuring SSO access, see Connecting to an SSO Provider.
Ultimately the data that is available to users from Data on Demand endpoints is subject to the access control configuration of the graphmart in Anzo.
Accessing Data via the OData API
This section provides guidance on accessing a Data on Demand endpoint from an application that supports the OData REST API. It includes an example that configures an OData connection in TIBCO Spotfire. The example steps can also be applied to OData connections in other similar business intelligence tools.
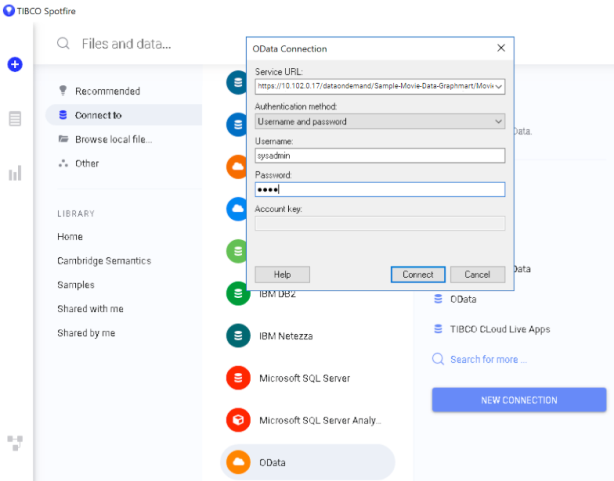
The first step is to connect to the OData endpoint using the Spotfire Data sources user interface. When setting up the OData connection, the Service URL is the OData/ODBC URL from the Data on Demand endpoint configuration details in Anzo. The OData connection uses the user’s Anzo credentials for authentication.
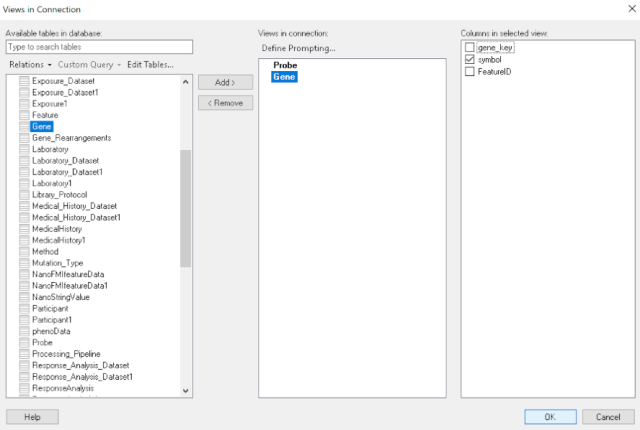
Once the connection is established, Sportfire prompts the user to select the classes and properties to work with. In this example, the FeatureID property from the Probe class and the symbol property from the Gene class are selected:
Once the properties are chosen, the data is loaded in Spotfire and can be used to inform existing analytics and data visualizations or create new ones.
Downloading the Anzo ODBC and JDBC Drivers
This section provides guidance on accessing Data on Demand endpoints from applications that support ODBC or JDBC APIs. Your Anzo deployment includes CData ODBC and JDBC drivers to use with applications. The first step is to retrieve the appropriate driver for your client. To download a driver, open a web browser and go to the following URL:
https://<Anzo_server>/installs/anzodataaccess
Where <Anzo_server> is the Anzo server DNS name or IP address. The Anzo Data Access Software Installation page provides links to download each driver. For example:
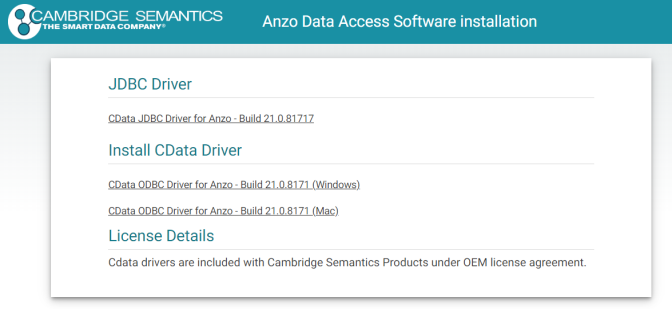
Download the appropriate driver to the client server:
- The CData JDBC Driver for Anzo is used to connect to Anzo from most Java applications and database management tools.
- The CData ODBC Driver for Anzo for Windows or Mac is for use with applications and database management tools that support open database connectivity, such as Microsoft Excel or Tableau.
Configuring the Driver and Connecting to the Endpoint
This section provides guidance configuring an ODBC or JDBC driver by showing examples of configuring DbVisualizer and Tableau to access a Data on Demand endpoint using Anzo's JDBC driver and configuring Power BI to access an endpoint using the ODBC driver.
Example JDBC Setup with DbVisualizer
- In DbVisualizer, go to Tools → Driver Manager.
- In the Driver Manager, click the green plus icon to create a new driver.
- Specify a name for the driver. For example, Anzo JDBC Driver.
- In the URL Format field, specify the format jdbc:anzo.
- In the Driver File Paths or Driver jar Files section of the screen, click the folder icon and then browse to and select the directory where you saved the CData JDBC Driver for Anzo cdata.jdbc.anzo.jar file that you downloaded to the server. DbVisualizer reads the jar and sets the Driver Class to cdata.jdbc.anzo.AnzoDriver. For example:

- To connect to the endpoint in DbVisualizer, go to Database → Create Database Connection. Click No Wizard when prompted.
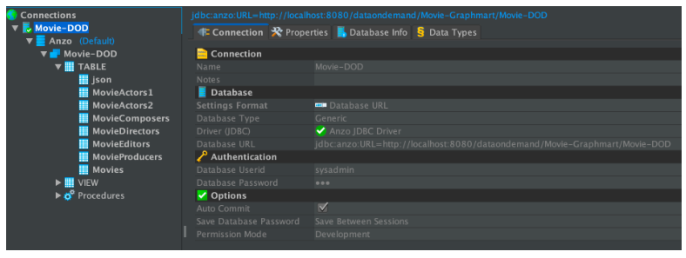
- Specify a name for the connection in the Name field.
- In the Driver (JDBC) field, select the Anzo JDBC driver connection.
- In the Database URL field, specify the JDBC URL from the Anzo Data on Demand endpoint configuration. For example:
jdbc:anzo:URL=https://10.10.0.11/dataondemand/Northwind/Northwind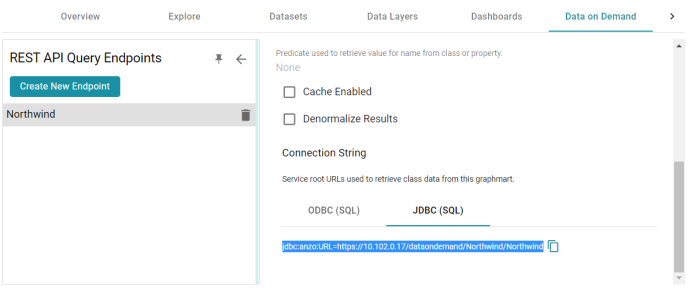
- Under Authentication, enter your Anzo user ID and password. You should now be able to connect to the endpoint and view the available schemas. For example:
Example JDBC Setup with Tableau
- After downloading the CData JDBC Driver for Anzo cdata.jdbc.anzo.jar file, place the .jar in the appropriate directory depending on your operating system:
- Windows: C:\Program Files\Tableau\Drivers
- MacOS: ~/Library/Tableau/Drivers
- Linux: /var/opt/tableau/tableau_server/data/tabsvc/vizqlserver/Datasources/
- Restart Tableau and then go to Add a Connection → To a Server.
- Click Other Databases (JDBC).
- In the Database URL field, specify the JDBC URL from the Anzo Data on Demand endpoint configuration. For example:
jdbc:anzo:URL=https://10.10.0.11/dataondemand/Northwind/Northwind - Enter your Anzo username and password and click Sign In. You should now be able to connect to the endpoint and view the available schemas.
Example ODBC Setup with Microsoft Power BI
- After downloading the Windows CData ODBC Driver for Anzo executable file, run the executable to start the installation wizard. The wizard guides you through installing the driver.
- At the end of the installation, make sure the Configure ODBC Data Source checkbox is selected and click Finish. The wizard opens the driver's DNS Configuration screen. For example:
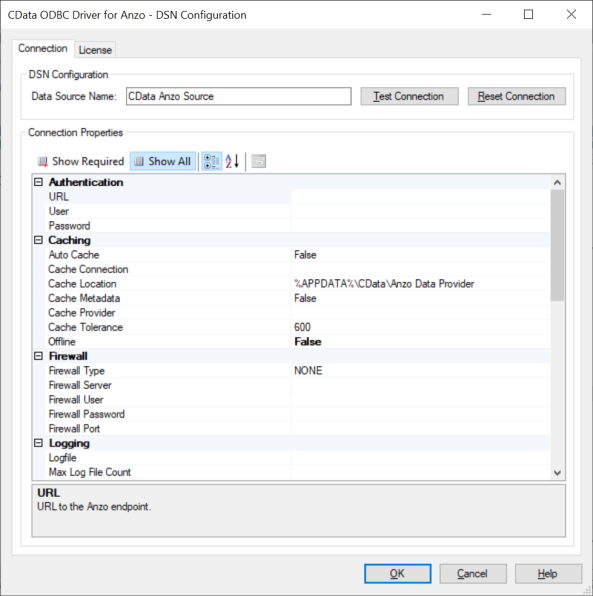
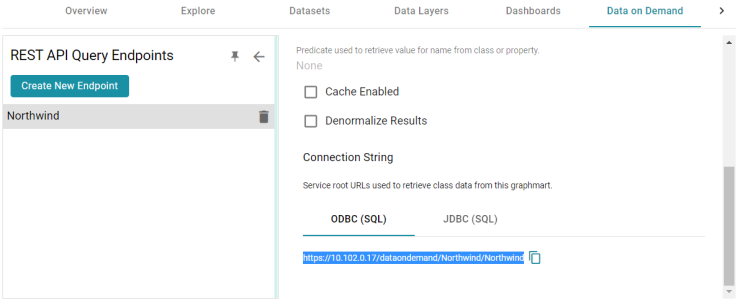
- Under Authentication in Connection Properties, specify the URL, User, and Password to use for connecting to the Data on Demand endpoint. The User and Password are the Anzo username and password to use for authentication, and URL is the OData/ODBC service root URL for the endpoint. You can retrieve the URL from the Data on Demand screen for the endpoint. For example:
- Click OK to save the configuration changes and close the dialog box.
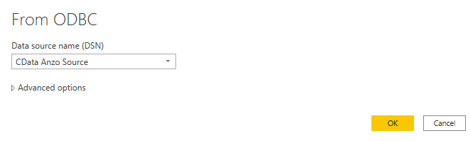
- Next, connect to the ODBC data source from Power BI. Open Power BI and click the Get Data button in the tool bar. In the Get Data dialog box, search for "ODBC." For example:
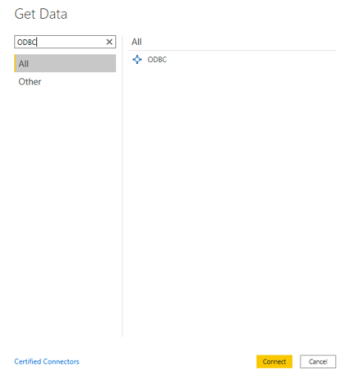
- The search opens the wizard for creating an ODBC connection to a specified data source. Select CData Anzo Source from the drop-down list. You do not need to configure the advanced options.
- Click OK to create the connection. Power BI opens the Navigator screen. For example:
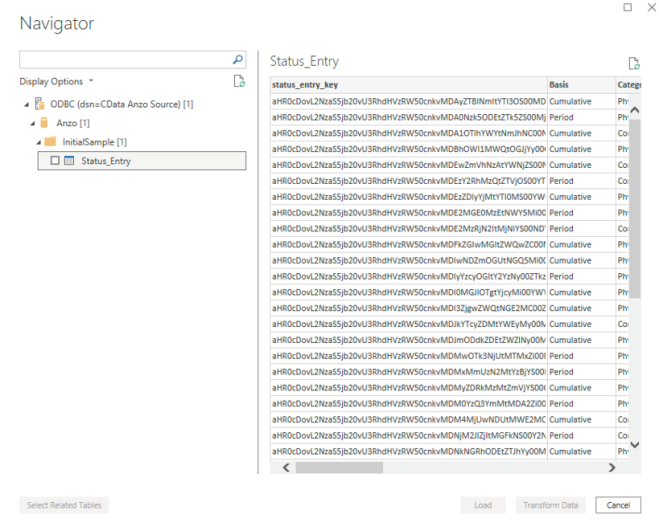
Under Display Options, the top level container in the view represents the ODBC driver, the Anzo item represents the database, and the InitialSample item represents the schema. Each table is represented as a table entry under the schema. In the example above there is one table. If you select a table, sample data from that table is displayed on the right side of the screen. To load table(s), select the checkbox for each table and click the Load button. You can also use the advanced features of Power BI to transform the data as you load it into the tool.
JDBC Driver Quick Reference
This section provides a quick reference for JDBC driver support.
- For the complete JDBC driver documentation, see CData JDBC Driver for Anzo.
- For the complete ODBC driver documentation, see CData ODBC Driver for Anzo.
SQL Compliance
The JDBC driver supports most of the standard operations for querying data. The exceptions are listed below.
- The driver does not currently support transactions.
- The driver does not support batching of SQL statements.
- The driver has support for inserting, updating, and deleting records. However, performing updates via the driver can have unexpected consequences.
For more information about SQL compliance, see the SQL Compliance section in the CData JDBC Driver documentation.
JDBC Performance Details
By default, the JDBC driver offloads to Anzo as much of the SELECT statement processing as possible and then processes the rest of the query locally in memory.
- For joins, the driver generates multiple OData queries and joins the results in memory. As a result, SQL queries that include JOINs can take up to several minutes to complete.
- For aggregates, the driver retrieves all rows necessary to process in memory.
- For predicates, the driver determines which clauses Anzo supports and sends them to Anzo to retrieve the smallest possible superset of rows that would satisfy the query. It then filters the rest of the rows client-side.
- The driver's SupportEnhancedSQL setting can be disabled to limit SQL execution to only what the Anzo API supports. For more information, see the Support Enhanced SQL section in the CData JDBC Driver documentation.
To determine which query capabilities the driver can offload to the Anzo API, you can query the sys_sqlinfo system table. The table contains information about the functionality that is supported by the connected source. For example:
SELECT * FROM sys_sqlinfo WHERE name='AGGREGATE_FUNCTIONS'
or name = 'COUNT' or name = 'SUPPORTED_OPERATORS' or name = 'GROUP_BY'
or name = 'OUTER_JOINS' or name = 'OJ_CAPABILITIES' or name = 'SUBQUERIES'
or name = 'STRING_FUNCTIONS' or name = 'NUMERIC_FUNCTIONS'
or name = 'TIMEDATE_FUNCTIONS';
For more information, see the sys_sqlinfo section in the CData JDBC Driver documentation.
Data Caching
Due to the client-side in-memory processing of aggregates and joins, the performance of queries against extremely large data sets may suffer. If this is a common use case, consider leveraging caching in the JDBC driver. If the driver maintains a local copy of the data, it reduces the number of API calls and can increase performance for long-running queries. For more information, see the Caching Data section in the CData JDBC Driver documentation.
Supported SELECT Statement Clauses
The following list shows the supported SELECT statement clauses. For more information, see the SELECT Statement section in the CData JDBC Driver documentation.
- SELECT
- INTO
- FROM
- JOIN
- WHERE
- GROUP BY
- HAVING
- UNION
- ORDER BY
- LIMIT
Supported Aggregate Functions
The following list shows the supported aggregate functions. For more information, see the Aggregate Functions section in the CData JDBC Driver documentation.
- COUNT
- COUNT_DISTINCT
- AVG
- MIN
- MAX
- SUM
Supported Joins
The following list shows the supported JOIN types. For more information, see the JOIN Queries section in the CData JDBC Driver documentation.
- Inner Join: Selects only the rows from both tables that match the join condition.
- Left Join: Selects all of the rows in the FROM table and only matching rows in the JOIN table.
SQL Function Reference
The JDBC driver provides implementations of the following common SQL functions. For more information, see the SQL Functions section in the CData JDBC Driver documentation.
The driver interprets all function input as either column names or strings. Therefore, all string literals must be escaped with single quotes. For example, SELECT DATENAME('yy',GETDATE())).
String Functions
- ASCII(character_expression)
- CHAR(integer_expression)
- CHARINDEX(expressionToFind ,expressionToSearch [,start_location ])
- CONCAT(string_value1, string_value2 [, string_valueN])
- CONTAINS(expressionToSearch, expressionToFind)
- ENDSWITH(character_expression, character_suffix)
- FORMAT(value, format)
- FROM_UNIXTIME(time, format, issecond)
- INDEXOF(expressionToSearch, expressionToFind [,start_location ])
- ISNULL(check_expression , replacement_value)
- JSON_AVG(json, jsonpath)
- JSON_COUNT(json, jsonpath)
- JSON_EXTRACT(json, jsonpath)
- JSON_MAX(json, jsonpath)
- JSON_MIN(json, jsonpath)
- JSON_SUM(json, jsonpath)
- LEFT(character_expression , integer_expression)
- LEN(string_expression)
- LOWER(character_expression)
- LTRIM(character_expression)
- NCHAR(integer_expression)
- PATINDEX(pattern, expression)
- QUOTENAME(character_string [, quote_character])
- REPLACE(string_expression, string_pattern, string_replacement)
- REPLICATE(string_expression ,integer_expression)
- REVERSE(string_expression)
- RIGHT(character_expression , integer_expression)
- RTRIM(character_expression)
- SOUNDEX(character_expression)
- SPACE(repeatcount)
- STARTSWITH(character_expression, character_prefix)
- STR(float_expression [ , integer_length [ , integer_decimal ] ] )
- STUFF(character_expression , integer_start , integer_length , replaceWith_expression)
- SUBSTRING(expression,integer_start,integer_length)
- TOSTRING(string_value1)
- TRIM(character_expression)
- UNICODE(ncharacter_expression)
- UPPER(character_expression)
- XML_EXTRACT(xml, xpath [, separator])
Date Functions
- CURRENT_DATE()
- CURRENT_TIMESTAMP()
- DATEADD(datepart , integer_number , date [, dateformat])
- DATEDIFF(datepart , startdate , enddate )
- DATEFROMPARTS(integer_year, integer_month, integer_day)
- DATENAME(datepart , date)
- DATEPART(datepart, date [,integer_datefirst])
- DATETIME2FROMPARTS(integer_year, integer_month, integer_day, integer_hour, integer_minute, integer_seconds, integer_fractions, integer_precision)
- DATETIMEFROMPARTS(integer_year, integer_month, integer_day, integer_hour, integer_minute, integer_seconds, integer_milliseconds)
- EOMONTH(start_date [, integer_month_to_add ])
- GETDATE()
- GETUTCDATE()
- ISDATE(date, [date_format])
- SMALLDATETIMEFROMPARTS(integer_year, integer_month, integer_day, integer_hour, integer_minute)
- SYSDATETIME()
- SYSUTCDATETIME()
- TIMEFROMPARTS(integer_hour, integer_minute, integer_seconds, integer_fractions, integer_precision)
- YEAR(date)
Math Functions
- ABS(numeric_expression)
- ACOS(float_expression)
- ASIN(float_expression)
- ATAN(float_expression)
- ATN2(float_expression1 , float_expression2)
- CEILING(numeric_expression)
- COS(float_expression)
- COT(float_expression)
- DEGREES(numeric_expression)
- EXP(float_expression)
- EXPR(expression)
- FLOOR(numeric_expression)
- LOG(float_expression [, base ])
- LOG10(float_expression)
- PI( )
- POWER(float_expression , y)
- RADIANS(float_expression)
- RAND([ integer_seed ])
- ROUND(numeric_expression , integer_length [ ,function ])
- SIGN(numeric_expression)
- SIN(float_expression)
- SQRT(float_expression)
- SQUARE(float_expression)
- TAN(float_expression)