Sharing Access to a Dashboard or Lens
This topic includes reference information about dashboard and lens permissions and provides instructions for configuring permissions.
- Dashboard Level Permissions Reference
- Lens Level Permissions Reference
- Configuring Dashboard or Lens Permissions
Dashboard Level Permissions Reference
Dashboard level permissions affect a user's ability to view, modify, delete, design, or configure dashboards and dashboard permissions. There are three predefined permission sets that can be assigned to an Anzo user or group. You also have the option to customize the set of permissions that are applied to a user or group.
The table below lists the predefined permission sets and describes the privileges that are granted for each permission that is part of the predefined set:
| Set | Permission | Allows a user to: |
|---|---|---|
| View | Read |
|
| Modify | In addition to the Read permission described above, the Modify set includes the Write and Delete permissions described below. | |
| Write |
|
|
| Delete |
|
|
| Admin | In addition to the Read, Write, and Delete permissions described above, the Admin set includes the Manage permission described below. | |
| Manage |
|
|
Default Dashboard Permissions
The table below lists the predefined permission sets that are applied by default when a new dashboard is created. Besides the sysadmin user, the dashboard creator is granted Admin privileges by default. The Everyone role is granted View privileges by default. No other users, groups, or roles have dashboard permissions assigned by default.
| Anzo User/Role | Applied Permission Set |
|---|---|
| Sysadmin User | Admin |
| Dashboard Creator | Admin |
| Everyone Role | View |
Lens Level Permissions Reference
Lens level permissions affect a user's ability to view, modify, delete, design, or configure lenses and lens permissions. There are three predefined lens permission sets that can be assigned to an Anzo user or group. You also have the option to customize the set of permissions that are applied. While dashboard level permissions can affect a user's ability to clone a lens, the appropriate lens level permissions are required to be able to perform functions such as deleting or redesigning a lens.
The table below lists the predefined permission sets and describes the privileges that are granted for each permission that is part of the predefined set:
| Set | Permission | Allows a user to: |
|---|---|---|
| View | Read |
|
| Modify | In addition to the Read permission described above, the Modify set includes the Write and Delete permissions described below. | |
| Write |
|
|
| Delete |
|
|
| Admin | In addition to the Read, Write, and Delete permissions described above, the Admin set includes the Manage permission described below. | |
| Manage |
|
|
Default Lens Permissions
The table below lists the predefined permission sets that are applied by default when a new lens is created. Besides the sysadmin user, the lens creator is granted Admin privileges by default. The Everyone role is granted View privileges by default. No other users, groups, or roles have lens permissions assigned by default.
| Anzo User/Role | Applied Permission Set |
|---|---|
| Sysadmin User | Admin |
| Lens Creator | Admin |
| Everyone Role | View |
Configuring Dashboard or Lens Permissions
This section provides instructions for modifying dashboard or lens properties to grant or restrict access to your dashboards and lenses.
Data can be restricted at a higher level than a dashboard. Though users might have access to view your dashboards and lenses, graphmart permissions determine whether they can view the data that the dashboard displays.
- Open the dashboard for which you want to modify access.
- Open the Properties dialog box for the either dashboard or for a specific lens:
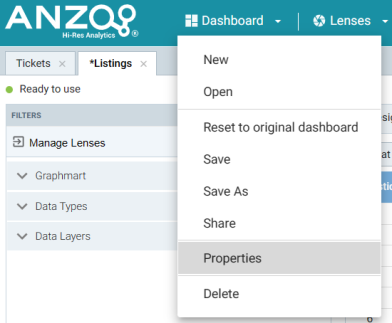
- To change access at the dashboard level, click Dashboard in the main toolbar and select Properties.Sharing a dashboard automatically shares the lenses in that dashboard.
- To change access for a lens in the dashboard, click the lens to display it and then click the Properties button in the object toolbar.

- To change access at the dashboard level, click Dashboard in the main toolbar and select Properties.
- In the Properties dialog box, click the Security tab. This tab lists the available groups and users who can view this dashboard or lens. The image below shows the Security tab at the dashboard level:
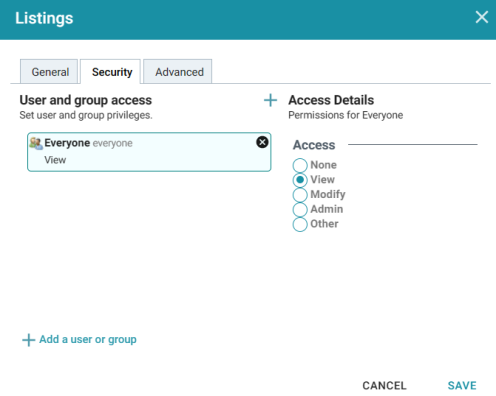
- Select a user or user group to manage, and then modify any of the following options:
- Remove a user or group: Click the delete icon (X) next to the user or group.
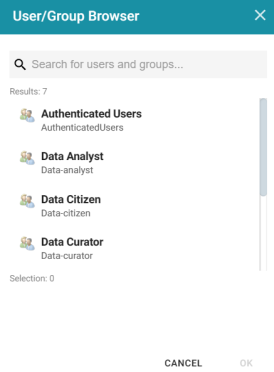
- Add a user or group: Click Add a user or group. On the User/Group Browser dialog box, select the users or groups that you want to add. Then click OK.
- Access Details: Select the access level for the selected user or group. Refer to Dashboard Level Permissions Reference or Lens Level Permissions Reference above for details about each of the access options.
- None: No permissions set for the selected dashboard or lens.
- View: Grants the View predefined permission set for the selected dashboard or lens.
- Modify: Grants the Modify predefined permission set for the selected dashboard or lens.
- Admin: Grants the Admin predefined permission set for the selected dashboard or lens.
- Other: Enables you to set custom access levels for the selected dashboard or lens. Select the checkboxes to enable any combination of the following permissions: Read, Write, Delete, or Manage (administrator permissions).
- Click Save to save the changes.
To get a URL to your dashboard that you can send to users, click Dashboard in the main toolbar and select Share. The Share Dashboard dialog box opens and displays a URL for the dashboard. You can copy the link and send it to users.