Creating a Template with a Templated Step
Templated Steps use user-defined key-value pairs. The keys are represented by parameters in the query. When this step is reused, users do not need to rewrite the query; they modify the values for the keys. Follow the steps below to create a Templated Step.
This type of template step uses key-value pairs that are user-defined. Creating the key-value pairs requires familiarity with the data and properties defined in the model. To create a query template that enables you to run a query and automatically generate the key-value pairs, see Creating a Template with a Query-Driven Templated Step.
- Go to the graphmart for which you want to add a step and then click the Data Layers tab.
- On the Data Layers tab, find the layer that you want to add the step to. Click the menu icon (
 ) for that layer and select Add Step/View. The Add Step/View dialog box is displayed with the New tab selected.
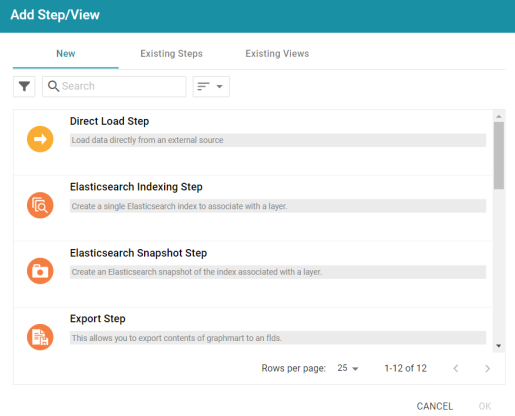
- To create a new Templated step, select Templated Step and then click OK. If you want to clone an existing step, click the Existing Steps tab, select the step that you want to clone, and then click OK. Anzo creates or clones the step and displays the Details tab:
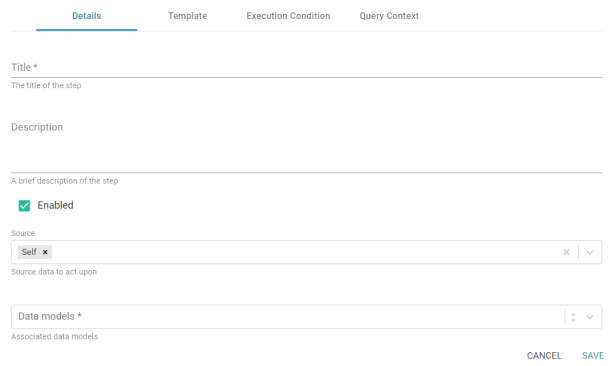
- On the Details tab, configure the following options as needed:
- Title: The required name of the step.
- Description: An optional short description of the step.
- Enabled: When creating a new step, the Enabled option is selected by default, indicating that the step is enabled and will run when the layer is loaded or refreshed. If you want to disable the step so that it is not processed, clear the Enabled checkbox.
- Source: The source data that this step should act upon. Steps can build upon the data generated by steps in other layers or can be self-contained, applying changes that relate only to the data defined in the layer that contains this step. You can select any number of the following options:
- Self: This option is selected by default and means that the step runs against only the data that is generated in the layer this step belongs to.
- All Previous Layers Within Graphmart: This option means that the step runs against the data that is generated by all of the successful layers that precede the layer this step is in. Any failed layers are ignored.
- Previous Layer Within Graphmart: This option means that the query runs against only the data that is generated by the one layer that precedes the layer this step is in.
- Layer Name: The Source drop-down list also includes options for specific layer names. You can choose a specific layer to act upon the data in that layer only.
- Data models: This required field specifies the model or models to associate with this step. The list displays all of the available models. By default, the field is set to Exclude System Data (
 ). If you want to choose a system model, click the toggle button on the right side of the field to change it to Include System Data (
 ). When system data is included, the drop-down list displays the system models in addition to the user-generated models.
 - Pre-Run Generate Statistics: This option controls whether to initiate AnzoGraph's internal statistics gathering queries before running the query to pre-compile. The statistics gathering helps ensure that the AnzoGraph query planner generates ideal query execution plans for queries that are run against the graphmart.
- When you have finished configuring the Details tab, click the Template tab. This tab defines the template query and the key-value pairs.
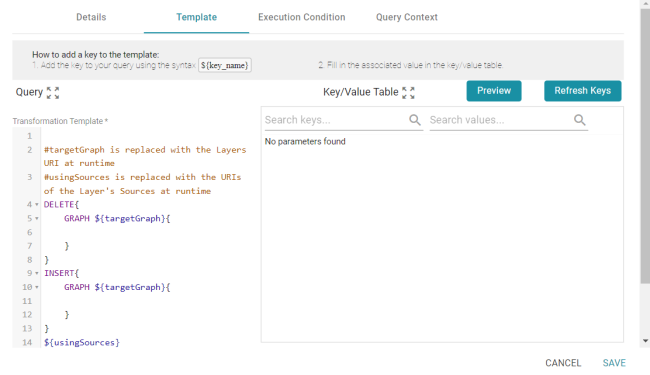
- On the left side of the screen create the query template. The default template includes the syntax for writing SPARQL INSERT and DELETE queries and includes source and target graph parameters that Anzo replaces at runtime. In the query, include the parameters in the format
${key_name}. Each parameter will become a key in the Key/Value Table will you click the Refresh Keys button. For example, the following INSERT query includes several parameters that represent properties and functions:INSERT { GRAPH ${targetGraph}{ ?lsubj ${linkProperty} ?rsubj } } ${usingSources} WHERE { ?lsubj ${sourceProperty} ?lobj . ?rsubj ${targetProperty} ?robj . FILTER (${lFunction}(?lobj) ${operator} ${rFunction}(?robj)) }If your query connects to a source that requires input of connection and authorization information, Cambridge Semantics recommends that you do not include the connection and authorization values directly in the query. Instead, replace those values with Context Variables from a Query Context. You can access Context Providers for each data source from the step's Query Context tab. For detailed information about query contexts and referencing variables in a query, see Using Query Contexts in Queries.
- Once the template query has been defined, populate the Key/Value Table with the keys from the query by clicking the Refresh Keys button. For example, using the example query above, the Key/Value table is populated with the following keys:
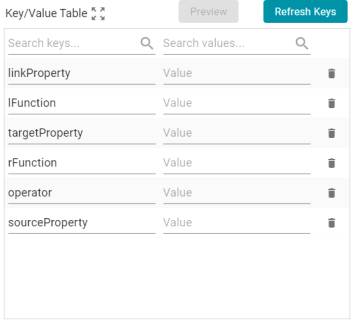
- In each row, specify the desired Value for the key. For example, in the image below, the property URI
http://cambridgesemantics.com/ont/autogen/c89d/Tickets#tickit_events_eventidis specified as the Value for thelinkPropertykey.
- Click Save to save the step configuration.
Once the Details tab is configured and the template and key-value pairs are defined, the step can be run. For information about running this step conditionally by setting up an execution condition, see Defining Execution Conditions.