Installing Anzo Unstructured
This topic provides instructions for deploying an Anzo Distributed Unstructured cluster.
- Complete the Pre-Installation Configuration
- Deploy the Leader Node
- Deploy the Worker Nodes
- Configure and Start the Anzo DU Services
- Configure the Connection to Anzo
Complete the Pre-Installation Configuration
Configure User Resource Limits
Before installing Anzo Unstructured, Cambridge Semantics recommends that you tune the user resource limits (ulimits) for your Linux distribution to increase the limits for the following resources. Tune ulimits on all AU host servers in the cluster:
- Increase the limit for the following resources to at least 65535:
- open files (nofile)
- max user processes (nproc)
- Increase the limit for the following resources to infinity:
- address space (as)
- CPU time (cpu)
- file locks (locks)
- file size (fsize)
- max memory size (memlock)
To view the current ulimits, run ulimit -a. To permanently change ulimits, modify the /etc/security/limits.conf file. For information, see How to set ulimit values in the RHEL support documentation.
Typically, as part of post-installation configuration, a systemd service is set up to start and stop the Leader and Worker processes. When systemd starts a process, however, it uses the limits that are defined in the systemd service rather than the limits in /etc/security/limits.conf. In addition to changing the ulimits in limits.conf, it is important to set the limits in the Leader and Worker services. The service file contents shown in Configure and Start the Anzo DU Services includes the recommended ulimit settings.
Use the Anzo Service User Account when Installing AU
Since the Anzo Unstructured cluster will access the shared file store, it is important to install and run the software with the same service account that runs Anzo. For more information, see Anzo Service Account Requirements.
Deploy the Leader Node
Follow the instructions below to deploy the Anzo Distributed Unstructured (DU) leader node.
- Make sure that the leader host server has access to the Anzo shared file system and meets the requirements in Anzo Unstructured Cluster Requirements and Recommendations.
- Copy the Anzo DU installation script to the leader server and then run the following command to make the script executable:
chmod +x <script_name>
- If necessary, run the following command to become the Anzo service user:
su <name>
Where <name> is the name of the service user. For example:
su anzo
- Run the following command to start the installation wizard:
./<script_name>
The script unpacks the JRE and then waits for input before starting the installation.
- Press Enter to start the installation. The software license agreement is presented.
- Review the software license agreement. Press Enter to scroll through the terms. At the end of the agreement, type 1 to accept the terms or type 2 to disagree and stop the installation.
When the agreement is accepted, the installer prompts you to specify the components to install:
Which components should be installed?
1: Leader [*1]
2: Worker [*2]
(To show the description of a component, please enter one of *1, *2)
Please enter a comma-separated list of the selected values or [Enter] for the default selection:
[1,2]
- At the components prompt, type 1 (Leader) and then press Enter.
The installer prompts you to specify the installation path:
Where should the Anzo Unstructured be installed?
[/opt/AnzoDU]
- Specify the path and directory to install Anzo DU. Press Enter to accept the default installation path or type an alternate path and then press Enter.
Next, the installer prompts for the hostname of this leader instance. It defaults to the IP address of the server:
Set the hostname for this node.
Enter the HostName/Address for this node.
Hostname/Address
[10.100.0.11]
- Press Enter to accept the default value. If necessary, type a different IP address, and then press Enter.
The installer then prompts for any additional leader node hostnames. Typically there is one leader node and this value is specified as the same IP address as the previous step.
Configure leader hostnames
Please enter the hostnames or addresses for the leader nodes. Each entry
comma separated.
[10.100.0.11]
- If you set up additional leader nodes for redundancy, enter a comma separated list of the IP addresses for the alternate nodes. Otherwise, accept the default value and press Enter.
Next, the installer prompts you to specify the maximum amount of memory that this leader instance can use. The installer lists the total RAM available and chooses 1/2 of the total memory as the default value.
Choose the maximum memory that the node can use
Please enter the maximum amount of RAM memory that the node may use.
The minimum amount currently supported is 1024 MB. 29995 MB is available.
Maximum Memory in MB
[14998]
- Specify the maximum amount of memory (in MB) that this leader instance can use. Press Enter to accept the default value or specify an alternate value and then press Enter.
- The installation of the Anzo DU leader software begins and is configured according to the values that you specified. Proceed to Deploy the Worker Nodes to install the Worker instances.
Deploy the Worker Nodes
Follow the instructions below to deploy the Anzo Distributed Unstructured (DU) worker nodes.
- Make sure that the worker host servers have access to the Anzo shared file system and meet the requirements in Anzo Unstructured Cluster Requirements and Recommendations.
- Copy the Anzo DU installation script to each of the worker servers and then run the following command to make the script executable:
chmod +x <script_name>
- If necessary, run the following command to become the Anzo service user:
su <name>
Where <name> is the name of the service user. For example:
su anzo
- Run the following command to start the installation wizard:
./<script_name>
The script unpacks the JRE and then waits for input before starting the installation.
- Press Enter to start the installation. The software license agreement is presented.
-
Review the software license agreement. Press Enter to scroll through the terms. At the end of the agreement, type 1 to accept the terms or type 2 to disagree and stop the installation.
When the agreement is accepted, the installer prompts you to specify the components to install:
Which components should be installed?
1: Leader [*1]
2: Worker [*2]
(To show the description of a component, please enter one of *1, *2)
Please enter a comma-separated list of the selected values or [Enter] for the default selection:
[1,2]
- At the components prompt, type 2 (Worker) and then press Enter.
The installer prompts you to specify the installation path:
Where should the Anzo Unstructured be installed?
[/opt/AnzoDU]
- Specify the path and directory to install Anzo DU. Press Enter to accept the default installation path or type an alternate path and then press Enter.
Next, the installer prompts for the hostname of this worker instance. It defaults to the IP address of the server:
Set the hostname for this node.
Enter the HostName/Address for this node.
Hostname/Address
[10.100.0.12]
- Press Enter to accept the default value. If necessary, type a different IP address, and then press Enter.
The installer then prompts you to specify the maximum number of service instances for this worker node. Each service instance processes one unstructured document at a time. The default value is 4 instances.
Choose the maximum number of service instances and worker port
Please enter the maximum number of service instances to use.
The minimum amount currently supported is 1.
Maximum Service Instances
[4]
- Press Enter to accept the default number of maximum service instances or specify another value and then press Enter.
The installer now prompts you to specify the port to use for this worker. The default port is 2552.
Worker Port
[2552]
- Specify the port to use for this worker. Press Enter to accept the default value or type a different port and then press Enter.
Next, the installer prompts you to specify the hostname(s) of the leader node(s).
Configure leader hostnames
Please enter the hostnames or addresses for the leader nodes. Each entry
comma separated.
[]
-
Specify the IP address for the leader instance that you deployed in Deploy the Leader Node above. If you deployed multiple leader nodes, specify each leader's IP address in a comma separated list.
The installer now prompts you to specify the maximum amount of memory that this worker instance can use. The installer lists the total RAM available and chooses 1/2 of the total memory as the default value.
Choose the maximum memory that the node can use
Please enter the maximum amount of RAM memory that the node may use.
The minimum amount currently supported is 1024 MB. 29995 MB is available.
Maximum Memory in MB
[14998]
- Specify the maximum amount of memory (in MB) that this worker instance can use. Press Enter to accept the default value or specify an alternate value and then press Enter.
The installation of the Anzo DU worker software begins and is configured according to the values that you specified.
- Repeat the steps above for each worker instance in the cluster.
Once the leader and all of the worker nodes are installed, proceed to Configure and Start the Anzo DU Services.
If you upgraded the Anzo Unstructured software, make sure that you restart the leader and worker applications.
In addition, restart the Anzo Server Akka Cluster Integration and Anzo Unstructured Distributed services. To restart these services:
- In the Administration application, expand the Servers menu and click Advanced Configuration.
- On the Advanced Configuration screen, click the I understand and accept the risk button to view the Anzo bundles.
- In the Search field at the top of the screen, start typing the name of the service that you want to restart. When the service appears in the list onscreen, click the service name to view the details.
- At the top of the screen, click Stop Bundle. Then click Start Bundle when the start option becomes available.
Configure and Start the Anzo DU Services
Once the Anzo Unstructured (AU) cluster is installed, Cambridge Semantics recommends that you set up leader and worker services to ensure that AU runs as the Anzo service user and can access the data that other platform components write to the shared file system. Follow the instructions below to configure the services.
Configure and Start the Leader Service
Follow the instructions below to create and start the leader service.
- On the leader server, create a file called anzo-du-leader.service in the
/usr/lib/systemd/systemdirectory. For example:# vi /usr/lib/systemd/system/anzo-du-leader.service
- Add the following contents to anzo-du-leader.service. Placeholder values are shown in bold:
[Unit]
Description=Service for Distributed Unstructured Leader
After=syslog.target network.target local-fs.target remote-fs.target nss-lookup.target

[Service]
Type=forking
RemainAfterExit=yes
LimitCPU=infinity
LimitNOFILE=65536
LimitAS=infinity
LimitNPROC=65536
LimitMEMLOCK=infinity
LimitLOCKS=infinity
LimitFSIZE=infinity
ExecStart=/install_path/leader start
ExecStop=/install_path/leader stop
User=service_user_name
Group=service_user_name

[Install]
WantedBy=default.target
Where install_path is the Anzo DU installation path and directory and service_user_name is the name of the Anzo service user. For example:
[Unit]
Description=Service for Distributed Unstructured Leader
After=syslog.target network.target local-fs.target remote-fs.target nss-lookup.target

[Service]
Type=forking
RemainAfterExit=yes
LimitCPU=infinity
LimitNOFILE=65536
LimitAS=infinity
LimitNPROC=65536
LimitMEMLOCK=infinity
LimitLOCKS=infinity
LimitFSIZE=infinity
ExecStart=/opt/AnzoDU/leader start
ExecStop=/opt/AnzoDU/leader stop
User=anzo
Group=anzo

[Install]
WantedBy=default.target
- Save and close the file, and then run the following commands to start and enable the new service:
# systemctl start anzo-du-leader.service
# systemctl enable anzo-du-leader.service
Once the service is enabled, the leader should be running. Any time you start and stop the leader, run the following systemctl commands: sudo systemctl stop anzo-du-leader and sudo systemctl start anzo-du-leader.
Configure and Start the Worker Service
Follow the instructions below to create and start the worker service. Complete the steps below on each worker node in the cluster.
- Create a file called anzo-du-worker.service in the
/usr/lib/systemd/systemdirectory. For example:# vi /usr/lib/systemd/system/anzo-du-worker.service
- Add the following contents to anzo-du-worker.service. Placeholder values are shown in bold:
[Unit]
Description=Service for Distributed Unstructured Worker
After=syslog.target network.target local-fs.target remote-fs.target nss-lookup.target

[Service]
Type=forking
RemainAfterExit=yes
LimitCPU=infinity
LimitNOFILE=65536
LimitAS=infinity
LimitNPROC=65536
LimitMEMLOCK=infinity
LimitLOCKS=infinity
LimitFSIZE=infinity
ExecStart=/install_path/worker start
ExecStop=/install_path/worker stop
User=service_user_name
Group=service_user_name

[Install]
WantedBy=default.target
Where install_path is the Anzo DU installation path and directory and service_user_name is the name of the Anzo service user. For example:
[Unit]
Description=Service for Distributed Unstructured Worker
After=syslog.target network.target local-fs.target remote-fs.target nss-lookup.target

[Service]
Type=forking
RemainAfterExit=yes
LimitCPU=infinity
LimitNOFILE=65536
LimitAS=infinity
LimitNPROC=65536
LimitMEMLOCK=infinity
LimitLOCKS=infinity
LimitFSIZE=infinity
ExecStart=/opt/AnzoDU/worker start
ExecStop=/opt/AnzoDU/worker stop
User=anzo
Group=anzo

[Install]
WantedBy=default.target
- Save and close the file, and then run the following commands to start and enable the new service:
# systemctl start anzo-du-worker.service
# systemctl enable anzo-du-worker.service
- Repeat the steps above for each worker server.
Once the service is enabled, the worker should be running. Any time you start and stop a worker, run the following systemctl commands: sudo systemctl stop anzo-du-worker and sudo systemctl start anzo-du-worker.
Any time the AU leader instance is restarted, the Anzo Server Akka Cluster Integration and Anzo Unstructured Distributed services must be restarted in Anzo. To restart a service:
- In the Administration application, expand the Servers menu and click Advanced Configuration.
- On the Advanced Configuration screen, click the I understand and accept the risk button to view the Anzo bundles.
- In the Search field at the top of the screen, start typing the name of the service that you want to restart. When the service appears in the list onscreen, click the service name to view the details.
- At the top of the screen, click Stop Bundle. Then click Start Bundle when the start option becomes available.
Configure the Connection to Anzo
After deploying and starting an Anzo Unstructured cluster, there is one more step needed to complete the configuration of the connection from Anzo to the DU cluster. Follow the instructions below to configure the connection.
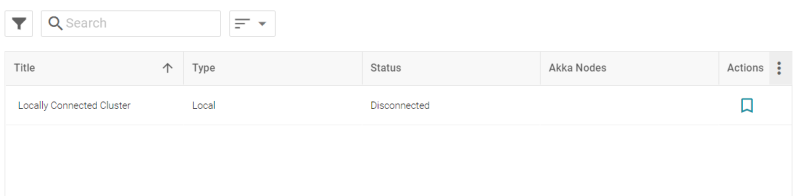
- In the Administration application, expand the Connections menu and click Unstructured Clusters. The Unstructured Clusters screen lists the available clusters. For example, the image below shows the locally connected cluster that was just installed. Note that the Status is Disconnected:
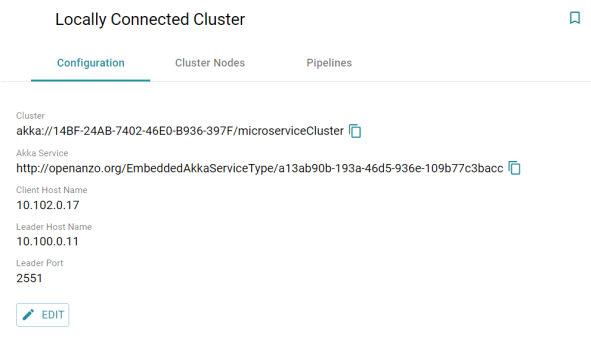
- Click the name of the new cluster to open the Configuration screen. For example:

- Click the Edit button to open the Edit Cluster Configuration dialog box.

- On the Edit Cluster Configuration dialog box, complete the Client and Leader Host Name fields. You do not need to specify the Leader Port as Anzo automatically populates the port once the connection is established.
- Client Host Name: Specify the hostname or IP address of the Anzo server.
- Leader Host Name: Specify the hostname or IP address of the leader server. This is the value specified in Step 8 in Deploy the Leader Node above.
- Click Save to save the connection configuration. Anzo connects to the cluster, adds the Leader Port value, and returns to the Configuration screen. For example:
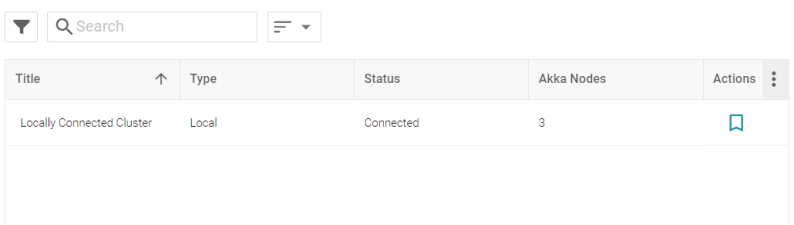
The new Anzo Unstructured cluster is now connected to Anzo and ready to process unstructured pipelines. If you return to the Unstructured Clusters screen, the Status of the cluster is now Connected and the number of Akka Nodes is displayed. For example:
For information about onboarding unstructured data, see Onboarding Unstructured Data.