Validate the Data (Validation Step)
This topic provides guidance on configuring a Validation Step to use for validating the data in a layer and optionally setting up execution conditions. Follow the steps below to create a Validation Step.
- Go to the graphmart for which you want to add a step and then click the Data Layers tab.
- On the Data Layers tab, find the layer that you want to add the step to. Click the menu icon (
 ) for that layer and select Add Step/View. The Add Step/View dialog box is displayed with the New tab selected.
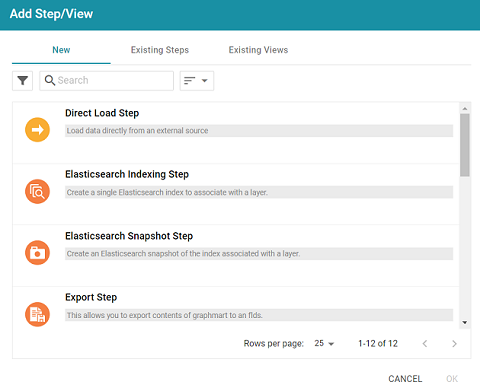
- To create a new Validation step, select Validation Step and then click OK. If you want to clone an existing step, click the Existing Steps tab, select the step that you want to clone, and then click OK. Anzo creates or clones the step and displays the Details tab:

- On the Details tab, configure the following options as needed:
- Title: The required name of the step.
- Description: An optional short description of the step.
- Enabled: When creating a new step, the Enabled option is selected by default, indicating that the step is enabled and will run when the layer is loaded or refreshed. If you want to disable the step so that it is not processed, clear the Enabled checkbox.
- Validation Source Datasource: This optional field enables you to select a data source (such as a system data source) to perform the validation against if you do not want the query to run against the graphmart that the step is in. When Validation Source Datasource is unset, the validation is performed against the graphmart.
- Source: The source data that this step should act upon. Steps can build upon the data generated by steps in other layers or can be self-contained, applying changes that relate only to the data defined in the layer that contains this step. You can select any number of the following options:
- Self: This option is selected by default and means that the step runs against the data that is in the parent layer.
- All Previous Layers Within Graphmart: This option means that the step runs against the data in all of the successful layers that precede the layer this step is in. Any failed layers are ignored.
- Previous Layer Within Graphmart: This option means that the query runs against the data that is in the one layer that precedes the layer this step is in.
- Layer Name: The Source drop-down list also includes options for layer names. You can choose a specific layer to act upon the data in that layer.
- Pre-Run Generate Statistics: This option controls whether to initiate AnzoGraph's internal statistics gathering queries before running the query to pre-compile. The statistics gathering helps ensure that the AnzoGraph query planner generates ideal query execution plans for queries that are run against the graphmart.
- When you have finished configuring the Details tab, click the Options tab. This tab includes the settings that specify the type of check to perform on the data as well as instructions for what to do if the validation fails.
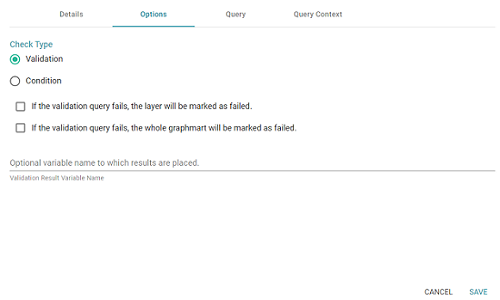
- On the Options tab, determine which type of check to perform and select the appropriate radio button. There are two check types:
- Validation: A Validation check validates the data according to the defined query (on the Query tab) and can be configured to take action depending on whether the validation passes or fails.
- Condition: A Condition check takes the results of the query and associates it with the specified variable. That variable can then be used for setting up an execution condition at the layer or step level.
- If you selected the Validation check type, you have the option to configure what to do if the validation query fails:
- If the validation query fails, the layer will be marked as failed: Select this option if you want Anzo to abort the load of the layer if this step fails.
- If the validation query fails, the whole graphmart will be marked as failed: Select this option if you want Anzo to abort the load of the entire graphmart if this step fails.
- If you selected the Condition check type, you are required to specify the variable name that you want to use to store the result from the query. This variable becomes available as a choice when configuring an execution condition.
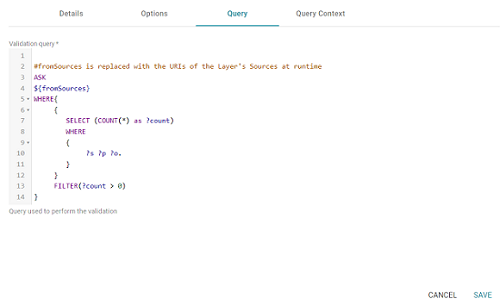
- When you have finished configuring the Options tab, click the Query tab and compose the validation query that the step should run. The tab includes the syntax for writing a SPARQL ASK query, which is useful for determining whether a certain pattern exists in the data. ASK queries return "true" or "false" to indicate whether a solution exists. The template includes a source graph parameter (
${fromSources}). Using the configured Source options from the Details tab, Anzo automatically populates the query with the appropriate source graph URIs when the query runs.If your query connects to a source that requires input of connection and authorization information, Cambridge Semantics recommends that you do not include the connection and authorization values directly in the query. Instead, replace those values with Context Variables from a Query Context. You can access Context Providers for each data source from the step's Query Context tab. For detailed information about query contexts and referencing variables in a query, see Using Query Contexts.
- Click Save to save the step configuration.
Once the Details tab is configured and the validation options and query are defined, the step can be run. For information about setting up an execution condition that uses this step, see Defining Execution Conditions.