Retrieving Diagnostic Files
When Cambridge Semantics Support requests AnzoGraph DB diagnostic files for troubleshooting an issue, you can quickly retrieve the files from either the Diagnostics tab in the Admin Console or by using the system management CLI. This topic describes the diagnostic files and provides instructions for retrieving the files from the user interface and the command line.
- Diagnostic File Overview
- Retrieving Files from the Admin Console
- Retrieving Files from the Command Line
Diagnostic File Overview
There are two types of diagnostic files:
- Xray: Xrays are generated on-demand. If you encounter an error and the database remains running, you generate an Xray to produce the diagnostic files.
- Crash Dump: If you encounter an error that crashes the database, AnzoGraph DB automatically generates a crash file that contains diagnostic information about the crash.
Xrays and crash dumps harvest the diagnostic data that is stored in AnzoGraph DB's system tables. They include information such as:
- A low level, de-identified log of the requests that were sent to the database.
- Statistics like query operation step execution times, number of rows processed, and amount of memory used.
- Detailed but de-identified trace information for errors that were encountered.
- Configuration information such as the number of nodes in the cluster and AnzoGraph DB system settings values.
Xrays and crash dumps are designed to be anonymous and can be safely shared with Cambridge Semantics Support. They do NOT capture user information or any of the data that is loaded into memory by a user, nor do they expose details that could be used to reveal the nature of the data being queried. They are valuable tools that enable Cambridge Semantics to diagnose and fix issues without access or any other visibility into a customer’s data or database. They can also be used to report on overall and detailed system performance, resulting in improved query performance for future releases of AnzoGraph DB.
Retrieving Files from the Admin Console
Follow the instructions below to download an xray or crash dump from the user interface.
- Log in to Admin Console and click the Diagnostics tab. The console displays the available options. For example:
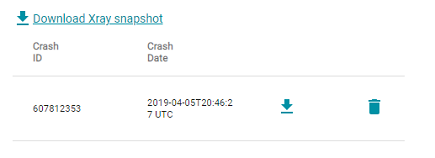
- If you want to retrieve an xray, click the Download Xray snapshot link. AnzoGraph DB creates the xray and produces a tarball with an .xray extension. The console downloads the .xray tarball to your computer.
The files in the tarball are compressed. Do not compress the .xray file before sending it to Cambridge Semantics.
- If you want to retrieve a crash dump, click the Refresh button to refresh the list of available crash dump .xray files. Click the file name that you want to download. The console downloads the .xray file to your computer.
The files in the tarball are compressed. Do not compress the .xray file before sending it to Cambridge Semantics.
Retrieving Files from the Command Line
Follow the instructions below retrieve diagnostic files using the system management CLI, azgctl. The CLI is in the <install_path>/bin directory.
Taking an X-Ray
Run the following command on the leader server to take an x-ray on a running database. The result is a tarball that includes historical system records from the specified time period. All flags for specifying a time period are optional. If you omit the options, the resulting x-ray will include the last 24 hours of historical system data.
The system manager interprets time specifications using the system’s local time and converts the timestamps to UTC when starting the x-ray.
azgctl -xray /path/name.xray [ -f <time> ] [ -t <time> ] [ -d <num_days> ]
                             [ -h <num_hours> ] [ -m <num_minutes> ]
| Option | Description |
|---|---|
| /path/name | The path on the file system where you want to save the tarball and the name of the tarball. All x-rays must be named with the .xray extension. |
| -f <time> | The -f <time> (or --from <time>) option can be used to specify the time to start the system data capture, i.e., omit all of the records from before the specified time. Time must be specified in the following format: YYYY-MM-DD[:HH[:MM]]. For example, -f 2024-01-10:15:00 sets the start time to 3:00 p.m. (local system time) on January 10, 2024. |
| -t <time> | The -t <time> (or --to <time>) option can be used to specify the time to end the system data capture, i.e., omit all of the records after the specified time. Time must be specified in the following format: YYYY-MM-DD[:HH[:MM]]. For example, -t 2024-01-09:19:30 sets the end time to 7:30 p.m. (local system time) on January 9, 2024. |
| -d <num_days> | The -d <num_days> (or --days <num_days>) option can be used to specify the number of days to include in the x-ray. The value must be a positive integer.
|
| -h <num_hours> | The -h <num_hours> (or --hours <num_hours>) option can be used to specify the number of hours to include in the x-ray. The value must be a positive integer.
|
| -m <num_minutes> | The -m <num_minutes> (or --minutes <num_minutes>) option can be used to specify the number of minutes to include in the x-ray. The value must be a positive integer.
|
Examples
The following example generates an x-ray that includes the last 24 hours of system data. A tarball named 24hr_errors.xray is written to the /tmp directory.
/opt/cambridgesemantics/anzograph/bin/azgctl -xray /tmp/24hr_errors.xray
The example below captures the last 12 hours worth of data. A tarball named last12hours.xray is written to the /tmp directory.
/opt/cambridgesemantics/anzograph/bin/azgctl -xray /tmp/last12hours.xray -h 12
The example below captures the last two days of data from before 5:00 p.m. on 1/18/24. A tarball named 1-16_to_1-18.xray is written to the /opt/shared/xrays directory.
/opt/cambridgesemantics/anzograph/bin/azgctl -xray /opt/shared/xrays/1-16_to_1-18.xray -t 2024-01-18:17:00 -d 2
Generating a Crash Dump
If you encounter an issue that stops the database, AnzoGraph DB automatically generates diagnostic files. Follow the instructions below to retrieve the files after a crash.
The database does not need to be running to collect the crash dump.
- Run the following command on the leader server to view a list of the available crash dumps.
azgctl -crashlist
For example:
/opt/cambridgesemantics/anzograph/bin/azgctl -crashlist
The results show a list of available crash dumps by timestamp. For example:
Crash ID               Time
----------------------------------
520460982     2023-12-28 20:30:35
520457655     2023-12-28 19:01:25
- Run the following command to retrieve the appropriate crash files. This command creates a tarball that includes the diagnostic files:
azgctl -crashfetch [ crash_id ] /path/name.xray
Include the
crash_idwhen you want to retrieve a specific crash dump that is listed in the crash list. Omit the crash ID to retrieve the latest files. All crash dump tarballs must include the.xrayextension.
Examples
The following command captures the most recent crash files. The tarball is named latest_crash.xray and it is saved to the /tmp directory.
/opt/cambridgesemantics/anzograph/bin/azgctl -crashfetch /tmp/latest_crash.xray
The example below captures the crash dump for ID 520457655:
/opt/cambridgesemantics/anzograph/bin/azgctl -crashfetch 520457655 /tmp/crash_520457655.xray
You can run azgctl -crashtoss to remove all crash dumps from the server.