Install or Upgrade a License
For the information on the license types available for Graph Lakehouse, see Licensing Methods
If you intend to use Graph Lakehouse with a legacy license key, please contact Altair Engineering Customer Support to request a new license key. This topic provides instructions for installing or upgrading a legacy license using the Graph Lakehouse user interface and the command line interface. It also provides instructions for activating an Altair Units License.
- Activate Graph Lakehouse with Altair Units Licensing
- Install or Upgrade a Legacy License from the User Interface
- Install or Upgrade a Legacy License from the Command Line
Activate Graph Lakehouse with Altair Units Licensing
Altair Units Licensing offers two methods - self-hosted Altair License Server (hosted on premises or in a customer-managed cloud) and Managed Altair Licensing (with license servers hosted by Altair and licenses managed through the Altair One portal). See Licensing Methods for details.
To enable Altair Units licensing in the Graph Lakehouse configuration, edit the <install_path>/config/settings.conf file. See the topic Change System Settings for detailed instructions on configuring Graph Lakehouseusing this file.
1. In the settings.conf file, set the enable_altair_licensing value to true.
-
If you are using a self-hosted Altair License Server, set the license_server configuration setting in
settings.confto6200@<license_server_name_or_IP>. The default license server port is 6200. Change it if the license server is configured to use a different port. Alternatively, set theALTAIR_LICENSE_PATHenvironment variable to the sameport@servervalue. -
If you are using managed Altair Licensing, authorize the Graph Lakehouse host using the Altair License Utility on the leader node of the cluster. The Altair License Utility (
almutil) is in the/usr/bindirectory of the Graph Lakehouse container. It can also be found in thebinsubdirectory of the Altair License Server program files (/usr/local/altair/licensing2025.0/bin) if it is installed on the same host as Graph Lakehouse.First, generate an authorization code from your Altair One account. If you are not registered on AltairOne, ask any registered user at your company to generate and send you an authorization code.
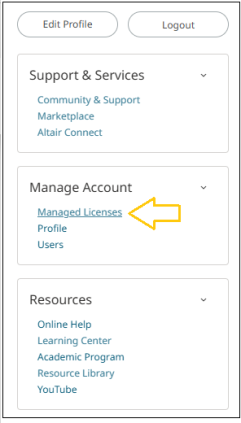
From a web browser on any machine, sign in to Altair One and click on the menu next to your name at the top-right corner. In the Manage Account section, click Managed Licenses.
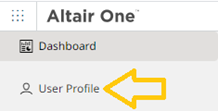
In the left panel of the next screen, click User Profile.
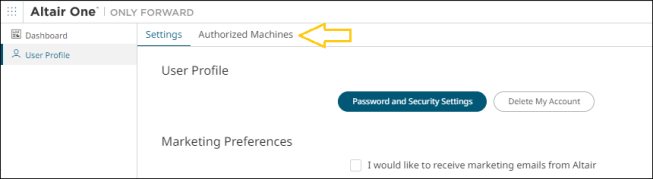
Click the Authorized Machines tab
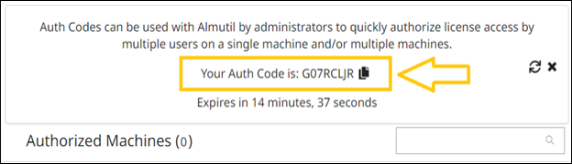
In the Authorized Machines page, click the Generate Auth Code button.

The generated authorization code will be displayed. Copy the code to the clipboard. Note: The code is valid for 15 minutes, so you must perform the next step within 15 minutes of generating the code.
Change to the directory that contains
almutil, for examplecd /usr/bin.Run the following command on the leader node of the cluster within 15 minutes of generating the code:
./almutil -a1auth -system -code <auth_code>
This command authorizes the node for the use or your managed Altair license by generating an encrypted token written to a configuration file
altair_hostedhwu.cfgwhose default location is/usr/local/altair.If you are using an http(s) proxy, set the proxy configuration for almutil before running
almutil -a1auth:./almutil -system -host <proxy_host> -port <proxy_port>
The proxy info is saved in
altair_hostedhwu.cfg. If your proxy configuration requires a proxy user ID and password, use the command:./almutil -system -host <proxy_host> -port <proxy_port> -user <proxy_user> -passwd <password>
The encrypted credentials of the proxy user will be saved in the file
altair_hostedhwu_ex.cfgin the same directory asaltair_hostedhwu.cfg.To test the connectivity with the Altair Cloud license servers, use the command:
./almutil -conntest
To print out the configuration information and test the validity of authorization token if found, use the command
./almutil -a1auth -test
To display the current license statistics including current usage:
./almutil -licstat
Run the
almutilcommand with no arguments to view the detailed usage help and advanced options.
2. Reinitialize Graph Lakehouse for the new license configuration to take effect. Reinitializing the database requires running the following system manager (azgctl) command on the file system. How do I access the Graph Lakehouse file system with Docker? If you are using a cluster, run the command on the leader node:
./<install_path>/bin/azgctl -restart -init
Install or Upgrade a Legacy License from the User Interface
First, open the user interface by following the appropriate instructions below according to your method of deployment:
| Deployment | Instructions |
|---|---|
| Desktop Container Engine | You can use the desktop application to open the Graph Lakehouse container in a browser, or open a browser and go to the following URL: http://127.0.0.1.If you specified a port other than 80 for the host HTTP port when you deployed Graph Lakehouse, include that port in the URL. For example, |
| Linux Container Engine | If you are accessing a container image on a remote Linux host, note the IP address of the host, and then open a browser and go to the following
URL: https://<host_IP_address>.If you mapped the container's HTTPS (8443) port to port 443 on the host when you deployed Graph Lakehouse, you do not need to specify a port. If you specified a port other than 443, include the port in the URL. For example, If you are using Docker locally on a Linux machine and need to know the IP address of the Graph Lakehouse container, you can run the following command:
For example:
|
| Kubernetes with Helm | Using the Graph Lakehouse cluster or external IP obtained from
the kubectl get service command, open a browser and go to the following
URL: https://<IP_address>. |
| EL9 Installer | Use the following URL to access the console: https://<host_IP_address>:<https_port>. |
- On the login screen, type the username and password for the Admin user. If you deployed Graph Lakehouse with a container engine like Docker, Podman, or Rancher, use admin as the user name and Passw0rd1 as the password. Then click Sign In.
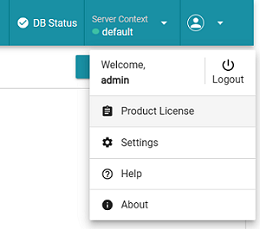
- On the top right of the screen, click the User drop-down menu and select Product License.
The Product License screen is displayed. For example, if you are using a legacy license key license, the screen is as follows:
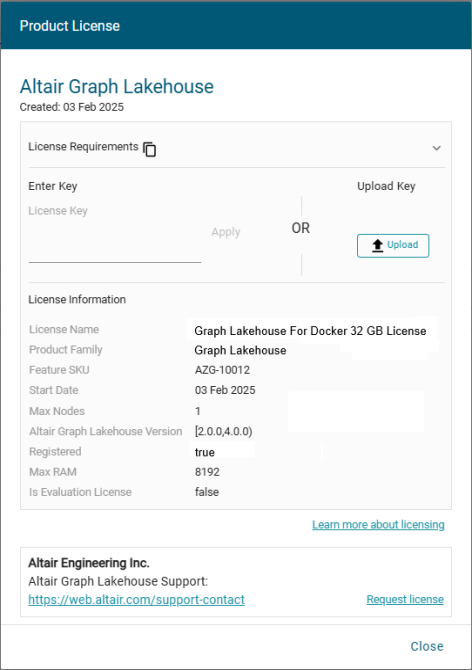
- On the Product License screen, click License Requirements and copy them to the clipboard. Click the Request License link to go to the Contact Altair Support web page.
- Contact Altair Customer Support to request the license for your system, providing the License Requirements copied at the previous step.
- Once you received the license key or file from Altair License Admin: Paste the license key in the License Key field and click Apply. Alternatively, click the Upload button upload the file with the license key information. Graph Lakehouse displays a "License was updated successfully" message and the screen is refreshed to display the details for the new license.
- Click Close to close the Product License dialog box and return to the General tab.
Because Graph Lakehouse shards data across slices, and the number if slices is determined by the number of available CPU allowed by the license, if your new license allows for an increased number of CPU and/or nodes in the cluster, Graph Lakehouse must be re-initialized to clear the existing persisted data and take advantage of the increased resources.
- Reintialize Graph Lakehouse to configure the database with the updated license. Reinitializing the database requires running the following system manager (
azgctl) command on the file system. How do I access the Graph Lakehouse file system with Docker? If you are using a cluster, run the command on the leader node:./<install_path>/bin/azgctl -restart -init
Graph Lakehouse is now configured according to the specifications of the new license key.
Install or Upgrade a Legacy License from the Command Line
- Run the following command to display your current deployment's license information:
<install_path>/bin/azgctl -getlicenseid
If Graph Lakehouse is stopped, you can run the following command to return the server ID:
<install_path>/bin/azg_get_server_id
The command returns a number of attributes associated with the current license, including a property_license.id value. The property_license.id value will be used as the Server ID when upgrading your license. For example:
property_license.id: 2191-680E-178F-3D28-1535-D0F1
- Copy the property_license.id value. This is your server ID. Contact Altair Support to request a new license and provide the required license ID and the system properties (Server ID, CPU Cores, Max RAM, and Max Nodes).
- After receiving the new license key from Altair License Admin, apply the key to your deployment using one of the following options:
- If Graph Lakehouse is stopped: Open in a text editor the license.pem file located in the
<install_path>/configdirectory on the leader node. In the license.pem file, replace the existing contents with the new license key that you copied in the previous step. Then save and close the file. - If Graph Lakehouse is running, you can use the system manager to import the license key. On the leader node, run the following command to import the key and update the license.pem file:
<install_path>/azg/bin/azgctl -license <license_key_text>
For example:
/opt/anzograph/bin/azgctl -license H4sIAAAAAAAAAG2RT0vDQBDF7/kUC54ELfsnu00LAaut...
Because Graph Lakehouse shards data across slices, and the number if slices is determined by the number of available CPU allowed by the license, if your upgraded license allows for an increased number of CPU and/or nodes in the cluster, Graph Lakehouse must be re-initialized to clear the existing persisted data and take advantage of the increased resources.
- If Graph Lakehouse is stopped: Open in a text editor the license.pem file located in the
- Reintialize Graph Lakehouse to configure the database with the updated license. Reinitializing the database requires running the following system manager (
azgctl) command on the file system. If you are using a cluster, run the command on the leader node:./<install_path>/bin/azgctl -restart -init
Graph Lakehouse is now configured to validate against the new license key. For information about loading data, see Load & Manage Data.