Creating a K8s Cluster with Amazon EKS
This topic provides instructions for setting up a Kubernetes cluster with Amazon Elastic Kubernetes Service (EKS) using the AWS command line tools, aws-cli and eksctl.
- Configure Your Workstation
- Create AWS IAM Policies for EKS Permissions
- Configure the VPC for the EKS Cluster
- Create the EKS Cluster
- Create Nodepools in the EKS Cluster
Configure Your Workstation
This section describes the requirements for configuring a workstation to use for creating and managing the EKS cluster. This workstation will be used to launch the EKS cluster and its nodepools and connect to the cluster API endpoint.
| Component | Requirement |
|---|---|
| Operating System | The operating system for the workstation must be CentOS 7.6 or higher. |
| Networking | The workstation should be in the same VPC as the EKS cluster or on a network that is routable from the VPC. For information about the EKS cluster network requirements, see Configure the VPC for the EKS Cluster. |
| Software | See Required Software Packages below. |
| CSI-Supplied EKS Scripts | Cambridge Semantics provides scripts and configuration files to use for provisioning the EKS cluster and its nodepools. Download the files to the workstation. Details about the files are provided in EKS Cluster Creation Scripts and Configuration Files below. |
Required Software Packages
Make sure that the workstation has the following software packages installed. In order to download the packages, the workstation needs outbound internet connectivity.
python-pip
PIP is a package manager for Python packages. Run the following commands to install PIP:
sudo yum install epel-release
sudo yum install python-pip
aws-cli
AWS CLI is the AWS command line interface. Version 1.16.156 or higher is required. Run the following command to install the aws-cli package:
pip install awscli --upgrade --user
Use the aws configure command to set the region and AWS secret and access keys for the IAM user who is responsible for EKS cluster deployment and management.
eksctl
EKSCTL is the AWS EKS command line interface. Version 0.3.1 or higher is required. Run the following commands to download and unpack the eksctl package and place it in the /usr/local/bin directory:
curl --silent --location "https://github.com/weaveworks/eksctl/releases/download/latest_release/eksctl_$(uname -s)_amd64.tar.gz" | tar xz -C /tmp
sudo mv /tmp/eksctl /usr/local/bin
kubectl
KUBECTL is the Kubernetes command line interface. The workstation must either use the same kubectl version as the version on the EKS cluster or a version that is within one minor version. For example, a v1.2 client should work with v1.1, v1.2, and v1.3. Run the following commands to configure access to the Kubernetes repository and install kubectl:
sudo bash -c "cat >/etc/yum.repos.d/kubernetes.repo" << 'EOF'
[kubernetes]
name=Kubernetes
baseurl=https://packages.cloud.google.com/yum/repos/kubernetes-el7-x86_64
enabled=1
gpgcheck=1
repo_gpgcheck=1
gpgkey=https://packages.cloud.google.com/yum/doc/yum-key.gpg https://packages.cloud.google.com/yum/doc/rpm-package-key.gpg
EOF
sudo yum install -y kubectl-version
For example:
sudo yum install -y kubectl-1.13.0
EKS Cluster Creation Scripts and Configuration Files
Cambridge Semantics provides a package of files that enable users to manage the configuration, creation, and deletion of EKS clusters and nodepools. The files and their directory structure are shown below.
├── aws_cli_common.sh
├── common.sh
├── conf.d
│   ├── ca_autodiscover.yaml
│   ├── k8s_cluster.conf
│   ├── nodepool_anzograph.yaml
│   ├── nodepool_common.yaml
│   ├── nodepool_dynamic.yaml
│   ├── nodepool_operator.yaml
│   ├── nodepool.yaml
│   └── warm_ip_target.yaml
├── create_k8s.sh
├── create_nodepools.sh
├── delete_k8s.sh
├── delete_nodepools.sh
└── README.md
- The create_k8s.sh and create_nodepools.sh scripts are used to provision the EKS cluster and any number of nodepools in the cluster. And the delete_k8s.sh and delete_nodepools.sh scripts are used to remove the cluster or nodepools.
- The configuration file, k8s_cluster.conf in the conf.d directory, is used with the create_k8s and delete_k8s scripts and supplies the cluster-wide configuration parameters such as network, region, and timeout values.
- The configuration files, nodepool*.yaml in the conf.d directory, contain nodepool settings. The files include sample configuration values for different types of nodepools, such as for Spark, Elasticsearch, or AnzoGraph. Each file is used to create one type of nodepool.
- The aws-cli-common.sh and common.sh scripts are used by the create and delete cluster and nodepool scripts.
The instructions for Create the EKS Cluster and Create Nodepools in the EKS Cluster provide more details about the scripts and configuration files.
Create AWS IAM Policies for EKS Permissions
Two AWS Identity and Access Management (IAM) policies need to be created to grant the appropriate permissions to AWS users who will set up and manage the EKS cluster and/or deploy applications using the K8s service:
- EKS Cluster Admin: The cluster administrator is responsible for EKS cluster management tasks such as creating and deleting clusters and nodepools and adding and removing containers in the Elastic Container Registry (ECR).
- EKS Cluster User: The cluster user uses the EKS cluster that the admin creates. This user manages namespaces and creates K8s objects like pods and services. This user needs read access to the ECR for deploying applications on K8s clusters. This user should also be added to aws-auth configmap of the K8s cluster.
The policies to add to AWS are provided below. For information about creating policies, see Creating IAM Policies in the AWS documentation.
EKS Cluster Admin Policy
The following IAM policy applies the minimum permissions needed for a cluster administrator who will create and manage the EKS cluster.
{
	"Version": "2012-10-17",
	"Statement": [
		{
		  "Sid": "IAMPermissions",
		  "Effect": "Allow",
		  "Action": [
			"iam:GetInstanceProfile",
			"iam:CreateInstanceProfile",
			"iam:AddRoleToInstanceProfile",
			"iam:RemoveRoleFromInstanceProfile",
			"iam:DeleteInstanceProfile",
			"iam:GetRole",
			"iam:CreateRole",
			"iam:TagRole",
			"iam:PassRole",
			"iam:GetRolePolicy",
			"iam:AttachRolePolicy",
			"iam:PutRolePolicy",
			"iam:DetachRolePolicy",
			"iam:DeleteRolePolicy",
			"iam:UntagRole",
			"iam:DeleteRole"
		  ],
		  "Resource": "*"
		},
		{
		  "Sid": "ComputeAndEKS",
		  "Effect": "Allow",
		  "Action": [
			"autoscaling:*",
			"cloudformation:*",
			"elasticloadbalancing:*",
			"ec2:*",
			"eks:*"
		  ],
		  "Resource": "*"
		},
		{
		  "Sid": "ECRPushPull",
		  "Effect": "Allow",
		  "Action": [
			"ecr:CompleteLayerUpload",
			"ecr:DescribeImages",
			"ecr:GetAuthorizationToken",
			"ecr:DescribeRepositories",
			"ecr:UploadLayerPart",
			"ecr:InitiateLayerUpload",
			"ecr:BatchCheckLayerAvailability",
			"ecr:PutImage"
		  ],
		  "Resource": "*"
		}
	]
}
EKS Cluster User Policy
The following IAM policy applies the minimum permissions needed for an EKS cluster user.
{
	"Version": "2012-10-17",
	"Statement": [
		{
		  "Sid": "Compute",
		  "Effect": "Allow",
		  "Action": [
			"ec2:*",
			"elasticloadbalancing:*",
			"autoscaling:*"
		  ],
		  "Resource": "*"
		},
		{
		  "Sid": "Pricing",
		  "Effect": "Allow",
		  "Action": [
			"pricing:GetProducts"
		  ],
		  "Resource": "*"
		},
		{
		  "Sid": "EKSListAndDescribe",
		  "Effect": "Allow",
		  "Action": [
			"eks:ListUpdates",
			"eks:DescribeCluster",
			"eks:ListClusters"
		  ],
		  "Resource": "arn:aws:eks:*:*:cluster/*"
		},
		{
		  "Sid": "ECRPull",
		  "Effect": "Allow",
		  "Action": [
			"ecr:GetDownloadUrlForLayer",
			"ecr:GetAuthorizationToken",
			"ecr:BatchGetImage",
			"ecr:BatchCheckLayerAvailability"
		  ],
		  "Resource": "*"
		}
	]
}
Configure the VPC for the EKS Cluster
The EKS cluster must be deployed in a non-default VPC that meets the following requirements.
| Note | You can choose to let the AWS EKS service create the VPC when the cluster is provisioned. However, if Anzo is currently deployed, Cambridge Semantics recommends that you provision the EKS cluster in the same VPC as Anzo. |
- The VPC needs pairs of public and private subnets in at least two availability zones. The two availability zones are required by the AWS EKS service to maintain high availability.
The subnets should specify CIDRs that can contain a large number of IP addresses. For example, a subnet mask of /19 is ideal for private subnets for pod IP addresses, and a subnet mask of /21 is ideal for public subnets that host elastic load balancers.
- Nodes in the nodegroup need outbound internet connectivity for registering to EKS for the first time.
- The DNS hostname and DNS resolution properties must be enabled.
- Tag the private subnet with the following key and value so that K8s knows the subnet can be used for internal load balancers:
kubernetes.io/role/internal-elb: 1 - Tag the public subnet with the following key and value so that K8s knows the subnet can be used for external load balancers:
kubernetes.io/role/elb: 1
For more information, see Creating a VPC for Your Amazon EKS Cluster in the AWS documentation.
Create the EKS Cluster
Follow the steps below to configure and then provision the K8s control plane that will manage the nodepools that will be used with Anzo to deploy K8s applications.
Configure the Cluster
Before creating the EKS cluster, specify the networking and control plane configuration to use by creating a configuration file based on the sample k8s_cluster.conf file in the conf.d directory. Follow the instructions below to configure the cluster.
- In the conf.d directory, copy k8s_cluster.conf to create a file to customize. You can specify any name for the .conf file.
Note: If you want to create multiple EKS clusters, you can create multiple .conf files. When you create a cluster (using create_k8s.sh), you specify the name of the .conf file to use for that cluster.
- Open the new .conf file for editing. The file includes the list of parameters and sample values. Modify the values as needed. The table below describes each setting.
Parameter Description Sample Value REGION The AWS region for the EKS cluster. us-east-1 AvailabilityZones List of Availability Zones. Separate zone names with a space. us-east-1a us-east-1b TAGS A comma-separated list of tags to add to the EKS cluster. Owner=User1,Description=EKS Cluster desc VPC_ID The ID of the VPC to provision the cluster into. This is the VPC described in Configure the VPC for the EKS Cluster. If you want EKSCTL to create the VPC, leave this value blank. Not set VPC_CIDR The CIDR to use for the VPC. Provide this value even if VPC_ID is not set. 10.107.0.0/16 NAT_SUBNET_CIDR The CIDR for the public subnet to be used by the NAT gateway. 10.107.0.0/24 PUBLIC_SUBNET_CIDRS CIDRs for the public subnets. Separate multiple CIDRs with a space. 10.107.1.0/24 10.107.2.0/24 PRIVATE_SUBNET_CIDRS CIDRs for the private subnets. Separate multiple CIDRs with a space. 10.107.3.0/24 10.107.4.0/24 VPC_NAT_MODE The NAT mode for the VPC. Valid values are "HighlyAvailable," "Single," or "Disable." Single WARM_IP_TARGET Specifies the number of free IP addresses to keep available for pod assignment on the node. 8 CUSTOMER_CIDRS Comma-separated list of the CIDRs that can access the K8s API over port 443. 10.107.0.0/16 10.108.0.0/16 CLUSTER_NAME Name for the EKS cluster. testcluster CLUSTER_VERSION Version of the EKS cluster. 1.13 ENABLE_PRIVATE_ACCESS Whether to enable private (VPC-only) access to EKS cluster endpoint. true ENABLE_PUBLIC_ACCESS Whether to enable public access to EKS cluster endpoint. false CNI_VERSION Version of the VPC CNI plugin. 1.5 LOGGING_TYPES Comma-separated list of the logging types to enable for the cluster. Valid values are "api," "audit," "authenticator," "controllerManager," and "scheduler." api,audit WAIT_DURATION The number of seconds to wait before timing out during AWS resource creation. 1200 WAIT_INTERVAL The number of seconds to wait before polling for resource state information. 10 STACK_CREATION_TIMEOUT Time in minutes to wait for EKS cluster state changes before timing out. For example the time to wait for creation or update to complete. 30m EKSCTL_VERSION The version of eksctl on the workstation. 0.3.0 AWS_CLI_VERSION The version of the aws-cli on the workstation. 1.16.156 - Save and close the configuration file, and then proceed to Create the Cluster.
Create the Cluster
To create an EKS cluster that is configured according to the file you created in Configure the Cluster, run the create_k8s.sh script with the following command:
$ ./create_k8s.sh cluster_config_filename [ -f ] [ -h ]
| Argument | Description |
|---|---|
| cluster_config_filename | Required name and extension of the configuration file that supplies the parameter values for this cluster. You do not need to specify the path to the conf.d directory. |
| -f | Optional flag. If specified, the script will prompt for confirmation before proceeding with each stage involved in creating the cluster and its components. |
| -h | Optional flag. If specified, the help will be displayed. |
For example:
$ ./create_k8s.sh k8s_cluster.conf
This script creates an EKS cluster along with the networking specifications described by the .conf file. The script deploys the infrastructure, such as a new VPC if no VPC_ID was specified and pairs of public and private subnets in multiple availability zones, using the CIDRs specified in the .conf file. It also creates an Internet and NAT gateway and route tables.
| Note | The user who creates the cluster will be registered as a system:master for the cluster. For information about adding other IAM users, see Managing Users or IAM Roles for your Cluster in the Amazon EKS documentation. |
When cluster creation is complete, proceed to Create Nodepools in the EKS Cluster to add one or more nodepools to the cluster.
Create Nodepools in the EKS Cluster
Follow the steps below to configure and then provision the nodepools in the EKS cluster that will be used to deploy K8s applications with Anzo.
Configure a Nodepool
Before creating a nodepool, supply the configuration values to use for that nodepool based on a sample nodepool*.yaml file in the conf.d directory. Follow the instructions below to configure a nodepool.
- Depending on the application that you want to deploy with this nodepool, determine the configuration file to copy and customize from the nodepool*.yaml sample files in the conf.d directory:
- nodepool_anzograph.yaml: The sample values in this file configure an autoscaling group for an AnzoGraph nodepool. The specified EC2 instance type offers high CPU and memory resources, and the file includes Linux kernel configuration settings that are ideal for AnzoGraph.
- nodepool_common.yaml: The sample values in this file configure a common nodepool, with a relatively small EC2 instance type that can be used for smaller workloads. This type of configuration is typically used to deploy K8s services that manage the EC2 instances that connect to the cluster.
- nodepool_dynamic.yaml: The sample values in this file configure an autoscaling group for a dynamic nodepool, where the EC2 instance type offers medium to large CPU and memory resources that are reasonable for deploying Elasticsearch and Spark applications. The file also includes system tuning bootstrap values that are required by Elasticsearch and/or Spark.
- nodepool_operator.yaml: The sample values in this file configure an autoscaling group for an operator nodepool that can be used to deploy controllers for managing applications deployed on K8s clusters.
- nodepool.yaml:
- warm_ip_target.yaml:
- Copy the appropriate configuration file to create the version to customize. You can specify any name for the .yaml file.
- Open the new .yaml file for editing. The file includes the list of parameters and sample values. Modify the values as needed. The table below describes the common settings.
Parameter Description Sample Value apiVersion The eksctl API version used to deploy EKS objects. eksctl.io/v1alpha5 kind The type of object to be created. ClusterConfig metadata parameters name The name of the EKS cluster. cluster01 region The region to deploy the EKS cluster in. us-east-1 nodeGroups parameters name The prefix to give to the names of the worker nodes that will be deployed. anzograph labels Labels to attach to the nodes in the nodepool. Once deployed, labels can be viewed by running kubectl get node <node_name> -o yaml{'csi.com/node-purpose': 'anzograph'} instanceType The EC2 instance type to use when deploying the nodes. m5.large desiredCapacity The number of Amazon EC2 instances that the auto-scaling group should maintain. 0 availabilityZones The list of availability zones to use when deploying auto scaling group instances. us-east-1a minSize The minimum number of instances that can exist in the auto scaling group. 0 maxSize The maximum number of instances that can exist in the auto scaling group. 5 volumeSize The storage size (in GB) to use for Amazon EBS volumes. 50 maxPodsPerNode The maximum number of pods that can be hosted on each EC2 instance. 8 iam:withAddonPolicies:
autoScalerIndicates whether this nodepool should be part of the cluster auto-scaler. true iam:withAddonPolicies:
imageBuilderIndicates whether to allow this nodepool to access the full Elastic Container Registry (ECR). true volumeType The type of Amazon EBS volume to use. gp2 privateNetworking Indicates whether to isolate the nodepool from the public internet. true securityGroups:
withSharedIndicates whether to create a shared security group for this nodepool to allow communication with other nodepools. true securityGroups:
withLocalIndicates whether to create a separate security group for this nodepool. true ssh:
allowIndicates whether to allow SSH access for the EC2 instances in this nodepool. true ssh:
publicKeyNameThe key pair name to use for SSH access. ssh:
publicKeyThe public key string for the specified publicKeyName. taints Indicates the schedule setting for the nodes. 'cambridgesemantics.com/dedicated': 'anzograph:NoSchedule' tags A list of tags to attach to each EC2/K8s instance. preBootstrapCommands A list of commands to be run on the EC2 instance during the deployment. - Save and close the configuration file, and then proceed to Create a Nodepool. Repeat the steps above to configure additional nodepools.
Create a Nodepool
To create a nodepool that is configured according to a file you created in Configure a Nodepool, run the create_nodepools.sh script with the following command:
$ ./create_nodepools.sh nodepool_config_filename [ -f ] [ -h ]
| Argument | Description |
|---|---|
| nodepool_config_filename | Required name and extension of the configuration file that supplies the parameter values for this nodepool. You do not need to specify the path to the conf.d directory. |
| -f | Optional flag. If specified, the script will prompt for confirmation before proceeding with each stage involved in creating the nodepool and its components. |
| -h | Optional flag. If specified, the help will be displayed. |
For example:
$ ./create_nodepools.sh anzograph_nodepool.yaml
This script creates the nodes in the nodepool according to the specifications provided in the .yaml file. Repeat the process to create additional nodepools.
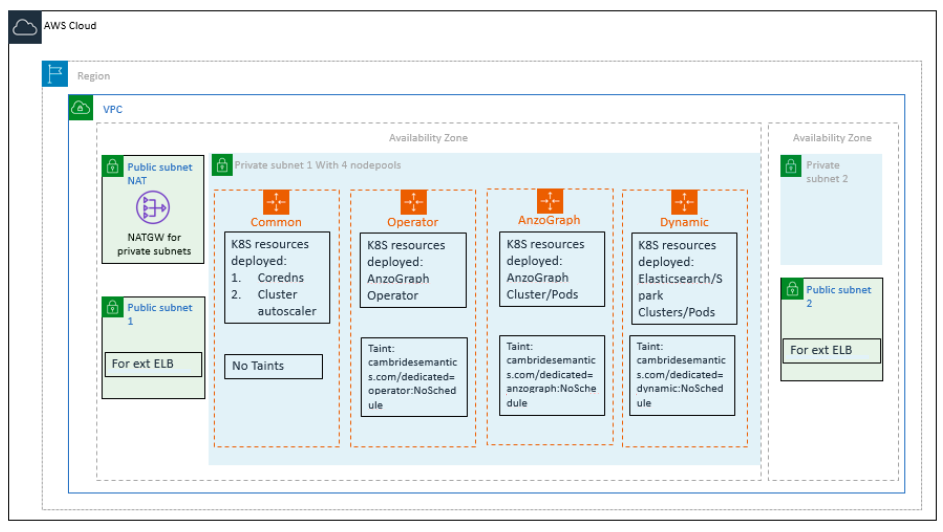
The diagram below shows the architecture for a sample deployment with four nodepools.
The next step is to create a Cloud Location in Anzo so that Anzo can connect to the EKS cluster and deploy applications. See Managing Cloud Locations.