Configuring a View Step
This topic provides guidance on configuring a View Step to use creating a custom view of the data that does not change the source or necessarily materialize any new data. View steps use SPARQL CONSTRUCT queries to create a view definition in AnzoGraph. The sections below describe each of the tabs and configuration options that are available when you create or edit a View Step.
Details
The Details tab includes the settings that configure options such as the name of the step, the source data to act upon, and the Data Models to create the view against.
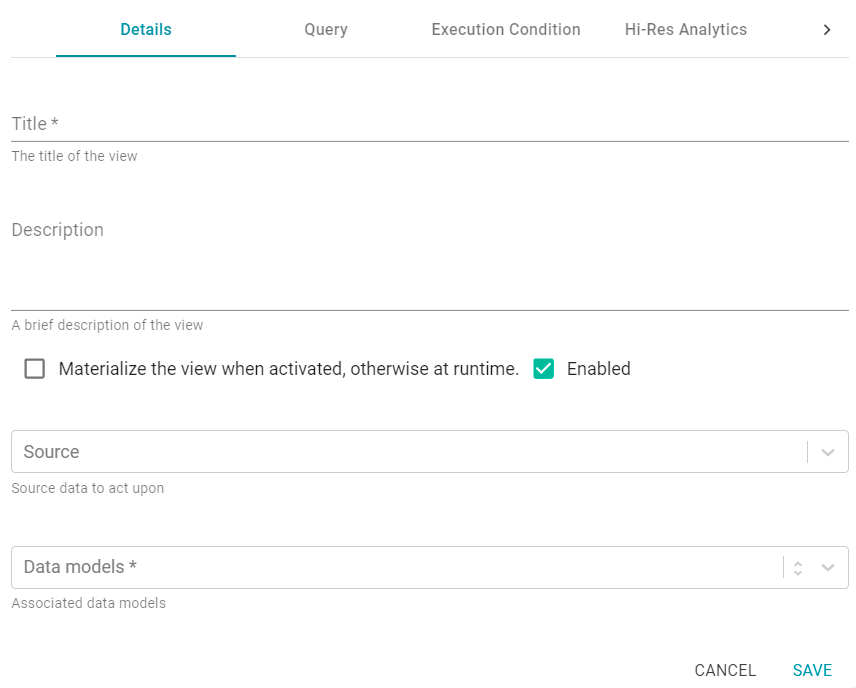
Title
The required name of the Step.
Description
And optional description of the Step.
Materialize the view when activated, otherwise at runtime
If you want to store a copy of the data that the view creates (materialize the data), select the Materialize the view when activated... check box. When this option is disabled Anzo creates a virtual view where only the view definition is stored in memory and not a copy of the data.
Enabled
When creating a new Step, the Enabled option is selected by default, indicating that the Step is enabled and will run when the Data Layer is loaded or refreshed. If you want to disable the Step so that it is not processed, clear the Enabled checkbox.
Source
The Source is the source data that this Step should act upon. Steps can build upon the data generated by Steps in other Data Layers or can be self-contained, applying changes that relate only to the data defined in the Layer that contains this Step. You can select any number of the following options:
- Self: This option is selected by default and means that the Query runs against only the data that is generated in the Layer this Step belongs to.
- All Previous Layers Within Graphmart: This option means that the Query runs against the data that is generated by all of the successful Layers in the Graphmart that precede the Layer this step is in. Any failed Layers are ignored.
- Previous Layer Within Graphmart: This option means that the Query runs against only the data that is generated by the one Layer that precedes the Layer this Step is in.
- Layer Name: The Source drop-down list also includes options for specific Layer names. You can choose a specific Layer to run the Query against that Layer only.
Data Models
This required field specifies the Data Model or Models that you want to create this view against. The list displays all of the Models for all of the Datasets in the Dataset catalog. By default, the field is set to Exclude System Data ( ). If you want to choose a system Model, click the toggle button on the right side of the field to change it to Include System Data (
 ). The Data Models drop-down list will display the system Models in addition to the Dataset Models.
Query
The Query tab contains the query used to create the view.
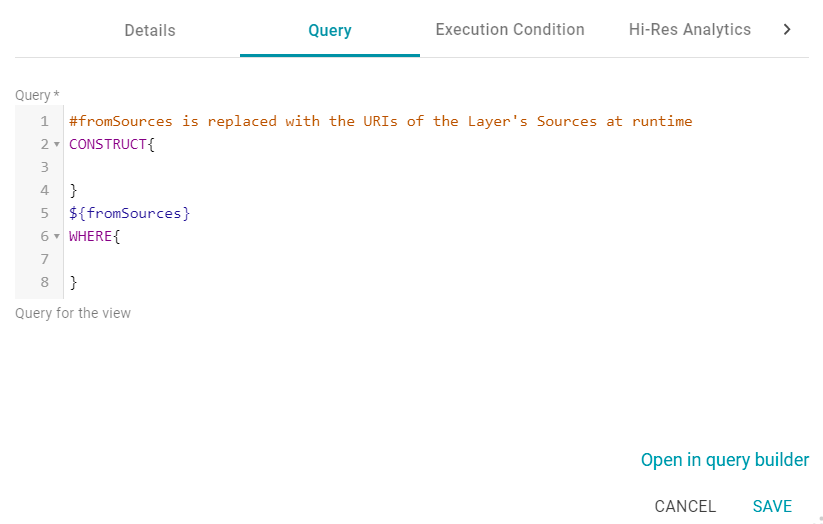
The tab includes the template for a CONSTRUCT query. For information about CONSTRUCT queries, see CONSTRUCT in the W3C SPARQL 1.1 Query Language specification.
Do not include a GRAPH keyword in the CONSTRUCT clause. Anzo uses the view's URI as the graph URI for the constructed triples. In addition, Anzo uses the configured Source options from the Details tab to automatically replace the ${fromSources} parameter with the appropriate FROM clauses when the query runs.
You can click the Open in Query Builder button to open the query in the Query Builder, where you can perform practice runs to see results without having to refresh the Graphmart or Data Layer.
Execution Condition
If you want this Step to be executed conditionally, based on the result of a specified Validation Condition, you can configure an Execution Condition on the Execution Condition tab that is available when creating or editing a Step. The image below shows the Execution Condition tab.
In order to set up an Execution Condition, the Graphmart needs to have at least one Validation Step that defines a Condition Variable. Condition Variables can be used across all Data Layers in the Graphmart. For guidance on configuring a Validation Step, see Configuring a Validation Step.
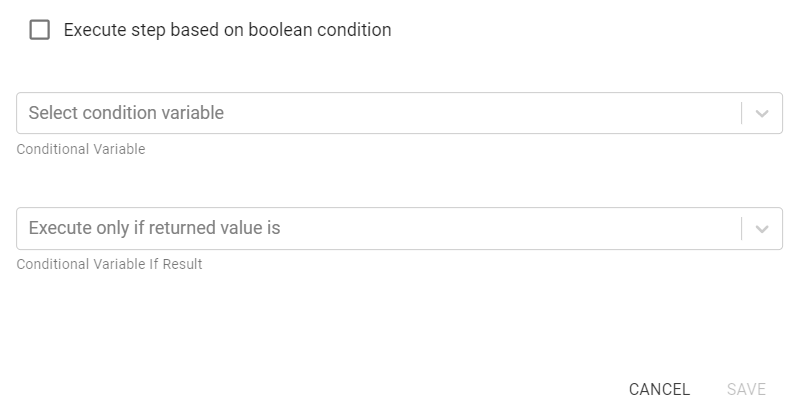
Enable Layer Based on Boolean Condition
This setting indicates whether to enable this Step only if the returned value from the Validation Condition is either true or false. You specify true or false in the Conditional Variable If Result field. If the Validation Condition fails, the Step is disabled.
Conditional Variable
This field specifies the variable that you want to base this Execution Condition on. The variable is the result of a Validation Step Query in the Graphmart.
Conditional Variable If Result
If you enabled the Enable Layer Based on Boolean Condition setting, select true or false from the drop-down list. The Step will be enabled only if the result of the Validation Step Query matches the value that you specified. If Enable Layer Based on Boolean Condition is disabled, leave this field blank.
Hi-Res Analytics
The Hi-Res Analytics tab contains advanced settings that control how the layer is exposed to and affects Hi-Res Analytic dashboards.
Changing these settings can have unexpected consequences, and Cambridge Semantics recommends that you do not modify them unless you understand the repercussions.
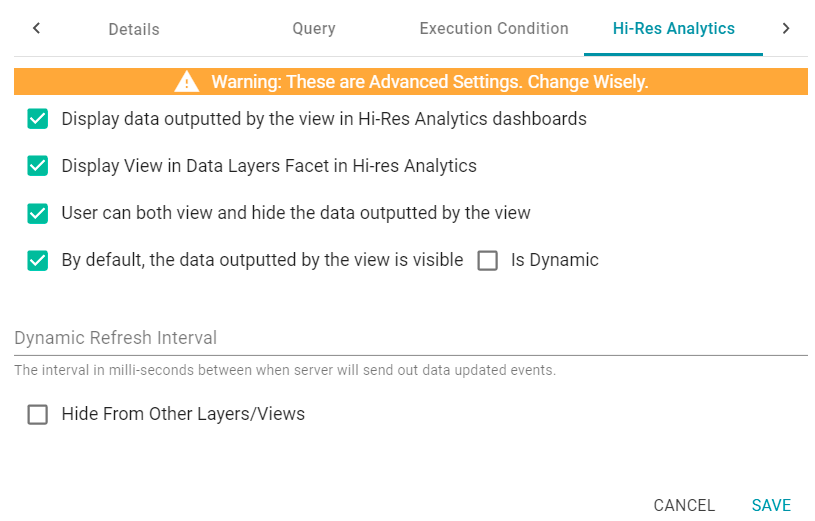
Display data outputted by the view in Hi-Res Analytics dashboards
This setting controls whether the data accessed by the view is available to query and display in dashboard :
- When the setting is enabled (the default value), the view data is available to dashboards.
- When the setting is disabled, other Data Layers in the Graphmart can use the view's data, but the data is not available to Hi-Res Analytics dashboards.
Display View in Data Layers Facet in Hi-res Analytics
This setting controls whether the view name is displayed in the Data Layers panel on Hi-Res Analytics dashboards. The image below shows an example Data Layers panel:
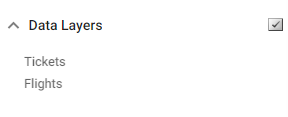
- When the setting is enabled (the default value), the view is listed in the Data Layers panel.
- When the setting is disabled, the view's data is always used in dashboards for this Graphmart but users do not see the view listed in the Data Layers panel.
User can both view and hide the data outputted by the view
This setting controls whether users have the option to show and hide the view in the Data Layers panel on dashboards:
- When the setting is enabled (the default value), the view is listed in the Data Layers panel and users have the option to show and hide the layer.
- When the setting is disabled, whether the view shows up in the Data Layers list depends on the By default, the data outputted by the view is visible setting. If the view is visible in the Data Layers panel ("By default, the data outputted by the view is visible" is enabled), users cannot toggle it on and off.
By default, the data outputted by the view is visible
This setting controls whether the data generated by the steps in the view is visible in dashboards:
- When the setting is enabled (the default value), the view is listed in the Data Layers panel in dashboards and is selected by default.
- When the setting is disabled, the view shows up in the Data Layers panel but is not selected. To include the view's data in a dashboard, the user must select the view.
Is Dynamic
Typically this option is used only for Graph Data Interface (GDI) connections where a remote Data Source is accessed and that source data changes dynamically. If the source is dynamic and you want Anzo to automatically refresh the view of the data at certain internals, select the Is Dynamic checkbox. Then set the Dynamic Refresh Interval (described below).
Dynamic Refresh Interval
If the Is Dynamic option is enabled, this setting configures the interval at which Anzo queries the Data Source to retrieve any updated view data. Specify the number of milliseconds to wait between refreshes of the data.
Hide from Other Layers/Views
This setting controls whether the other Data Layers in the Graphmart can act upon the data in this view.
- When the setting is disabled (the default value), this view is available as a choice in the Source drop-down list when a Step is configured.
- When the setting is enabled, this view is not listed as a choice in the Source list.
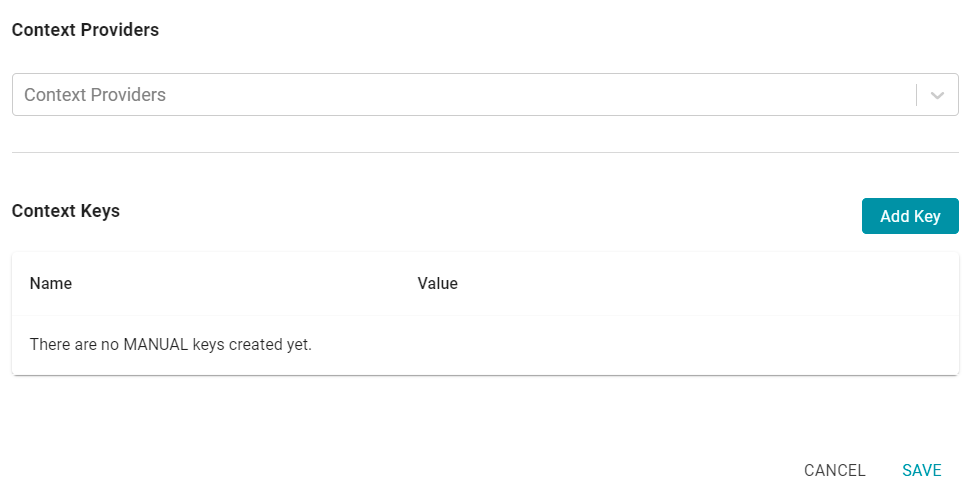
Context
When you use the Graph Data Interface (GDI) for Data Virtualization, you may connect to Data Sources that require input of sensitive connection and authorization information such as keys, tokens, and user credentials. The Context tab gives you the option to configure a Context to store the sensitive information as key-value pairs. Queries can then reference the keys from the Context so that the sensitive details are abstracted from any requests that are sent to the Data Source.
Context Providers
Connections in Anzo implement the Context Provider interface. For example, File Store connections, Anzo Data Store connections, and Data Source connections provide contexts (in the form of JSON objects) that contain key-value pairs which define connection details such as URLs, database names, usernames and passwords, tokens, etc. These contexts are passed to the Data Source when a request is made against that source. To use one of the Anzo-generated Context Providers that was created for a pre-existing connection, select that provider from the drop-down list.
If you specify a Context Provider, the key-value pairs from the selected provider are not populated in the Context Key list on the screen. However, the keys are used automatically when a query is run against that provider.
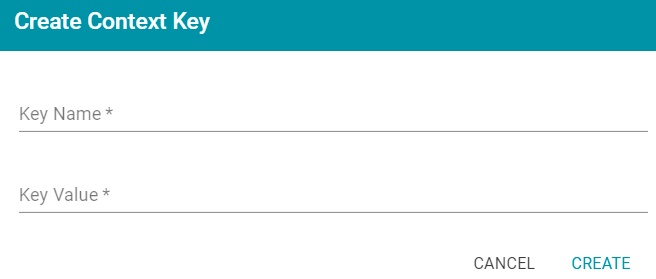
Context Keys
Context Keys are user-defined key-value pairs that are not associated with a particular Context Provider. To add a key and define its value, click the Add Key button. Then specify the Key Name and Key Value in the Create Context Key dialog box. Click Create to add the key-value pair to the Context.
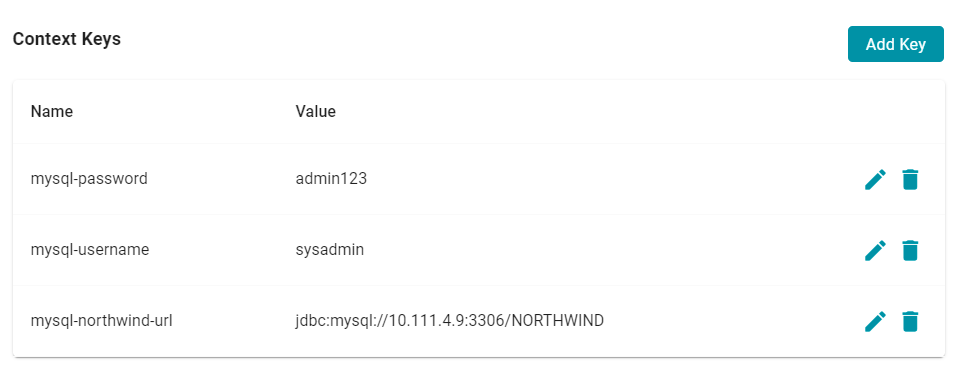
The image below, for example, creates URL, username, and password Context Keys.
The format that you use for referencing a Context Key in a query depends on the type of AnzoGraph plugin or extension that is being called by the query. Generally, Contexts are only used in Steps that contain Graph Data Interface (GDI) queries. When referencing Context Keys in GDI queries, use the following format:
{{@<context_key_name>}}