Installing Anzo
This topic provides instructions for installing Anzo. For information about server requirements, see Anzo Requirements.
- Make Sure the Anzo Service User Account is Created
- (Optional) Create the Shared File System
- Install and Configure Anzo
- (Optional) Route the Anzo Ports to the Default HTTP/S Ports
- Configure and Start the Anzo Service
Make Sure the Anzo Service User Account is Created
It is important to work with your IT organization to ensure that an Anzo service user account is created at the enterprise level. The user account needs to be associated with a central directory server (LDAP) so that it is available for installing and running Anzo components across environments. For more information, see Anzo Service Account Requirements.
If necessary, you can create a temporary user account on the Anzo host server. Note that creating the account locally can cause issues when migrating Anzo or integrating with a central LDAP server. The service account should meet the following requirements:
- The service account should not have root-user privileges.
- The account must have read and write permissions for the Anzo installation directory. The default installation directory is
/opt/Anzo. - The account must have read and write access to the shared file store, such as the NFS mount location, where Anzo will read and write files during the data onboarding processes.
If your organization will use Anzo Unstructured with Elasticsearch to onboard unstructured data, it is especially important to install and run Anzo as a non-root user. Elasticsearch cannot be run by a root user, but it must have access to the data that Anzo writes on the shared file store. When Anzo is run as root the data that it generates is owned by root and Elasticsearch cannot access it.
(Optional) Create the Shared File System
At the end of the Anzo installation during the initial configuration of the server, you specify the location of the shared file system. This shared data directory becomes the default File Store in Anzo. It is not required, but if the shared storage system is not yet created, you may want to set it up before installing Anzo. For information, see Deploying the Shared File System.
If the shared data directory does not exist at the time of initial configuration, you can still complete the configuration. Anzo will create the directory that is specified in the Anzo Shared Data Directory setting. The shared file system will need to be mounted in the specified location or configured as a new File Connection before you can onboard data from files, run ETL pipelines, or export data from Graphmarts.
Install and Configure Anzo
Follow the instructions below to install Anzo. These instructions assume that you have copied the Anzo installation script to the server.
- If necessary, run the following command to become the Anzo service user:
# su <name>
Where <name> is the name of the service user. For example:
# su anzo
- If necessary, run the following command to make the Anzo installation script executable:
chmod +x <script_name>
- Run the following command to start the installation wizard:
./<script_name>
The script unpacks the JRE and then waits for input before starting the installation.
- Press Enter to start the installation.
- Review the software license agreement. Press Enter to scroll through the terms. At the end of the agreement, type 1 to accept the terms or type 2 to disagree and stop the installation.
The installer prompts you to specify the components to install:
Which components should be installed?
1: Server [*1]
2: Client [*2]
3: Spark [*3]
(To show the description of a component, please enter one of *1, *2, *3)
Please enter a comma-separated list of the selected values or [Enter] for the default selection:
[1,2,3]
- In a comma-separated list, specify the components to install. Item 1 is the Anzo server, item 2 is the Anzo Admin command line client, and item 3 is the embedded Spark server and compiler as well as the Sparkler compiler.
If you exclude the Spark component, you will not be able to ingest data sources using ETL pipelines as described in Ingesting Data Sources via ETL Pipelines. All data onboarding must be done be done via Direct Data Loading (as described in Directly Loading Data Sources via Graphmarts) or manually written Graph Data Interface queries.
- Specify the path and directory for the Anzo installation. Press Enter to accept the default installation path or type an alternate path and then press Enter.
- Indicate whether you want the installer to create symlinks. Press Enter for yes or type n and press Enter for no.
- If you chose to let the installer create symlinks, specify the directory to create the symlinks in. Press Enter to accept the default path or type an alternate path and then press Enter.
- Specify the maximum amount of memory (in MB) that the server can use and then press Enter. The installation wizard lists the total RAM available. To meet the minimum memory requirement, the wizard chooses 1/4 of the total memory as the default value. Cambridge Semantics recommends that you allocate at least 1/2 of the total memory to Anzo.
The wizard installs the components that you selected and then asks if you want to start the Anzo services.
- Press Enter to start the Anzo services. When prompted, open a browser and go to the following URL to open the license administration wizard.
http://<hostname>:8945/
Where <hostname> is the Anzo server DNS name or IP address. The License Key Information screen appears. For example:
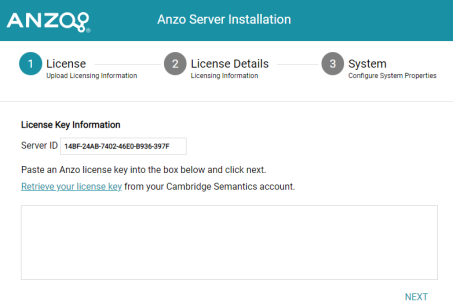
- Paste your license key into the box and then click Next. If necessary, you can obtain the license key by clicking Retrieve your license key and logging in to your Cambridge Semantics account.
- The wizard displays your license details. Review the details and then click Next.
The wizard displays the System Configuration screen:
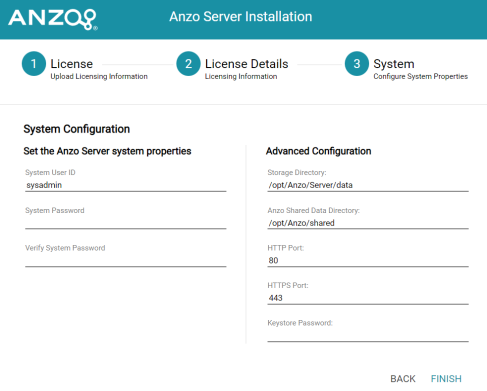
- On the left side of the screen in the System Password and Verify System Password fields, specify the password to use for the system administrator, sysadmin.
Do not change the System User ID. It must be sysadmin. The sysadmin user account has permission to access all features in the main Anzo application as well as administrative functions in the Administration application. In addition, the sysadmin user has read and write access to all of the artifacts (Data Sources, Models, Pipelines, etc.) that are created by all Anzo users. For more information about the account, see System Administrator.
- On the right side of the screen under Advanced Configuration, configure the following settings as needed:
- Storage Directory: This setting configures the location where system data, like the binary store and system journal or volume, is stored. The default location is
<install_path>/Server/data. You can specify an alternate location by typing a new path and directory. - Anzo Shared Data Directory: This setting specifies the base location of the shared file storage (as described in Deploying the Shared File System). The default value is
/opt/Anzo/shared. Change the default value to the correct location for your shared directory. For example,/opt/anzoshare/data. If the specified location does not exist, Anzo will create it. Later you can mount the directory to the specified location or configure another location as a new File Connection (see Connecting to a File Store for information). - HTTP Port: This setting specifies the HTTP port for Anzo. The default port is 80. Since non-root users cannot access ports below 1000, however, the Anzo services, which will run as the Anzo service user, will not be able to access port 80 when Anzo starts. Therefore, Cambridge Semantics recommends that you change this value to 8080.
- HTTPS Port: This setting specifies the HTTPS port for Anzo. The default port is 443. For the same reason stated above for HTTP Port, Cambridge Semantics recommends that you change this value to 8443.
- Keystore Password: This setting specifies the custom password to use for the Anzo key and trust stores. The password can be changed in the future. See Regenerate the Internal Server Secret for information.
- Storage Directory: This setting configures the location where system data, like the binary store and system journal or volume, is stored. The default location is
- Click Finish. The wizard configures and restarts the server. The process may take several minutes. Once the server is running, the browser displays the Anzo application login screen.
(Optional) Route the Anzo Ports to the Default HTTP/S Ports
If you do have a load balancer that reroutes traffic on the server and you want users to be able to access Anzo over HTTP/S without having to specify a port (8080 or 8443) in the connection URL, you can configure the firewall to forward HTTP requests to port 8080 and HTTPS requests to port 8443 automatically. This section provides instructions for rerouting ports via the iptables or firewalld interfaces.
To re-route ports using the iptables interface
Run the following commands to route the Anzo ports via the iptables interface:
# iptables -A PREROUTING -t nat -i eth0 -p tcp --dport 80 -j REDIRECT --to-port 8080
# iptables -A PREROUTING -t nat -i eth0 -p tcp --dport 443 -j REDIRECT --to-port 8443
# iptables-save > /etc/sysconfig/iptables
To re-route ports using the firewalld interface
Run the following commands to route the Anzo ports via the firewalld interface:
# firewall-cmd --permanent --add-forward-port=port=443:proto=tcp:toport=8443
# firewall-cmd --permanent --add-forward-port=port=80:proto=tcp:toport=8080
# firewall-cmd --reload
Configure and Start the Anzo Service
The last step in the configuration is to implement the Anzo systemd service. It is important to set up the service so that the server starts automatically as the Anzo service user. In addition, the service is configured to tune user resource limits (ulimits) for the Anzo process. Follow the instructions below to implement and start the service.
- If Anzo is running, run the following command to stop the server:
./opt/Anzo/Server/AnzoServer -stop
- Create a file called anzo-server.service in the
/usr/lib/systemd/systemdirectory. For example:# vi /usr/lib/systemd/system/anzo-server.service
- Add the following contents to anzo-server.service. Placeholder values are shown in bold:
[Unit]
Description=Service for Anzo server.
After=syslog.target network.target local-fs.target remote-fs.target nss-lookup.target

[Service]
Type=simple
RemainAfterExit=yes
LimitCPU=infinity
LimitNOFILE=65536
LimitAS=infinity
LimitNPROC=65536
LimitMEMLOCK=infinity
LimitLOCKS=infinity
LimitFSIZE=infinity
WorkingDirectory=/<install_path>
UMask=0007
ExecStart=/<install_path>/Server/AnzoServer start
ExecStop=/<install_path>/Server/AnzoServer stop
User=<service_user_name>
Group=<service_user_name>

[Install]
WantedBy=default.target
Where install_path is the Anzo installation path and directory and service_user_name is the name of the Anzo service user. For example:
[Unit]
Description=Service for Anzo server.
After=syslog.target network.target local-fs.target remote-fs.target nss-lookup.target

[Service]
Type=simple
RemainAfterExit=yes
LimitCPU=infinity
LimitNOFILE=65536
LimitAS=infinity
LimitNPROC=65536
LimitMEMLOCK=infinity
LimitLOCKS=infinity
LimitFSIZE=infinity
WorkingDirectory=/opt/Anzo
UMask=0007
ExecStart=/opt/Anzo/Server/AnzoServer start
ExecStop=/opt/Anzo/Server/AnzoServer stop
User=anzo
Group=anzo

[Install]
WantedBy=default.target
- Save and close the file, and then run the following commands to start and enable the new service:
# systemctl start anzo-server.service
# systemctl enable anzo-server.service
The client displays a message such as the following:
Created symlink from /etc/systemd/system/default.target.wants/anzo-server.service to
/usr/lib/systemd/system/anzo-server.service.
Once the service is enabled, Anzo should be running. Any time you start and stop Anzo, run the following systemctl commands: sudo systemctl stop anzo-server and sudo systemctl start anzo-server.