Creating an Elasticsearch Index (Elasticsearch Indexing Step)
This topic provides guidance on configuring an Elasticsearch Indexing Step that generates an Elasticsearch index from data in a graphmart. Follow the steps below to create an Elasticsearch Indexing Step.
For an overview on creating an Elasticsearch index and snapshot from a graphmart, see Creating an Elasticsearch Index from Graphmart Data.
- Go to the graphmart for which you want to add a step and then click the Data Layers tab.
- On the Data Layers tab, find the layer that you want to add the step to. Click the menu icon (
 ) for that layer and select Add Step/View. The Add Step/View dialog box is displayed with the New tab selected.
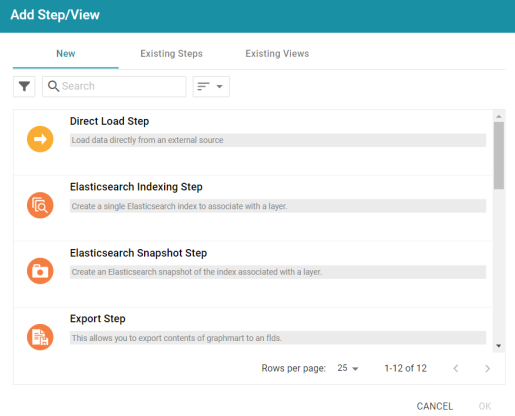
- To create a new Elasticsearch Indexing step, select Elasticsearch Indexing Step and then click OK. If you want to clone an existing step, click the Existing Steps tab, select the step that you want to clone, and then click OK. Anzo creates or clones the step.
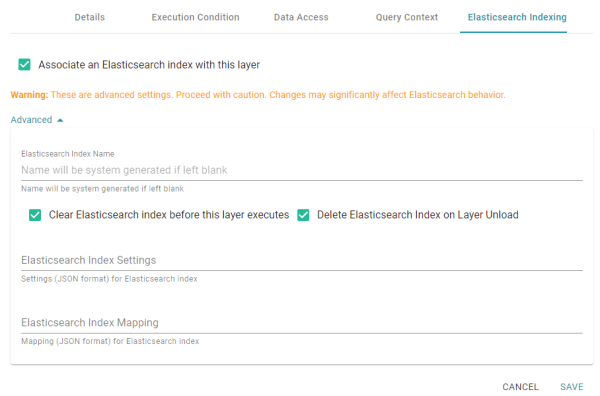
If this is the first Elasticsearch-related step in the layer, the following warning is displayed:

The warning is to inform you that the Elasticsearch index-related configuration settings at the layer level are automatically adjusted to the default settings for layers that contain Elasticsearch Indexing or Snapshot Steps. Those settings are on the layer's Elasticsearch Indexing tab. The image below shows the tab with the default settings:
- Click OK to close the warning, if necessary. The Details tab is displayed:
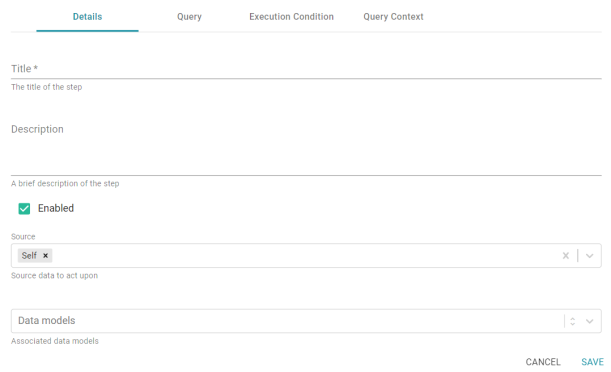
- On the Details tab, configure the following options as needed:
- Title: The required name of the step.
- Description: An optional short description of the step.
- Enabled: When creating a new step, the Enabled option is selected by default, indicating that the step is enabled and will run when the layer is loaded or refreshed. If you want to disable the step so that it is not processed, clear the Enabled checkbox.
- Source: The source data that this step should act upon. Steps can build upon the data generated by steps in other layers or can be self-contained, applying changes that relate only to the data defined in the layer that contains this step. You can select any number of the following options:
- Self: This option is selected by default and means that the step runs against only the data that is generated in the layer this step belongs to.
- All Previous Layers Within Graphmart: This option means that the step runs against the data that is generated by all of the successful layers that precede the layer this step is in. Any failed layers are ignored.
- Previous Layer Within Graphmart: This option means that the query runs against only the data that is generated by the one layer that precedes the layer this step is in.
- Layer Name: The Source drop-down list also includes options for specific layer names. You can choose a specific layer to act upon the data in that layer only.
- Data models: This optional field specifies the model or models to associate with this step. The list displays all of the available models. By default, the field is set to Exclude System Data (
 ). If you want to choose a system model, click the toggle button on the right side of the field to change it to Include System Data (
 ). When system data is included, the drop-down list displays the system models in addition to the user-generated models.
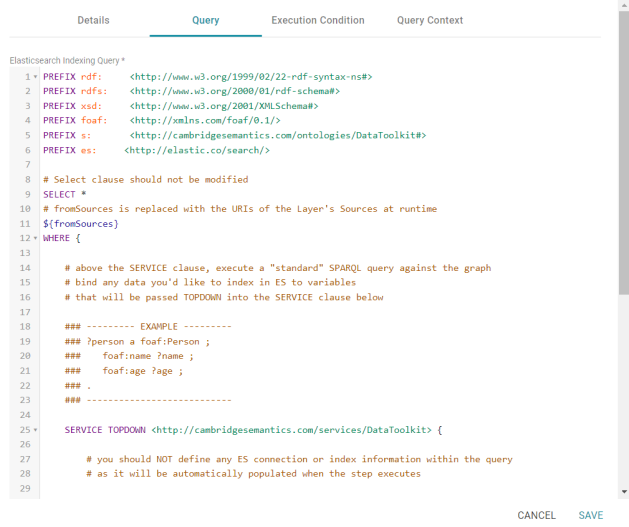
- When you have finished configuring the Details tab, click the Query tab. This tab contains the Elasticsearch indexing query to run. The template includes the syntax for writing a SPARQL SELECT query that uses the Graph Data Interface (GDI) to generate the index on the Elasticsearch server. Unlike queries for other steps, this step does not run an INSERT query because the data is not being inserted into AnzoGraph. For general information about writing GDI queries, see Getting Started with GDI Queries.
Do not include Elasticsearch connection or index parameters in the query. Anzo automatically populates that information from the AnzoGraph configuration when the step is run.
- Click Save to save the step configuration.
Once the Details tab is configured and the query is written, the step can be run. For information about running this step conditionally by setting up an execution condition, see Defining Execution Conditions.