Creating an Elasticsearch Index from Graphmart Data
By associating an Elasticsearch index with a data layer, you can load data from a graphmart to an Elasticsearch index, enabling you to perform free-text and pattern searches on your knowledge graphs. This topic gives instructions for adding a layer that creates an Elasticsearch index for a graphmart.
Prerequisites
Before configuring a graphmart to create an Elasticsearch index, make sure that the following requirements are met:
- A supported version of Elasticsearch is installed and configured. For more information, see the Deployment Guide.
- The Elasticsearch instance is connected to Anzo. See Connecting to Elasticsearch for more information.
- The AnzoGraph instance that you will load the graphmart to is also connected to Elasticsearch. Configure the connection by selecting the Elasticsearch instance in the Elasticsearch Configuration field in the AnzoGraph configuration. For more information, see Connecting to AnzoGraph.
Adding a Data Layer that Creates an Elasticsearch Index
The steps below guide you through configuring a workflow that generates an Elasticsearch index and snapshot from graphs in a graphmart.
- If a file-based linked data set (FLDS) has not been generated for this Graphmart, add an Export Step to the last layer in the Graphmart so that all of the graph data is exported to an FLDS on the file store. For instructions on adding steps, see Adding Steps to Data Layers. For information about configuring an Export Step, see Exporting Data to an FLDS (Export Step).
- Add a new Data Layer to the Graphmart. This layer will be associated with the Elasticsearch index and contain steps to generate the index and snapshot. For instructions on adding a layer, see Adding Data Layers to Graphmarts.
- In the new layer, click the Elasticsearch Indexing tab. Then select the Associate an Elasticsearch index with this layer checkbox. When this setting is enabled, Anzo creates an Elasticsearch index on the Elasticsearch server and links this layer to that index.

Though the index will be populated with data from other layers in the Graphmart, you do not need to modify those layers to associate them with the index. Associate an Elasticsearch index with this layer should be disabled on all layers that do not contain Elasticsearch Indexing Steps.
- The Advanced settings on this screen relate to managing the index's life cycle. It is not necessary to modify the settings to successfully generate an index for the Graphmart. If you have an advanced use case, such as a case that requires linking this layer to an existing index or needing to add custom Elasticsearch-specific index and/or mapping configurations, expand Advanced to access the options. The list below describes the available settings.
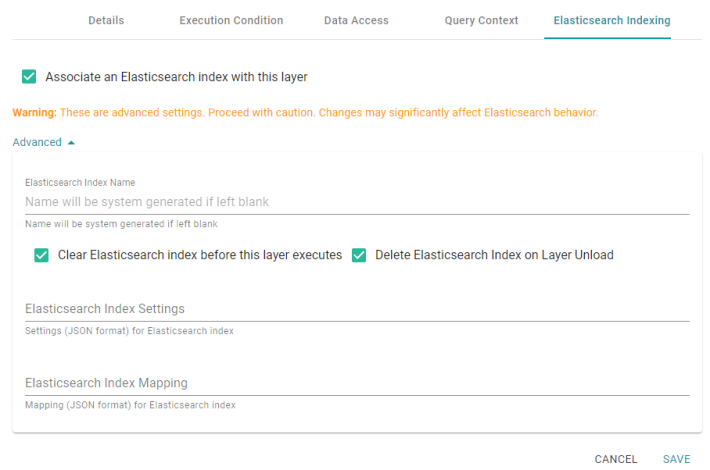
- Elasticsearch Index Name: By default, the new index is given a system-generated name. However, if you are linking this layer to an existing index, add the existing index name to this field. Or, if you plan to reference this index elsewhere and want to give it a human-readable name, you can specify a custom name.
- Clear Elasticsearch index before this layer executes: This option is enabled by default and means that the index is cleared and recreated each time this layer is run.
- Delete Elasticsearch Index on Layer Unload: This option is enabled by default and means that the index is deleted any time the Graphmart is deactivated or reloaded. The index is recreated during the reload or when the Graphmart is activated again. If you do not want the index to be deleted when the Graphmart is offline, clear the checkbox.
- Elasticsearch Index Settings: You can use this field to add, in JSON format, any Elasticsearch-specific index settings.
- Elasticsearch Index Mapping: You can use this field to add, in JSON format, any Elasticsearch-specific mapping settings.
- When you have finished configuring the layer, click Save to add it to the Graphmart.
- Next, add an Elasticsearch Indexing Step to the new layer.
- On the Details tab for the Elasticsearch Indexing Step, complete the required fields and enter any optional details.

The required field is described below. For more information about configuring Elasticsearch Indexing Steps, see Creating an Elasticsearch Index (Elasticsearch Indexing Step).
- Title: Specify the name to give the step.
- When you have finished configuring the Details tab, click the Query tab. The tab includes a template for writing a SPARQL SELECT query that incorporates the Graph Data Interface (GDI) service to generate an index on the Elasticsearch server.
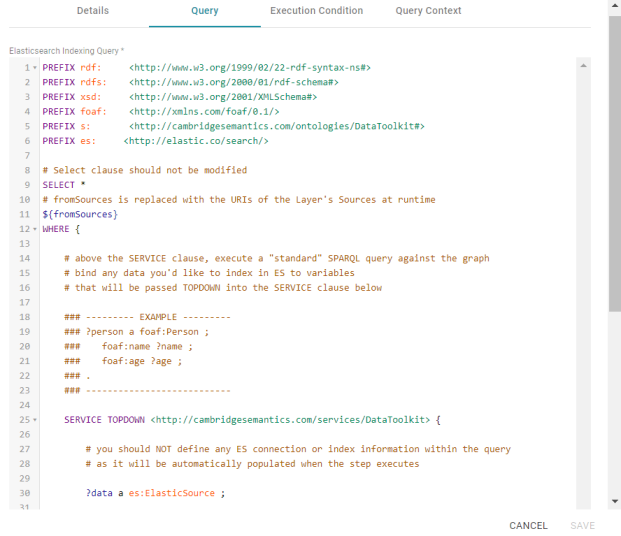
Unlike queries for other steps, this step does not run an INSERT query because the data is not being inserted into AnzoGraph. Edit the template as needed. You can click the Preview in Query Builder button to open the query in the Query Builder, where you can perform practice runs to see results without having to refresh the Graphmart or layer. For general information about writing GDI queries, see Getting Started with GDI Queries.
Do not include Elasticsearch connection or index parameters in the query. Anzo automatically populates that information from the AnzoGraph configuration when the step is run.
- When you have completed the indexing query, click Save to save the configuration and add the step to the layer.
- If you want to create a snapshot for the index in this layer, add an Elasticsearch Snapshot Step to the same layer. On the Details tab for the Elasticsearch Snapshot Step, complete the required fields and enter any optional details.
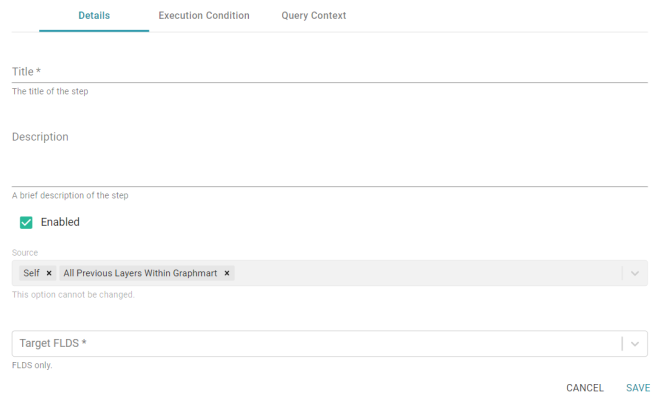
The list below describes the required fields. For more information about configuring Elasticsearch Indexing Steps, see Taking a Snapshot of an Elasticsearch Index (Elasticsearch Snapshot Step).
- Title: Specify the name to give the step.
- Target FLDS: Select the FLDS to save the snapshot to. Typically you select the FLDS that was either created by an Export Step in a previous layer or generated automatically based on the workflow that was followed to create the graphmart.
- When you have finished configuring the snapshot step, click Save to save the configuration and add the step to the layer.
Once the new Elasticsearch-related layer is complete, reload the graphmart to generate an FLDS (if one did not exist), create an index, and save a snapshot to the FLDS.