Managing AWS CloudFormation Stacks
This topic provides information about managing AWS CloudFormation AnzoGraph DB stacks.
Modifying a Stack
When you log in to the AWS CloudFormation Management Console and view the list of existing stacks, AWS enables you to make stack modifications via the Delete and Stack actions buttons. For example:
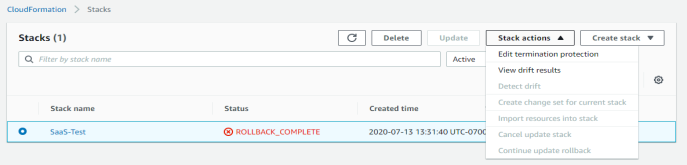
The Cambridge Semantics CloudFormation service does not support making changes to AnzoGraph DB stacks using the Update or Create change set for current stack functions. If you want to change an AnzoGraph DB cluster configuration, such as adding or removing nodes, changing customer access CIDRs, or editing usernames and passwords, delete the current stack and then follow the instructions in AWS CloudFormation Deployment Instructions to launch a new cluster with the desired changes. This topic includes instructions for deleting a stack.
Deleting a Stack
Follow the instructions below to delete an AnzoGraph DB stack.
- Log in to the AWS CloudFormation Management Console. AWS opens the CloudFormation Stacks page where you can view a list of your stacks.
- In the list of stacks, select the radio button next to the stack that you want to delete. Then click the Delete button.
The console displays a Delete Stack confirmation message. Click Delete stack to delete the stack. The status of the stack changes to DELETE_IN_PROGRESS and the CloudFormation service removes AnzoGraph DB and its supporting infrastructure.
The Cambridge Semantics CloudFormation service manages all resources that it creates. When you delete an AnzoGraph DB stack, all CloudFormation-managed resources are also deleted. The CloudFormation does not remove or alter your existing components.
Enabling Secure Shell (SSH) Access
For security reasons, the AnzoGraph DB CloudFormation service does not automatically enable secure shell access to AnzoGraph DB instances. If you want to enable SSH access to a cluster, follow the instructions below.
Log in as the centos user any time you SSH to an AnzoGraph DB instance.
- Log in to the AWS CloudFormation Management Console. AWS opens the CloudFormation Stacks page where you can view a list of your stacks.
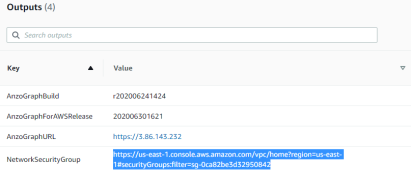
- In the list of stacks, click the stack name for the stack to which you want to enable SSH access. AWS displays the Stack Detail screen for that stack.
- On the Stack Detail screen, expand the Outputs section, and then click the URL for NetworkSecurityGroup. For example:
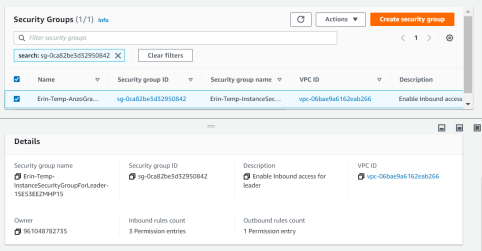
AWS displays the Security Group screen.
- On the Security Group screen, your security group is selected and the details for the security group are shown at the bottom of the screen. For example:
- Click the Actions button at the top of the screen, and select Edit Inbound Rules. The Edit inbound rules screen is displayed. For example:

- At the bottom of the screen, click Add rule. AWS adds a new rule row to the end of the table.
- In the new row, click the Custom TCP Rule drop-down list and select SSH (22).
- In the Source field for the rule, type the CIDR that should have SSH access to the AnzoGraph DB instances. For example, to enable SSH access for the same CIDR that has HTTPS access to AnzoGraph DB, you can copy the CIDR from the Source field for the HTTPS (443) rule. If you want to enable SSH access for multiple CIDRs, create an additional SSH (22) rule for each CIDR.
- When you are finished adding rules, click the Save rules button at the bottom of the screen.
The security group is now configured to allow SSH access to any AnzoGraph DB instances that belong to the security group. You can SSH to an instance using the EC2 key pair that you specified when you deployed the stack. For information about connecting to EC2 instances, see Connect to Your Linux Instance in the AWS Documentation.
When you SSH, log in as the centos user. If you plan to perform AnzoGraph DB operations, such as running queries from the command line, make sure that you log in to the leader node. Perform all command line operations on the leader node. For information about the command line, see Using the AnzoGraph DB CLI.