AWS CloudFormation Deployment Instructions
This topic provides instructions for deploying AnzoGraph DB and its supporting infrastructure on AWS. Before starting the deployment process, make sure that your environment meets the requirements described in Prerequisites for CloudFormation Deployments.
Choose the Deployment Steps to Follow
For guidance that is tailored for your deployment scenario, review the scenarios described in the I Want to column in the table below. Then click the link in the Steps to Follow column that corresponds to your use case.
| I Want to... | Steps to Follow |
|---|---|
| Deploy AnzoGraph DB into a public subnet with restricted access, as described in Deploy AnzoGraph in an Existing Public Subnet with Restricted Access. | Deploy AnzoGraph with Restricted Access |
| Deploy AnzoGraph DB into my existing intranet VPC, as described in Deploy AnzoGraph in a Private VPC Subnet. I want the CloudFormation wizard to create a private subnet using my VPC's dynamic routes and deploy a NAT gateway to enable outbound traffic between the AnzoGraph DB instances in my new private subnet and the internet or other AWS services. Or I want full control over the deployment so that the AnzoGraph DB cluster gets created in my existing VPC and subnet, which is already NAT-enabled or configured with internet and intranet access. |
Deploy AnzoGraph in a Private VPC Subnet (Intranet) |
| Deploy AnzoGraph DB for use as an AWS PrivateLink service, as described in Deploy AnzoGraph as SaaS using AWS PrivateLink. | Deploy AnzoGraph as SaaS |
| Deploy AnzoGraph DB using the AnzoGraph DB CloudFormation service role, as described in Applying the IAM Policy to a CloudFormation Service. | Deploy AnzoGraph with a CloudFormation Service Role |
Follow the steps below to deploy an AnzoGraph DB environment in a VPC with a public subnet and restrict access to that environment to specific address spaces (CIDRs).
-
Go to the AnzoGraph DB AWS Marketplace. There are two AnzoGraph DB offerings: Free Edition and Enterprise Edition. For details about the options, see What are the different AnzoGraph DB offerings? Depending on whether you want to deploy the Free Edition or Enterprise Edition, click on of the following links to go to the appropriate marketplace:
- From the Marketplace, click the Continue to Subscribe button at the top of the page. The Subscribe page is displayed, which provides information about the AnzoGraph DB End User License Agreement (EULA) and AWS privacy and customer policies. Review the policies, and then click Accept Terms.
- When you are ready to deploy AnzoGraph DB, click the Continue to Configuration button at the top of the screen.
- On the Configure this software page, click the Select a CloudFormation Template drop-down list and select Deploy AnzoGraph in Existing Public Subnet. Additional Software Version and Region options are displayed.
- If necessary, click the Software Version drop-down list and select the version of AnzoGraph DB that you want to deploy. The latest released version is selected by default. Then click the Region drop-down list and select the region in which you want to deploy AnzoGraph DB.
- Click the Continue to Launch button at the top of the screen. The screen shows an overview of the launch configuration. Under Choose Action, select Launch CloudFormation from the drop-down list and then click the Launch button. The browser opens the AWS Management Console and displays the Create stack screen.
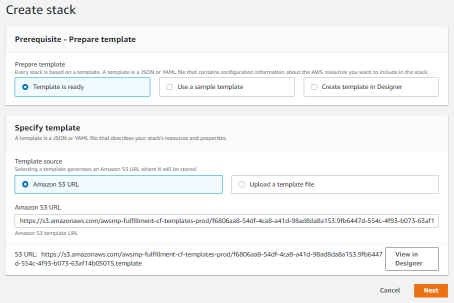
- On the Create stack screen, you do not need to make any changes. The appropriate CloudFormation template is specified based on the option you selected on the configuration page. Click the Next button. The Specify stack details page is displayed:
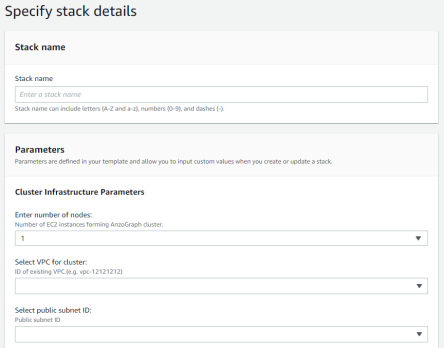
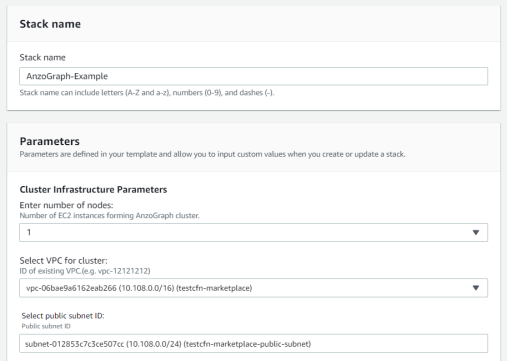
- At the top of the screen, specify the unique Stack name value that you want to use for this AnzoGraph DB stack. Stack names can include a maximum of 32 characters can include letters (A-Z and a-z), numbers (0-9), and dashes (-). The CloudFormation wizard prepends this value to the AnzoGraph DB instance names.
- In the Enter number of nodes drop-down list, select the number of instances that you want to include in the cluster. For information about determining cluster size by estimating the amount of memory required for your use case, see Sizing Guidelines for In-Memory Storage.
- In the Select VPC for cluster drop-down list, select the VPC that you created in Creating a VPC.
- In the Select public subnet ID field, specify the ID for the subnet that AWS created with your VPC. If necessary, see How do I find the subnet ID for my VPC?
For example, the image below shows sample values for the steps that have been completed so far:
- In the Enter list of customer IPs for cluster access field, enter a comma separated list of the CIDRs that should have secure access to the AnzoGraph DB cluster. You can add up to 10 CIDRs. For example, if the VPC uses the 10.0.0.0/16 address space, you can specify the CIDR
10.0.0.0/16to restrict access to IP addresses in the VPC only. Or you can specify a list of CIDRs to further restrict access to a subset IP addresses, such as10.0.3.0/24,10.0.4.0/8. For example:
- In the Select instance type for cluster drop-down list, select the AWS instance type for the instances that will host AnzoGraph DB. Which EC2 instance types are available for deployment?

- In the Select SSH EC2 keypair drop-down list, select the EC2 key pair to use for SSH access to the cluster.
For security reasons, the AnzoGraph DB CloudFormation service does not automatically enable secure shell access to AnzoGraph DB instances. After you deploy the cluster, you can manually enable SSH access. How do I enable SSH access to AnzoGraph DB instances?
- The Do you want insecured (HTTP) access to cluster field determines whether to enable HTTP access to AnzoGraph DB in addition to HTTPS TSL 1.2 encrypted access. HTTP access is insecured. Select yes from the drop-down list to enable HTTP access. Select no to disable HTTP access. Then proceed to the Cluster Configuration Parameters.
- For the Persist data to disk option under Cluster Configuration Parameters, specify whether you want to enable the save data to disk option in AnzoGraph DB:
- If you select yes (the default value), the CloudFormation service adds a disk to each node in the cluster and AnzoGraph DB saves the data in memory to disk after every transaction. Each time AnzoGraph DB is restarted, the persisted data is automatically loaded back into memory.
- If you select no, the CloudFormation service does not add an additional disk to the nodes and AnzoGraph DB does not save data to disk. The data in memory must be reloaded manually after each restart.
- The Select type of settings.conf for AnzoGraph field specifies the server configuration to start AnzoGraph DB with. By default it is set to standalone, which is the optimal configuration for AnzoGraph DB DB deployments (without Anzo integration).
- If you are deploying an AnzoGraph DB cluster for use with Anzo, select anzo.
- If Cambridge Semantics has supplied you with a custom settings file (or a string of setting=value pars), select custom, and then supply the string or file location in the Enter \n separated contents of settings.conf... field.
- If you plan to query source data from relational databases and want to connect to your sources via the Cambridge Semantics-provided JDBC drivers, specify the URL for the driver repository in the Enter repo URL... field.
- Next, specify whether you would like to enable role-based authentication and access control in AnzoGraph DB. For details about access control with AnzoGraph DB, see Authentication and Access Control. To enable role-based authentication, select yes from the Enable role management... drop-down list.
- If you enabled AnzoGraph DB access control, specify a password for the superadmin user. The superadmin account has permissions to manage roles and grant or revoke permissions to members in those roles.
- In the Cluster Credentials section, type the Username for AnzoGraph GRPC that you want to use for users or applications with system administration access to AnzoGraph DB. Then type the password for the user name in the Password for AnzoGraph GRPC field. Passwords must be at least eight characters long and contain at least one digit, one special character, and one letter.
- In the Username to query AnzoGraph field, type the user name that you want to use for users and applications that can query data in AnzoGraph DB but do not have access to system administration operations. Then type the password for the user name in the Password to query AnzoGraph field.
- If you enabled public access by entering 0.0.0.0/0 in the "Enter list of customer IPs for cluster access" field, leave the Enter shared path on NFS server field blank. Cambridge Semantics does not recommend that you mount existing NFS servers to a public environment.
If you secured the environment or want to mount NFS servers on the AnzoGraph DB cluster nodes, you can type a comma separated list of paths to existing NFS directories that you want the CloudFormation wizard to mount. Make sure that any NFS servers meet the requirements in NFS Server Requirements.
For example, the following value mounts two NFS directories on each AnzoGraph DB cluster instance. The mounts are on a server whose IP address is 198.168.0.1, and data1 and data2 are the directories to mount on each node:

- When you have finished configuring the stack details, click the Next button. The Configure stack options screen is presented. For example:
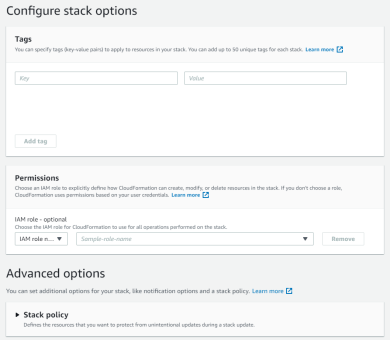
The stack options enable you to specify tags and permissions and other advanced options. If you would like to configure the settings, see Setting AWS CloudFormation stack options in the AWS documentation for guidance.
- Click the Next button to proceed. The Review screen is displayed, which lists all of the configured stack details and options. If you want to make changes, you can click the Edit button for the options that you want to change. When you are ready to deploy the stack, select the I acknowledge that AWS CloudFormation might create IAM resources checkbox at the bottom of the screen and then click the Create stack button.

The CloudFormation wizard starts to deploy the AnzoGraph DB infrastructure and displays the creation progress. For example:

The deployment might take several minutes. You can view all of the associated events by refreshing the Events tab.
When the deployment is complete, the Status displays CREATE_COMPLETE and the Outputs tab shows the AnzoGraph DB HTTPS endpoint (as well as the HTTP endpoint if you enabled HTTP access). The Outputs tab also displays the Network Security Group that the CloudFormation wizard created so that you can review the details. For example:

You can click the AnzoGraph DBURL to open the AnzoGraph DB Query & Admin Console. If you use the HTTPS endpoint, your browser may warn you that the server’s SSL certificate has not been signed by a trusted authority. This is normal behavior. To continue, click the Advanced link at the bottom of the page and then click the Proceed link. The browser displays the AnzoGraph login screen. Enter the credentials you created during the deployment. See Get Started for the next steps to follow to help you get familiar with AnzoGraph DB and SPARQL. For information about managing a deployed stack, see Managing AWS CloudFormation Stacks.
-
Go to the AnzoGraph DB AWS Marketplace. There are two AnzoGraph DB offerings: Free Edition and Enterprise Edition. For details about the options, see What are the different AnzoGraph DB offerings? Depending on whether you want to deploy the Free Edition or Enterprise Edition, click on of the following links to go to the appropriate marketplace:
- From the Marketplace, click the Continue to Subscribe button at the top of the page. The Subscribe page is displayed, which provides information about the AnzoGraph DB End User License Agreement (EULA) and AWS privacy and customer policies. Review the policies, and then click Accept Terms.
- When you are ready to deploy AnzoGraph DB, click the Continue to Configuration button at the top of the screen.
- On the Configure this software page, click the Select a CloudFormation Template drop-down list and select Deploy AnzoGraph in Private VPC Subnet. Additional Software Version and Region options are displayed.
- If necessary, click the Software Version drop-down list and select the version of AnzoGraph DB that you want to deploy. The latest released version is selected by default. Then click the Region drop-down list and select the region in which you want to deploy AnzoGraph DB.
- Click the Continue to Launch button at the top of the screen. The screen shows an overview of the launch configuration. Under Choose Action, select Launch CloudFormation from the drop-down list and then click the Launch button. The browser opens the AWS Management Console and displays the Create stack screen.

- On the Create stack screen, you do not need to make any changes. The appropriate CloudFormation template is specified based on the option you selected on the configuration page. Click the Next button. The Specify stack details page is displayed:

- At the top of the screen, specify the unique Stack name value that you want to use for this AnzoGraph DB stack. Stack names can include a maximum of 32 characters can include letters (A-Z and a-z), numbers (0-9), and dashes (-). The CloudFormation wizard prepends this value to the AnzoGraph DB instance names.
- In the Enter number of nodes drop-down list, select the number of instances that you want to include in the cluster. For information about determining cluster size by estimating the amount of memory required for your use case, see Sizing Guidelines for In-Memory Storage.
- In the Select VPC for cluster drop-down list, select the intranet VPC that you want to deploy AnzoGraph DB into.
- For the Select public subnet ID, choose one of the following options from the list below:
- If you want the CloudFormation service to create a new subnet and NAT gateway in the VPC, leave the Enter subnet ID... field blank.
- If you have a subnet that is configured with outbound internet and intranet access but does not use a NAT gateway, enter the ID for the subnet in the Select public subnet ID field. In this case, the CloudFormation wizard deploys AnzoGraph DB into the subnet and does not configure a NAT gateway. How do I find the subnet ID for my VPC?
- If you have a NAT gateway, leave the Select public subnet ID field blank and specify the NAT gateway ID as described in the next step.
- If your organization uses a NAT gateway, enter the gateway ID in the Enter existing NAT Gateway ID field. If you specified a subnet in the Select public subnet ID field, leave this field blank.
- In the Enter list of customer IPs for cluster access field, enter a comma separated list of the CIDRs that should have secure access to the AnzoGraph DB cluster. You can add up to 10 CIDRs. For example, if the intranet uses the 10.0.0.0/8 address space, you can specify the CIDR
10.0.0.0/8to allow all IP addresses in the intranet to access AnzoGraph DB. Or you can specify a list of CIDRs to enable more restrictive access, such as10.0.3.0/24,10.0.4.0/8. - In the Select instance type for cluster drop-down list, select the AWS instance type for the instances that will host AnzoGraph DB. Which EC2 instance types are available for deployment?

- In the Select SSH EC2 keypair drop-down list, select the authorization key that you want to use for SSH access to the cluster.
For maximum security, the CloudFormation wizard creates a security group that restricts SSH access to the AnzoGraph DB subnet only.
- The Do you want insecured (HTTP) access to cluster field determines whether to enable HTTP access to AnzoGraph DB in addition to HTTPS TSL 1.2 encrypted access. HTTP access is insecured. Select yes from the drop-down list to enable HTTP access. Select no to disable HTTP access. Then proceed to the Cluster Configuration Parameters.
- For the Persist data to disk option under Cluster Configuration Parameters, specify whether you want to enable the save data to disk option in AnzoGraph DB:
- If you select yes (the default value), the CloudFormation service adds a disk to each node in the cluster and AnzoGraph DB saves the data in memory to disk after every transaction. Each time AnzoGraph DB is restarted, the persisted data is automatically loaded back into memory.
- If you select no, the CloudFormation service does not add an additional disk to the nodes and AnzoGraph DB does not save data to disk. The data in memory must be reloaded manually after each restart.
- The Select type of settings.conf for AnzoGraph field specifies the server configuration to start AnzoGraph DB with. By default it is set to standalone, which is the optimal configuration for AnzoGraph DB DB deployments (without Anzo integration).
- If you are deploying an AnzoGraph DB cluster for use with Anzo, select anzo.
- If Cambridge Semantics has supplied you with a custom settings file (or a string of setting=value pars), select custom, and then supply the string or file location in the Enter \n separated contents of settings.conf... field.
- If you plan to query source data from relational databases and want to connect to your sources via the Cambridge Semantics-provided JDBC drivers, specify the URL for the driver repository in the Enter repo URL... field.
- Next, specify whether you would like to enable role-based authentication and access control in AnzoGraph DB. For details about access control with AnzoGraph DB, see Authentication and Access Control. To enable role-based authentication, select yes from the Enable role management... drop-down list.
- If you enabled AnzoGraph DB access control, specify a password for the superadmin user. The superadmin account has permissions to manage roles and grant or revoke permissions to members in those roles.
- In the Cluster Credentials section, type the Username for AnzoGraph GRPC that you want to use for users or applications with system administration access to AnzoGraph DB. Then type the password for the user name in the Password for AnzoGraph GRPC field. Passwords must be at least eight characters long and contain at least one digit, one special character, and one letter.
- In the Username to query AnzoGraph field, type the user name that you want to use for users and applications that can query data in AnzoGraph DB but do not have access to system administration operations. Then type the password for the user name in the Password to query AnzoGraph field.
- In the Enter shared path on NFS server field, you can type a comma separated list of paths to existing NFS directories that you want the CloudFormation wizard to mount on each AnzoGraph DB node. Make sure that any NFS servers meet the requirements in NFS Server Requirements.
For example, the following value mounts two NFS directories on each AnzoGraph DB cluster node. The mounts are on a server whose IP address is 198.168.0.1, and data1 and data2 are the directories to mount on each node:

- When you have finished configuring the stack details, click the Next button. The Configure stack options screen is presented. For example:

The stack options enable you to specify tags and permissions and other advanced options. If you would like to configure the settings, see Setting AWS CloudFormation stack options in the AWS documentation for guidance.
- Click the Next button to proceed. The Review screen is displayed, which lists all of the configured stack details and options. If you want to make changes, you can click the Edit button for the options that you want to change. When you are ready to deploy the stack, select the I acknowledge that AWS CloudFormation might create IAM resources checkbox at the bottom of the screen and then click the Create stack button.

The CloudFormation wizard starts to deploy the AnzoGraph DB infrastructure and displays the creation progress. For example:

The deployment might take several minutes. You can view all of the associated events by refreshing the Events tab.
When the deployment is complete, the Status displays CREATE_COMPLETE and the Outputs tab shows the AnzoGraph DB HTTPS endpoint (as well as the HTTP endpoint if you enabled HTTP access). The Outputs tab also displays the Network Security Group that the CloudFormation wizard created so that you can review the details. For example:

You can click the AnzoGraph DBURL to open the AnzoGraph DB Query & Admin Console. If you use the HTTPS endpoint, your browser may warn you that the server’s SSL certificate has not been signed by a trusted authority. This is normal behavior. To continue, click the Advanced link at the bottom of the page and then click the Proceed link. The browser displays the AnzoGraph login screen. Enter the credentials you created during the deployment. See Get Started for the next steps to follow to help you get familiar with AnzoGraph DB and SPARQL. For information about managing a deployed stack, see Managing AWS CloudFormation Stacks.
Follow the steps below to deploy the AnzoGraph DB infrastructure using AWS PrivateLink.
-
Go to the AnzoGraph DB AWS Marketplace. There are two AnzoGraph DB offerings: Free Edition and Enterprise Edition. For details about the options, see What are the different AnzoGraph DB offerings? Depending on whether you want to deploy the Free Edition or Enterprise Edition, click on of the following links to go to the appropriate marketplace:
- From the Marketplace, click the Continue to Subscribe button at the top of the page. The Subscribe page is displayed, which provides information about the AnzoGraph DB End User License Agreement (EULA) and AWS privacy and customer policies. Review the policies, and then click Accept Terms.
- When you are ready to deploy AnzoGraph DB, click the Continue to Configuration button at the top of the screen.
- On the Configure this software page, click the Select a CloudFormation Template drop-down list and select Deploy AnzoGraph as SaaS. Additional Software Version and Region options are displayed.
- If necessary, click the Software Version drop-down list and select the version of AnzoGraph DB that you want to deploy. The latest released version is selected by default. Then click the Region drop-down list and select the region in which you want to deploy AnzoGraph DB.
- Click the Continue to Launch button at the top of the screen. The screen shows an overview of the launch configuration. Under Choose Action, select Launch CloudFormation and then click the Launch button. The browser opens the AWS Management Console and displays the Create stack screen.

- On the Create stack screen, you do not need to make any changes. The appropriate CloudFormation template is specified based on the option you selected on the configuration page. Click the Next button. The Specify stack details page is displayed:
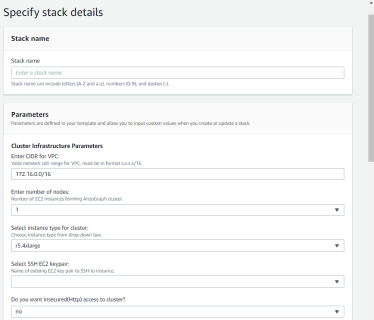
- In the Enter CIDR for VPC field, enter the CIDR that you want to use as the network range for the VPC that the CloudFormation service creates. The CIDR must be in x.x.x.x/16 format.
- In the Enter number of nodes drop-down list, select the number of instances that you want to include in the cluster. For information about determining cluster size by estimating the amount of memory required for your use case, see Sizing Guidelines for In-Memory Storage.
- In the Select instance type for cluster drop-down list, select the AWS instance type for the instances that will host AnzoGraph DB. Which EC2 instance types are available for deployment?

- In the Select SSH EC2 keypair drop-down list, select the EC2 key pair to use for SSH access to the cluster.
For security reasons, the AnzoGraph DB CloudFormation service does not automatically enable secure shell access to AnzoGraph DB instances. After you deploy the cluster, you can manually enable SSH access. How do I enable SSH access to AnzoGraph DB instances?
- The Do you want insecured (HTTP) access to cluster field determines whether to enable HTTP access to AnzoGraph DB in addition to HTTPS TSL 1.2 encrypted access. HTTP access is insecured. Select yes from the drop-down list to enable HTTP access. Select no to disable HTTP access. Then proceed to the Cluster Configuration Parameters.
- For the Persist data to disk option under Cluster Configuration Parameters, specify whether you want to enable the save data to disk option in AnzoGraph DB:
- If you select yes (the default value), the CloudFormation service adds a disk to each node in the cluster and AnzoGraph DB saves the data in memory to disk after every transaction. Each time AnzoGraph DB is restarted, the persisted data is automatically loaded back into memory.
- If you select no, the CloudFormation service does not add an additional disk to the nodes and AnzoGraph DB does not save data to disk. The data in memory must be reloaded manually after each restart.
- The Select type of settings.conf for AnzoGraph field specifies the server configuration to start AnzoGraph DB with. By default it is set to standalone, which is the optimal configuration for AnzoGraph DB DB deployments (without Anzo integration).
- If you are deploying an AnzoGraph DB cluster for use with Anzo, select anzo.
- If Cambridge Semantics has supplied you with a custom settings file (or a string of setting=value pars), select custom, and then supply the string or file location in the Enter \n separated contents of settings.conf... field.
- If you plan to query source data from relational databases and want to connect to your sources via the Cambridge Semantics-provided JDBC drivers, specify the URL for the driver repository in the Enter repo URL... field.
- Next, specify whether you would like to enable role-based authentication and access control in AnzoGraph DB. For details about access control with AnzoGraph DB, see Authentication and Access Control. To enable role-based authentication, select yes from the Enable role management... drop-down list.
- If you enabled AnzoGraph DB access control, specify a password for the superadmin user. The superadmin account has permissions to manage roles and grant or revoke permissions to members in those roles.
- In the Cluster Credentials section, type the Username for AnzoGraph GRPC that you want to use for users or applications with system administration access to AnzoGraph DB. Then type the password for the user name in the Password for AnzoGraph GRPC field. Passwords must be at least eight characters long and contain at least one digit, one special character, and one letter.
- In the Username to query AnzoGraph field, type the user name that you want to use for users and applications that can query data in AnzoGraph DB but do not have access to system administration operations. Then type the password for the user name in the Password to query AnzoGraph field.
- In the Enter shared path on NFS server field, you can type a comma separated list of paths to existing NFS directories that you want the CloudFormation wizard to mount on each AnzoGraph DB node. Make sure that any NFS servers meet the requirements in NFS Server Requirements.
For example, the following value mounts two NFS directories on each AnzoGraph DB cluster node. The mounts are on a server whose IP address is 198.168.0.1, and data1 and data2 are the directories to mount on each node:

- When you have finished configuring the stack details, click the Next button. The Configure stack options screen is presented. For example:

The stack options enable you to specify tags and permissions and other advanced options. If you would like to configure the settings, see Setting AWS CloudFormation stack options in the AWS documentation for guidance.
- Click the Next button to proceed. The Review screen is displayed, which lists all of the configured stack details and options. If you want to make changes, you can click the Edit button for the options that you want to change. When you are ready to deploy the stack, select the I acknowledge that AWS CloudFormation might create IAM resources checkbox at the bottom of the screen and then click the Create stack button.

The CloudFormation wizard starts to deploy the AnzoGraph DB infrastructure and displays the creation progress. For example:

The deployment might take several minutes. You can view all of the associated events by refreshing the Events tab.
When the deployment is complete, the Status displays CREATE_COMPLETE and the Outputs tab shows the AnzoGraph DB HTTPS endpoint (as well as the HTTP endpoint if you enabled HTTP access). The Outputs tab also displays the Network Security Group and Network Route Table that the CloudFormation wizard created so that you can review the details. In addition, the screen displays the AnzoGraph DB VPC Endpoint Service that was created. For example:

Follow the instructions in Whitelist Principals and Create a VPC Endpoint below to modify the endpoint service to add to the whitelist the accounts, roles, or users who need access to AnzoGraph DB.
Whitelist Principals and Create a VPC Endpoint
Follow the steps below to modify the AnzoGraph DB VPC Endpoint Service whitelist to give accounts, roles, or users permission to connect to the AnzoGraph DB endpoint.
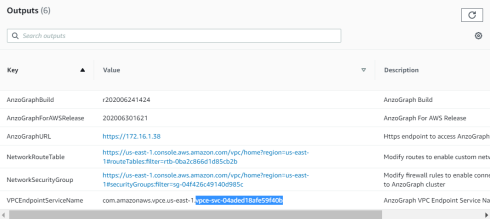
- On the Stack Detail screen for the stack that you deployed, copy the service ID portion of the VPCEndpointServiceName value. For example:
- Go to the AWS VPC Management Console and click Endpoint Services in the console navigation.
- On the Endpoint Services screen, find the AnzoGraph DB endpoint service using the ID from the first step. Select the check box for the service to view the service details at the bottom of the screen.
- In the service details, click the Whitelisted principals tab. Then click the Add principals to whitelist button. AWS displays the Add principals to whitelist screen.
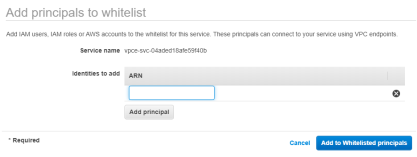
- In the Identities to add field, type the Amazon Resource Name (ARN) for the IAM user, IAM role, or AWS account that you want to have access to the endpoint service. To enter additional principals, click Add principal and enter the ARNs. The example below adds the ARN for two IAM groups.
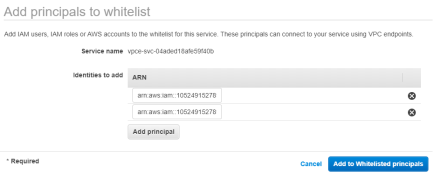
- When you finish adding principals, click Add to Whitelisted principals to submit the changes. See Create an Endpoint Connection below for instructions on creating an endpoint connection to give a VPC access to the AnzoGraph DB service.
Create an Endpoint Connection
- Log in to the AWS VPC Management Console and then click Endpoints in the navigation menu. AWS displays the Endpoints Management screen.
- Click the Create Endpoint button at the top of the screen. AWS displays the Create Endpoint screen.
- On the Create Endpoint screen next to Service Category, click the Find service by name radio button. AWS displays the Service Name and VPC fields. For example:
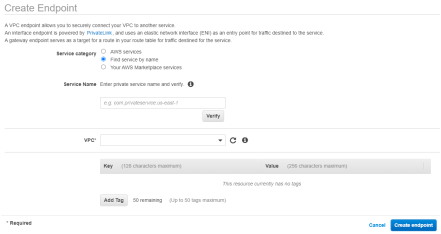
- In the Service Name field, specify the VPCEndpointServiceName for the VPC endpoint service that the CloudFormation wizard created during the AnzoGraph DB deployment. The name can be found on the Outputs tab in the stack details. For example:

- After adding the Service Name, click the Verify button to ensure that the service can be found. Then click the VPC drop-down list and select the VPC to create the endpoint for. The subnet and security group details for the VPC are displayed. For example:

- Click the Create endpoint button at the bottom of the screen.
Creating the endpoint connection sends a request to the VPC endpoint service to ask for access. View the VPC endpoint service and grant the request if needed.
Instances that are in the VPC for which you created a connection to the VPC endpoint service now have access to the AnzoGraph DB service. See Get Started for the next steps to follow to help you get familiar with AnzoGraph DB and SPARQL. For information about managing a deployed stack, see Managing AWS CloudFormation Stacks.
Follow the steps in this section to deploy AnzoGraph DB using a CloudFormation Service Role.
-
Go to the AnzoGraph DB AWS Marketplace. There are two AnzoGraph DB offerings: Free Edition and Enterprise Edition. For details about the options, see What are the different AnzoGraph DB offerings? Depending on whether you want to deploy the Free Edition or Enterprise Edition, click on of the following links to go to the appropriate marketplace:
- From the Marketplace, click the Continue to Subscribe button at the top of the page. The Subscribe page is displayed, which provides information about the AnzoGraph DB End User License Agreement (EULA) and AWS privacy and customer policies. Review the policies, and then click Accept Terms.
- When you are ready to deploy AnzoGraph DB, click the Continue to Configuration button at the top of the screen.
- On the Configure this software page, click the Select a CloudFormation Template drop-down list and select Deploy AnzoGraph in Private VPC Subnet. Additional Software Version and Region options are displayed.
- If necessary, click the Software Version drop-down list and select the version of AnzoGraph DB that you want to deploy. The latest released version is selected by default. Then click the Region drop-down list and select the region in which you want to deploy AnzoGraph DB.
- Click the Continue to Launch button at the top of the screen. The screen shows an overview of the launch configuration. Under Choose Action, select Launch CloudFormation from the drop-down list and then click the Launch button. The browser opens the AWS Management Console and displays the Create stack screen.

- On the Create stack screen, you do not need to make any changes. The appropriate CloudFormation template is specified based on the option you selected on the configuration page. Click the Next button. The Specify stack details page is displayed:

- At the top of the screen, specify the unique Stack name value that you want to use for this AnzoGraph DB stack. Stack names can include a maximum of 32 characters can include letters (A-Z and a-z), numbers (0-9), and dashes (-). The CloudFormation wizard prepends this value to the AnzoGraph DB instance names.
- In the Enter number of nodes drop-down list, select the number of instances that you want to include in the cluster. For information about determining cluster size by estimating the amount of memory required for your use case, see Sizing Guidelines for In-Memory Storage.
- In the Select VPC for cluster drop-down list, select the intranet VPC that you want to deploy AnzoGraph DB into.
- For the Select public subnet ID field, choose one of the following options from the list below:
- If you want the CloudFormation service to create a new subnet and NAT gateway in the VPC, leave the Select public subnet ID field blank.
- If you have a subnet that is configured with outbound internet and intranet access but does not use a NAT gateway, enter the ID for the subnet in the Select public subnet ID field. In this case, the CloudFormation wizard deploys AnzoGraph DB into the subnet and does not configure a NAT gateway. How do I find the subnet ID for my VPC?
- If you have a NAT gateway, leave the Select public subnet ID field blank and specify the NAT gateway ID as described in the next step.
- If your organization uses a NAT gateway, enter the gateway ID in the Enter existing NAT Gateway ID field. If you specified a subnet in the Select public subnet ID field, leave this field blank.
- In the Enter list of customer IPs for cluster access field, enter a comma separated list of the CIDRs that should have secure access to the AnzoGraph DB cluster. You can add up to 10 CIDRs. For example, if the intranet uses the 10.0.0.0/8 address space, you can specify the CIDR
10.0.0.0/8to allow all IP addresses in the intranet to access AnzoGraph DB. Or you can specify a list of CIDRs to enable more restrictive access, such as10.0.3.0/24,10.0.4.0/8. - In the Select instance type for cluster drop-down list, select the AWS instance type for the instances that will host AnzoGraph DB. Which EC2 instance types are available for deployment?

- In the Select SSH EC2 keypair drop-down list, select the authorization key that you want to use for SSH access to the cluster.
For maximum security, the CloudFormation wizard creates a security group that restricts SSH access to the AnzoGraph DB subnet only.
- The Do you want insecured (HTTP) access to cluster field determines whether to enable HTTP access to AnzoGraph DB in addition to HTTPS TSL 1.2 encrypted access. HTTP access is insecured. Select yes from the drop-down list to enable HTTP access. Select no to disable HTTP access. Then proceed to the Cluster Configuration Parameters.
- For the Persist data to disk option under Cluster Configuration Parameters, specify whether you want to enable the save data to disk option in AnzoGraph DB:
- If you select yes (the default value), the CloudFormation service adds a disk to each node in the cluster and AnzoGraph DB saves the data in memory to disk after every transaction. Each time AnzoGraph DB is restarted, the persisted data is automatically loaded back into memory.
- If you select no, the CloudFormation service does not add an additional disk to the nodes and AnzoGraph DB does not save data to disk. The data in memory must be reloaded manually after each restart.
- The Select type of settings.conf for AnzoGraph field specifies the server configuration to start AnzoGraph DB with. By default it is set to standalone, which is the optimal configuration for AnzoGraph DB DB deployments (without Anzo integration).
- If you are deploying an AnzoGraph DB cluster for use with Anzo, select anzo.
- If Cambridge Semantics has supplied you with a custom settings file (or a string of setting=value pars), select custom, and then supply the string or file location in the Enter \n separated contents of settings.conf... field.
- If you plan to query source data from relational databases and want to connect to your sources via the Cambridge Semantics-provided JDBC drivers, specify the URL for the driver repository in the Enter repo URL... field.
- Next, specify whether you would like to enable role-based authentication and access control in AnzoGraph DB. For details about access control with AnzoGraph DB, see Authentication and Access Control. To enable role-based authentication, select yes from the Enable role management... drop-down list.
- If you enabled AnzoGraph DB access control, specify a password for the superadmin user. The superadmin account has permissions to manage roles and grant or revoke permissions to members in those roles.
- In the Cluster Credentials section, type the Username for AnzoGraph GRPC that you want to use for users or applications with system administration access to AnzoGraph DB. Then type the password for the user name in the Password for AnzoGraph GRPC field. Passwords must be at least eight characters long and contain at least one digit, one special character, and one letter.
- In the Username to query AnzoGraph field, type the user name that you want to use for users and applications that can query data in AnzoGraph DB but do not have access to system administration operations. Then type the password for the user name in the Password to query AnzoGraph field.
- In the Enter shared path on NFS server field, you can type a comma separated list of paths to existing NFS directories that you want the CloudFormation wizard to mount on each AnzoGraph DB node. Make sure that any NFS servers meet the requirements in NFS Server Requirements.
For example, the following value mounts two NFS directories on each AnzoGraph DB cluster node. The mounts are on a server whose IP address is 198.168.0.1, and data1 and data2 are the directories to mount on each node:

- When you have finished configuring the stack details, click the Next button. The Configure stack options screen is presented. For example:

The stack options enable you to specify tags and permissions and other advanced options. If you would like to configure the settings, see Setting AWS CloudFormation stack options in the AWS documentation for guidance.
- Under Permissions on the options screen, click the IAM Role drop-down list and select the service role that you created in Applying the IAM Policy to a CloudFormation Service.
- Click the Next button to proceed. The Review screen is displayed, which lists all of the configured stack details and options. If you want to make changes, you can click the Edit button for the options that you want to change. When you are ready to deploy the stack, select the I acknowledge that AWS CloudFormation might create IAM resources checkbox at the bottom of the screen and then click the Create stack button.

The CloudFormation wizard starts to deploy the AnzoGraph DB infrastructure and displays the creation progress. For example:

The deployment might take several minutes. You can view all of the associated events by refreshing the Events tab.
When the deployment is complete, the Status displays CREATE_COMPLETE and the Outputs tab shows the AnzoGraph DB HTTPS endpoint (as well as the HTTP endpoint if you enabled HTTP access). The Outputs tab also displays the Network Security Group that the CloudFormation wizard created so that you can review the details. For example:

You can click the AnzoGraph DBURL to open the AnzoGraph DB Query & Admin Console. If you use the HTTPS endpoint, your browser may warn you that the server’s SSL certificate has not been signed by a trusted authority. This is normal behavior. To continue, click the Advanced link at the bottom of the page and then click the Proceed link. The browser displays the AnzoGraph login screen. Enter the credentials you created during the deployment. See Get Started for the next steps to follow to help you get familiar with AnzoGraph DB and SPARQL. For information about managing a deployed stack, see Managing AWS CloudFormation Stacks.