Creating a Graphmart
There are four ways to create a new graphmart:
-
You can create an empty graphmart and build it from scratch by adding data layers and steps that load and transform data. To create an empty graphmart, go to the Graphmarts screen in the Graph Studio application, click Add Graphmart, and select Create New Graphmart. See Graphmart Settings Reference for information about graphmart settings, and see Adding Data Layers to Graphmarts for information about adding layers and steps.
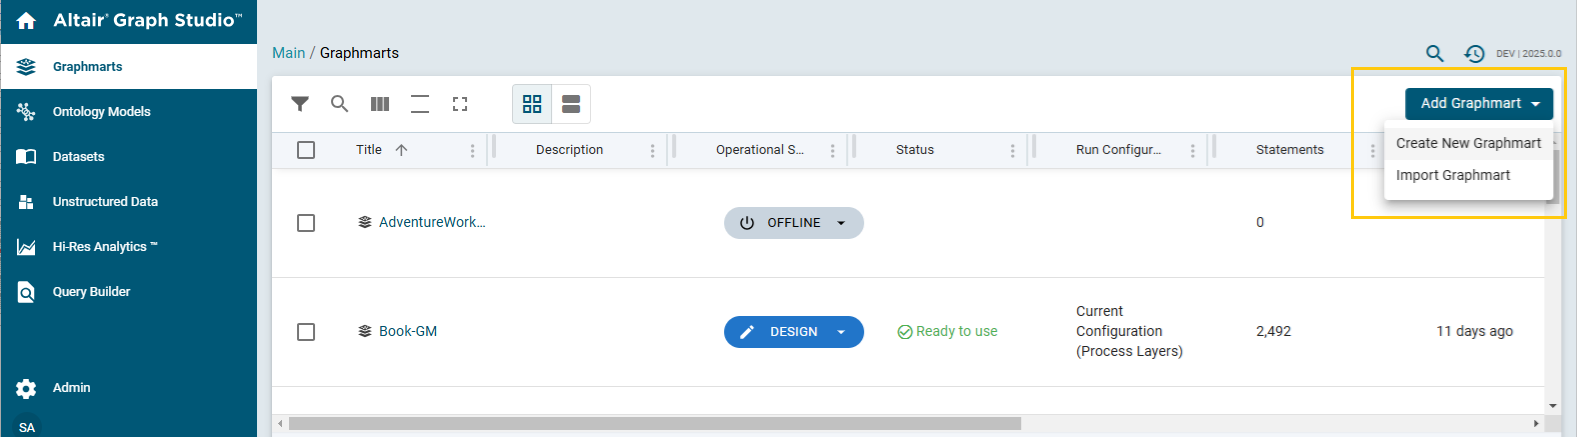
- You can import an exported graphmart by clicking Add Graphmart in the Graphmarts screen and selecting Import Graphmart.
- You can create a graphmart from a dataset in the Datasets catalog. For instructions, see Creating a Graphmart from a Dataset.
- You can create a new graphmart as a copy of an existing one. For instructions, see Copying a Graphmart.
Once the graphmart has been created, it opens in the Design mode. See the description of the graphmart's operational states below.
For instructions on navigating different components, features and UI elements of a graphmart, see Navigating the Graphmart User Interface.
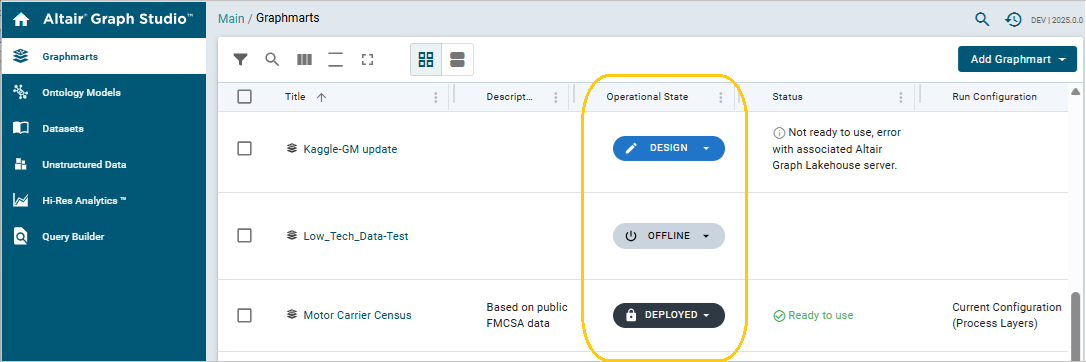
Graphmart's Operational States
There are three operational states (modes) for a graphmart: Offline (deactivated), Deployed (activated) and Design. In the Graphmarts screen, which lists all available graphmarts, the state of each graphmart is displayed in the Operational State column. Here you can also switch any graphmart from one state to another by clicking in the Operational State column and selecting the desired mode.
-
Offline:
Putting a graphmart in the Offline (deactivated) state makes it read-only. Any changes to the graphmart's configuration cannot be made to a graphmart when it is not deployed or not in the design mode, since much of its functionality is tied to having a connection to the Lakehouse server.
-
Design:
The Design mode is the Read/Write mode intended for making all kinds of changes to the graphmart - changing the queries, adding or dropping layers, reloading and refreshing, etc. You have an option of choosing whether to expose your changes to the Hi-Res Analytics Dashboards while you are still working on the changes to prevent any inconsistencies in data accessed by the dashboard users. If you choose not to expose them, the users will get a message saying this graphmart is not online until you are done, that is, until you explicitly deploy it by putting in the Deployed state.
-
Deployed:
The Deployed state is analogous to "production": Once you deploy a graphmart after making changes in the Design mode, it again becomes read-only in terms of the ability to make any changes to the structure - queries, etc. To make changes, you must switch back to the Design mode to put the graphmart back in the Read/Write (editable) state. Once you deploy a graphmart, the "Deployed" label with a lock icon is displayed for it.
You can also set graphmart modes in the individual interface of each graphmart when it is open.
See also: Navigating the Graphmart User Interface.