Creating a Dataset from RDF Files
Source data that is not in RDF format is onboarded through the automated direct data load workflow or unstructured pipelines, where the data is converted to RDF format. If you have data that is already in RDF format in Turtle or N-Triple files, those files can be added to the Datasets catalog directly, making the data available to add to a graphmart for loading and analyzing in AnzoGraph.
To import data from CSV, JSON, XML, Parquet, or SAS files, follow the processes described in Adding Data Sources.
Follow the instructions below to create a dataset from a directory of Turtle or N-Triple files. Make sure that the files and directory meet the requirements in File Requirements.
File Requirements
To add data to the Dataset catalog, the location of the files, the file format, and the directory structure must meet the following requirements:
- Supported File Locations: Files can be staged on a configured file store, or they can be uploaded from your computer as a .zip file.
- Supported File Formats: Files must be in one of the following formats:
- Turtle (.ttl file type)
- N-Triple (.n3 and .nt file types)
Either of the file types listed above can be compressed in GZIP format and named as <filename>.<filetype>.gz files.
- Supported Directory Structure: When importing RDF files that are not part of an FLDS, the files must be placed in a directory named rdf.<filetype> or rdf.<filetype>.gz. Stage uncompressed TTL files in a directory called rdf.ttl, and stage compressed TTL files in a directory called rdf.ttl.gz. Stage uncompressed N-Triple files in a directory called rdf.nt or rdf.n3, depending on the file type extension. Place compressed files in an rdf.nt.gz or rdf.n3.gz directory. For example:
External-RDF-Top-Level-Directory
└── rdf.ttl.gz
    └── external-rdf-file1.ttl.gz
    └── external-rdf-file2.ttl.gz
    └── external-rdf-file3.ttl.gz
All files inside an rdf.<filetype> or rdf.<filetype>.gz directory must be the same format and end in the same extension. Data in mixed formats will not load successfully. If you plan to import multiple file types, organize files into separate directories by file extension type, and then import each directory separately.
To upload files from your computer, use the same directory structure as shown above. Zip the top-level directory so that the upload file is
External-RDF-Top-Level-Directory.zipand contains therdf.ttl.gzdirectory.
Importing RDF Files
Follow the steps below to create a dataset from RDF files.
Anzo provides the option to link the files to an existing data model during the import. If the model is not yet available in Anzo, consider uploading it before importing the RDF files. See Uploading a Model for instructions. You are not required to include a model at import time; a model can be associated with a data set at any time. How do I associate a model with a dataset?
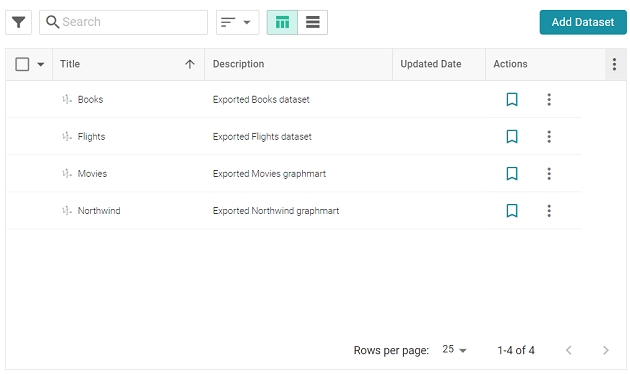
- In the Anzo application, expand the Blend menu and click Datasets. Anzo displays the Datasets screen, which lists the catalog of datasets. For example:
- On the Datasets screen, click Add Dataset. Anzo opens the Create Dataset dialog box.
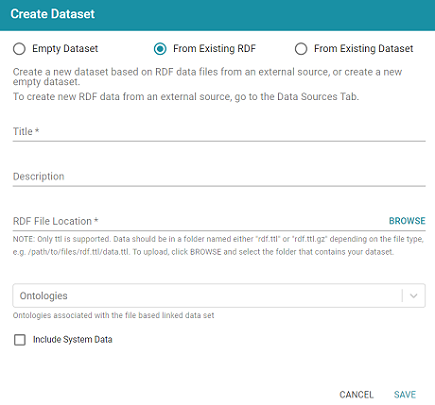
- The From Existing RDF radio button is selected by default. Type a name for the new dataset in the Title field and an optional description in the Description field.
- Click the RDF File Location field to open the File Location dialog box and follow the appropriate steps below depending on the location of the files.
If you are uploading a .zip file from your computer:
- As a best practice, check the upload location that is listed in the Upload To field by hovering your pointer over the value to view the tooltip. Make sure the upload location is a directory on the shared file store and not in the server installation path. If the file is not uploaded to the shared file store it is not accessible by applications like AnzoGraph. In addition, other users cannot create graphmarts from the data source because they typically do not have access to the file location.
For example, viewing the Upload To location for the screen above shows that the file will be uploaded to the server installation path,
/opt/Anzo/Server/data...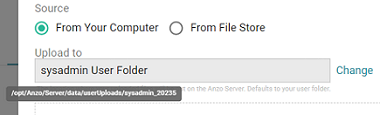
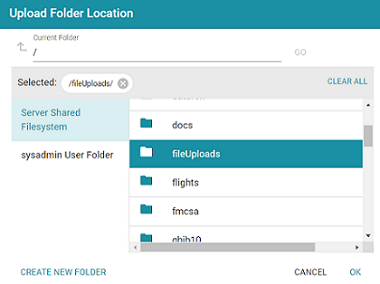
If your Upload To location is configured to upload the file to the server installation path, click Change and select an upload location that is on the shared file store. For example, the image below shows the Upload Folder Location dialog box that is presented after clicking Change. A folder called fileUploads is selected on the shared store.
- Drag and drop the .zip file with the RDF files onto the screen or click Browse to navigate to the file on your computer and select it.
- Click OK to close the dialog box and return to the Create Dataset screen.
If the files are on the File Store
- Select the From File Store radio button.
- Find and select the rdf.<filetype> directory that you want to import, and then click OK to close the dialog box and return to the Create Dataset screen.
- As a best practice, check the upload location that is listed in the Upload To field by hovering your pointer over the value to view the tooltip. Make sure the upload location is a directory on the shared file store and not in the server installation path. If the file is not uploaded to the shared file store it is not accessible by applications like AnzoGraph. In addition, other users cannot create graphmarts from the data source because they typically do not have access to the file location.
- If you want to associate a model with this dataset, click the Ontologies drop-down list and select the model. To include a system model, select the Include System Data checkbox. If you do not want to associate a model with the data at this time, leave the Ontologies field blank.
Datasets without a model cannot be viewed in Hi-Res Analytics dashboards, but the imported data can still be queried. A model can be associated with the data set at a later time. How do I associate a model with a dataset?
- Click Save. Anzo creates the FLDS and adds the new dataset to the Datasets catalog, and return to the Datasets screen.
Anzo generates an flds.trig file at the same level as the rdf.<filetype> directory. The file contains metadata about the load files.
You can now select the dataset in the catalog and create a new graphmart or add the dataset to an existing graphmart. See Creating a Graphmart from a Dataset or Adding a Dataset to a Graphmart for instructions.