Ingesting a Data Source with a Metadata Dictionary
Follow the instructions below to ingest data for a schema that has an associated metadata dictionary.
For instructions on ingesting data without a metadata dictionary, see Ingesting a New Data Source or Re-Ingesting an Updated Data Source.
- In the Anzo application, expand the Onboard menu and click Structured Data. Anzo displays the Data Sources screen, which lists any existing sources. For example:

- On the Data Sources screen, click the name of the source for which you want to ingest data. Anzo displays the Tables screen for the source. For example:

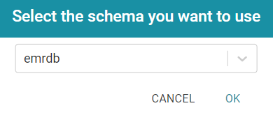
- Click the Ingest drop-down button and select Ingest With Dictionary. If the source has more than one schema, Anzo displays the select schema dialog box. In the drop-down list, select the schema to use, and then click OK. For example:
Anzo opens the Ingest With Dictionary dialog box, which lists the dictionary to use. If there is only one configured data store, the Anzo Data Store value is also auto-populated. In addition, if the default ETL Engine is configured for the system, the Auto Map Engine Config field is also populated (see Configure the Default ETL Engine). For example:

- If necessary, click the Anzo Data Store field and select the data store for this pipeline.
- If necessary, click the ETL Engine field and select the ETL engine to use for this pipeline.
- By default, Anzo enables the Select all tables radio button to ingest the data for all tables in the schema. If you do not want to add all tables, click the Custom select radio button and then select each of the tables to add.
- To view model and dictionary options for this pipeline, expand the Advanced section of the dialog box:
If this source has not been previously ingested and no model exists, Anzo displays the following options:
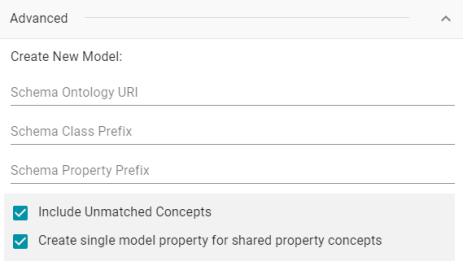
The list below describes the options:
- Schema Ontology URI: The URI for the model. When this field is blank, Anzo generates the model URI with the following format:
http://cambridgesemantics.com/ont/autogen/xx/<schema_name>
Where xx is a hash snippet based on the model's globally unique identifier (GUID). If you want to specify a different format, you can type that URI into the Schema Ontology URI field. For example, a URI such as
http://mycompany.com.ontology/moviesresults in a model URI ofhttp://mycompany.com.ontology/movies.Make sure that Schema Ontology URI is unique. If the URI is not unique, this model will overwrite any existing model that uses this URI.
- Schema Class Prefix: The URI prefix format to use for classes in the model. When this field is blank, Anzo generates class URIs using the following format:
http://cambridgesemantics.com/ont/autogen/xx/<schema_name>#<class_name>
Where xx is a hash snippet based on the model's GUID. If you want to specify a different format for class URIs, type the prefix to use in this field. For example, a prefix such as
http://mycompany.com.ontology/classresults in class URIs likehttp://mycompany.com.ontology/class#<class_name>.Since you are specifying a prefix format, and the class name will be appended to the prefix, it is permissible to set Schema Class Prefix to the same value across schemas.
- Schema Property Prefix: The URI prefix format to use for properties in the model. When this field is blank, Anzo generates property URIs using the following format:
http://cambridgesemantics.com/ont/autogen/xx/<schema_name>#<class_name>_<property_name>
Where xx is a hash snippet based on the model's GUID. If you want to specify a different format for property URIs, type the prefix to use in this field. you can type that URI into the Schema Property Prefix field. For example, a prefix such as
http://mycompany.com.ontology/propertyresults in property URIs likehttp://mycompany.com.ontology/property#<class_name>_<property_name>.Since you are specifying a prefix format, and the property name will be appended to the prefix, it is permissible to set Schema Property Prefix to the same value across schemas.
- Include Unmatched Concepts: This option specifies whether to ingest new data that does not map to the concepts that are defined in the dictionary. For example, imagine that the dictionary includes a class concept with 10 properties that map to columns in the schema. However, the new data contains 15 columns, 5 of which are not mapped to properties in the dictionary. If Include Unmatched Concepts is enabled, Anzo ingests the data for all 15 columns and updates the model to include the 5 unmatched properties. The 5 new properties are added to a new subclass of the class that is defined in the dictionary. If Include Unmatched Concepts is disabled, Anzo ingests only the 10 columns that match the concepts in the dictionary. New properties will not be added to the model.
- Create single model property for shared property concepts: If you have a shared property that exists in two or more classes, selecting this option means that Anzo will create one multi-domained property in the model instead multiple individual properties with a single domain. When this option is disabled, Anzo creates a separate property for each instance of the shared property.
If this source has been previously ingested and a model exists, Anzo displays the following options:
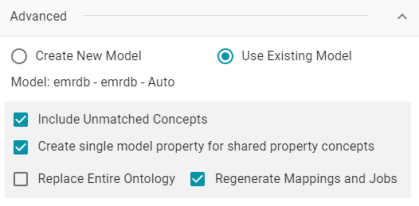
The list below describes the options:
- Use Existing Model: Select this option if you want to reuse the existing model. Anzo displays the name of the model that will be used and presents additional model-related options at the bottom of the screen.
- Include Unmatched Concepts: This option specifies whether to ingest new data that does not map to the concepts that are defined in the dictionary. For example, imagine that the dictionary includes a class concept with 10 properties that map to columns in the schema. However, the new data contains 15 columns, 5 of which are not mapped to properties in the dictionary. If Include Unmatched Concepts is enabled, Anzo ingests the data for all 15 columns and updates the model to include the 5 unmatched properties. The 5 new properties are added to a new subclass of the class that is defined in the dictionary. If Include Unmatched Concepts is disabled, Anzo ingests only the 10 columns that match the concepts in the dictionary. New properties will not be added to the model.
- Create single model property for shared property concepts: If you have a shared property that exists in two or more classes, selecting this option means that Anzo will create one multi-domained property in the model instead multiple individual properties with a single domain. When this option is disabled, Anzo creates a separate property for each instance of the shared property.
- Replace Entire Ontology: Selecting this option means that Anzo deletes all entities from the existing model and recreates them. The model that results from the current ingestion workflow will contain only the data from the current process. For example, if a previous run generated a model that contains classes A, B, and C, and the current data contains Classes C, D, and E, selecting Replace Entire Ontology results in a model that contains only classes C, D, and E. If Replace Entire Ontology is NOT selected, the resulting model will contain classes A, B, C, D, and E.
- Regenerate Mappings and Jobs: Selecting this option means that Anzo deletes all entities from the existing mappings and jobs and recreates them. The artifacts that result from the current ingestion workflow will contain only the data from the current process. For example, if a previous run generated mappings and jobs that contain tables A and B and the current run is ingesting tables C and D, selecting Regenerate Mappings and Jobs results in artifacts that contain only tables C and D. If Regenerate Mappings and Jobs is NOT selected, the resulting artifacts contain tables A, B, C, and D.
- Schema Ontology URI: The URI for the model. When this field is blank, Anzo generates the model URI with the following format:
- Click Save. Anzo creates a pipeline (or updates the existing one) and generates or updates the model and mappings according to the options you specified.
- In the main navigation menu under Onboard, click Structured Data. Then click the Pipelines tab.
- Click the name of the pipeline to run. Anzo displays the pipeline overview screen. For example:

- If you would like to see the jobs that Anzo created for this data source, click the Jobs tab. The jobs are listed on the left side of the screen. A job exists for each of the tables that were imported. If this pipeline has not been published previously, the right side of the screen remains blank. After the jobs are run, selecting a job from the list displays its history on the right. For example, the image below shows a new pipeline that has not been published:

- To run all of the jobs, click the Publish All button at the top of the screen. To publish a subset of the jobs, select the checkbox next to each job that you want to run and then click the Publish button above the list of jobs. Anzo runs the pipeline and generates the resulting file-based linked data set in a new subdirectory under the specified Anzo data store.
When the pipeline finishes, this run of the pipeline becomes the Managed Edition. The Managed Edition always contains the latest successfully published data for all of the jobs in the pipeline. If one or more of the jobs failed, those jobs are excluded from the edition. If you publish the failed jobs at a later date or you create and publish additional jobs in the pipeline, the data from those jobs is also added to the Managed Edition. For more information about editions, see Managing Dataset Editions.
The new dataset also becomes available in the Datasets catalog. From the catalog, you can create a new graphmart from the dataset or add the dataset to an existing graphmart. See Creating a Graphmart from a Dataset or Adding a Dataset to an Existing Graphmart for instructions.